Getting Started with Openmediavault 7
Version History:
January 23rd, 2024 - Rev 0.1 (1rst Draft for RC1)
February 4th, 2024 - Rev 0.2 Various edits and link updates.
February 11th, 2024 - Rev 1.0 Cross link checks and various updates and edits.
November 14th, 2024 - Rev 1.1 Additional note and link RE SMART stat's.
April 19th, 2025 - Rev 1.2 Various minor updates \ edits.
Introduction to Openmediavault
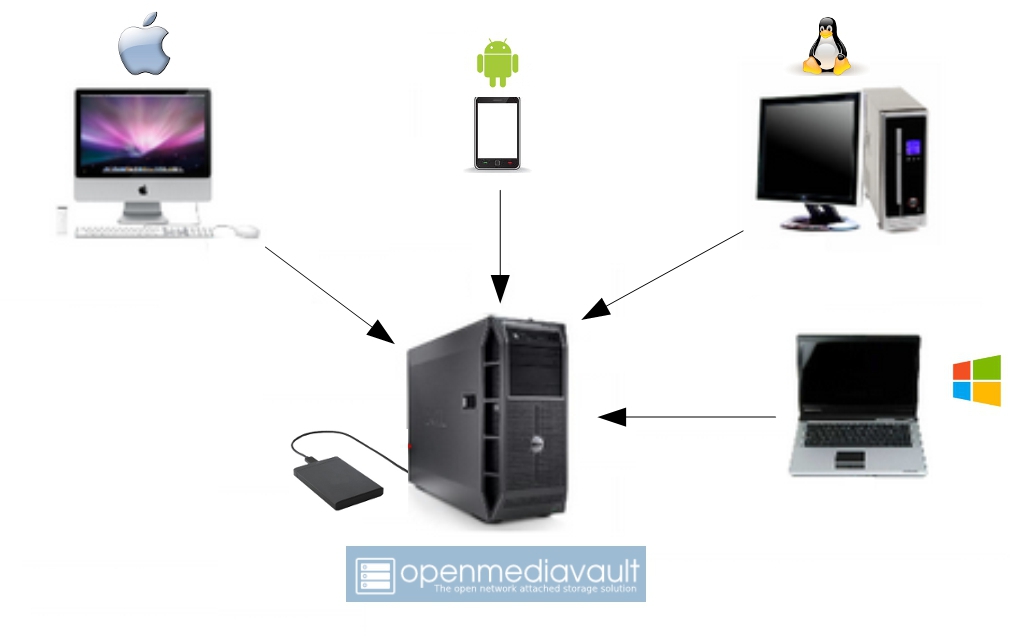
Openmediavault is a File Server / NAS system designed to work on most modern IBM compatible PC systems, to include typical amd64 or i386 PC’s and select ARM devices. Openmediavault can be thought of as filling a role similar to Microsoft's Server Essentials, but extends far beyond the role of a basic File Server with additional functionality added VIA plugin’s and Dockers. Openmediavault is designed to work with popular client operating systems and multiple filesystem types, utilizing proven data sharing techniques on small and medium sized Local Area Networks.
In meeting the needs of it's intended users, individuals and small-to-medium-sized businesses, Openmediavault is designed for flexibility.
History
Openmediavault's history began with Volker Theile, who was the only active developer of the FreeNAS project by the end of 2009. Volker became interested in completely rewriting FreeNAS, for use on Linux. Initially, he named the rewritten package coreNAS. Shortly thereafter, Volker discarded the name coreNAS in favor of openmediavault. Openmediavault's initial release was on 17 October 2011. It's built upon very mature and proven software layers and is under constant development. Openmediavault relies on the Debian project and uses their system and repositories as a base. The project focus is on creating and maintaining a stable and extensible NAS system that is intuitive and easy to use.
Purpose
The purpose of openmediavault is to provide a NAS system that is highly “extensible” with value added plugin’s and access to numerous Dockers that are desirable and beneficial to home users and small businesses at little to no cost.
One of the ambitions of the openmediavault project is to make advanced NAS technologies and features available to inexperienced users in an easy to use WEB GUI, thereby making it possible for people, without extensive knowledge of Linux, to gain easy access to advanced technologies.
Getting Involved
If businesses and home users find openmediavault to be beneficial, please consider supporting the project with a modest donation. While openmediavault is free, donations to cover Web site costs, hardware for testing, and other unavoidable expenses are needed and very much appreciated.
Donate to openmediavault Main project development
And
Donate to omv-extras.org (Scroll to the bottom.) Support for Single Board Computers and Development of Plugins.
About this Guide
In computing, generally speaking, there are several ways to do the same thing. By extension, methods and methodology become progressively more advanced as a user's skill level increases. With these notes in mind, methods found in this guide may not be considered as “Best Practice”, especially from a hardened security perspective. The purpose and intent of this guide is to provide a walk-through to get users up and running as quickly and easily as possible.
- This guide contains links to external sources of information and software. It's best used on a PC connected to the Internet.
- This is a community document and a work in progress. Input and feedback are welcome and can be sent to: omvguide@gmail.com
Beginners:
This document is intended for beginners who will, primarily, be using the openmediavault's GUI. Beginners are assumed to have basic knowledge of computers and their LAN systems, and a Windows or Apple PC. The focus of this guide will be to take a technically easy route, for the widest possible cross section of new users, toward accomplishing basic tasks using methods and processes that are easy to understand and duplicate.
Advanced Users:
Openmediavault was designed to be intuitive for advanced users and beginners alike.
After the installation is complete, for a streamlined setup, see
the → Quick Start Guide.
A Cautionary Note for Advanced Users:
Many of the configuration files traditionally used to customize Debian Linux are controlled by the openmediavault system database. As a result, manual edits of configuration files may be overwritten as of the next, “on-demand”, configuration change in the openmediavault GUI. Further, it is possible to “break” openmediavault with alterations and permissions changes to the files of the boot drive, on the command line.
In the beginning it's best to rely, primarily, on the GUI for configuration and control. Otherwise, before attempting to customize the operating system,
backing up the boot drive is highly recommended.
Linux Experts, Admin's, and Developers:
Users in this category may prefer the information available on the Project's Wiki.
Hardware
Hardware requirements to run openmediavault are very modest, however, actual hardware requirements for specific “use cases” vary widely.
The following is intended only as general guidance.
Compatibility:
Openmediavault 7.X is currently supported by Debian 12, “Bookworm”.
Compatible hardware and other requirements of Debian Linux are available
at Debian.org
64 bit hardware (amd64):
The openmediavault project maintains convenient, fully integrated, openmediavault/Debian → installation ISO's installation ISO's. This is the best method
for getting openmediavault up and running quickly.
32 bit Hardware (i386):
While openmediavault is supported by 32 bit Debian installations, it's a two step scripted
process referenced in;
Installing OMV7 on i386 (32-bit) platforms.
The openmediavault project does not provide integrated 32 bit installation ISO's.
ARM Hardware:
The openmediavault project provides scripted installation support for ARM Single Board Computer (SBC) platforms. Supported platforms are the Raspberry PI,
models 2B and higher, and various ARM platforms supported by the Armbian Project.
Minimum Hardware requirements
Openmediavault/Debian will run on I386, AMD64, and select ARM platforms with 512K of ram or more, but performance expectations should be adjusted accordingly. The system boot drive should have a minimum of 8GB capacity.
Recommended Minimum requirements
For basic File Server operations - 1 or 2 users:
- Intel Core 2 Duo or equivalent AMD processor and 1GB of RAM.
- Any of the ARM Single Board Computers supported by openmediavault. At least 1 GB of RAM would be preferred.
If flash media is used, (USB thumb-drives, SD-cards, etc.) the system boot drive should have at least 16GB capacity, for longer life.
Recommended Hardware and Considerations for a good use experience
amd64
- Intel i3 (or equivalent AMD processor), with 4GB ram (ECC preferred) and a 16GB system boot drive will provide good performance in home or small business use cases.
- As the number of NAS users increase and server processes are added, processing power and memory requirements increase.
- For file caching, in support of normal file system operations, performance is better with more RAM.
- The number of a Motherboard's SATA or SAS ports can be a factor if future storage expansion is needed.
- A case design that accommodates the physical installation of additional hard drives can be helpful.
- Integrated video is preferred over add-on Video cards. With openmediavault's headless server design, add-on Video cards are an excessive and unnecessary power drain with no performance benefit. Installing a high end, high powered Video card in a headless server is analogous to installing a 65 to 200 watt light bulb in a closet, without a switch, and closing the door.
ARM - Single Board Computers:
Performance levels vary greatly among the various models of Single Board Computer
(hereafter referred to as an “SBC”) that are supported by Armbian, Raspberry PI OS, and
Openmediavault. While most will support file server operations for a few users; if
running server add-on's or Dockers is a requirement, research supported SBC's carefully
before buying. Armbian's
or openmediavault's forums may be of assistance,
along with Internet product reviews.
When considering an SBC as a primary NAS server for home use, note that support for SBC's is
for the current Openmediavault release only. Accordingly, SBC users should read the
ending cautionary note in the Utilities, Maintenance and Backup document under
Operating System Backup.
Raspberry PI's
(Hereafter referred to as “R-PI's”.)
Given the current market for SBC's, the majority of SBC users will likely be owners of R-PI's.
Openmediavault runs well on the R-PI models 4 and above. While openmediavault will run on an R-PI model 2B
and the various models of the R-PI 3, it is not recommended. Performance is poor. What
exactly does “poor performance” mean? In this context, if the R-PI's CPU is running at 100%,
openmediavault may not show up on the local network and / or network shares may not open.
This may give the false impression that there's a software or permissions problem. In other
instances, the WEB GUI login page may not respond.
These issues may appear to be software related, but that's not always the case. Older R-PI's
are very easily over stressed and, during periods where the CPU is running at 100%, they may
not respond to external input. With this performance limitation in mind, earlier versions of
the R-PI (2B and 3X models) should be used only as a basic file server for 1 or 2 user home
environments, where multitasking is less likely. If running automated tasks, it's best to
schedule them to run in the early morning hours when user access would not be affected.
In addition, R-PI's suffer from USB under powering in models 2B and 3X. See notes regarding
this issue in
USB Power - A Common Raspberry PI problem
Where CPU Power may be Needed – “Transcoding”
Transcoding is a process for translating media file formats into types that mobile devices
understand. Since mobile devices are low powered, they're not capable of re-processing high
resolution media files smoothly so the processing burden is often transferred to the media
server.
If a user's primary consideration is setting a up a media server for mobile devices, using pre-2011 hardware, the CPU of the older device should be examined
carefully.
Pre-2011 Intel and AMD CPU's
Plex, a popular media server, recommends at least 2000 on the CPU's PassMark score for each
concurrent 1080p transcoded stream. (See the advice article here)
However note that this advice applies to pre-2011 Intel and AMD CPU's.
Look up an older CPU here → PassMark CPU Benchmarks
2011 and Newer Intel CPU's
As of the beginning of the Sandy Bridge CPU series in 2011 and later, a core has been added
to Intel CPU's for the sole purpose of video transcoding. CPU's with
Quick Sync, to include Celeron and
Atom models that are relatively low powered, do a good job of transcoding for portable devices.
If NAS administrators have numerous smart phone users, in their homes or businesses, who will
be watching transcoded video on the small screen, CPU loading and Video processing features
may require some additional thought and research.
Additional reading → Intel Quick Sync versus similar AMD technology.
Selecting a Boot Drive
Nearly any type of hard drive, SSD, or flash device (USB thumb-drives and SD-cards) 8GB or
larger, will function as an openmediavault boot drive.
However, some notions of achieving a “Faster” or a “Better Performing NAS server” by using
certain types of fast boot media should be dispelled.
Server boot requirements and considerations are different when compared to desktop and
business workstation requirements.
- Given openmediavault's lean configuration, boot times can be fast. Boot times of 1 minute and Shutdown times of 20 seconds are common, even when using relatively slow flash media such as USB thumb-drives and SD-cards. (Recent models can be quite fast – check their benchmarks.)
- Typically servers are rebooted no more than once a week. When automated, a reboot event is usually scheduled after-hours when users are not affected.
- After the boot process is complete, most of openmediavault's file server functions are running from RAM.
- “The WEB/GUI is more responsive with fast media.”
This is the single instance where an SSD or a spinning hard drive may create the illusion of higher performance. In the traditional role of a NAS as a File Server, when the server boots, the Linux kernel and most of the necessary processes required to act as a File Server are loaded into RAM - the fastest possible media for execution.
Navigating openmediavault's WEB/GUI interface is another matter. Loading WEB pages may call files from the boot drive which may make the server appear to be slower, when using slow media. However, the speed of the boot drive has little impact on overall file server function and actual NAS file serving performance.
* The above assumes that adequate RAM has been provisioned. *
Final Notes on Choosing a Boot Drive
Openmediavault's boot requirements are very modest:
While some users prefer traditional hard drives or SSD's, the boot requirement can be served with USB thumb-drives and SD-cards, 8GB or larger.
With USB connections on the outside of a PC case, cloning
USB drives for operating system backup is
an easy process. Given this consideration, some users prefer USB thumb-drives and other
external flash media to internal drives. Further, given the ease of operating system
recovery in the event of a boot drive failure, beginners are encouraged to consider using
flash media.
If flash media is used:
New name brand drives are recommended such as Samsung, SanDisk, etc. While not
absolutely essential; USB3 thumb-drives are preferred, due to their more advanced
controllers, and SD-cards branded A1 (or better) for their improved random read/write performance.
USB3 thumb-drives and A1 spec'ed SD-cards are faster and, generally speaking, more reliable than similar items with older specifications.
While boot drive size matters, bigger is not always better. An acceptable size trade off for wear leveling and the speed of cloning is between 16 and 32GB.
“Wear leveling” will be explained during the installation and configuration of the
flash-memory plugin. Note that the flash-memory plugin is required to boot from flash media.
It's purpose and installation are detailed in The Flash Memory Plugin.
Use-case exceptions where boot media larger than 32GB may be useful:
- Running applications that utilize WEB interfaces, such as Plex, Emby, etc.
- Hosting Web or Media Servers with extensive content.
- Hosting Virtualized Guest operating systems with desktops. (Does not apply to R-PI's or ARM platforms. R-PI's and ARM platforms can not virtualize i386 or amd64 operating systems.)
There's no penalty for starting with a smaller boot drive. Moving to a larger drive, if needed, can be done later.)
| Warning | |
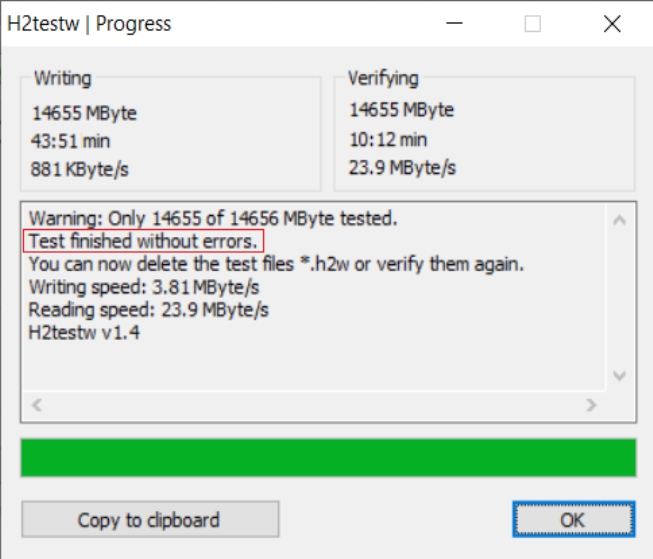
| Buying flash devices on-line, even from reputable retailers, comes with the substantial risk of buying fakes. Buying flash drives, in sealed packaging, from walk-in retail stores with liberal return policies is recommended. The use of cheap generics, fakes or knockoffs is highly discouraged. They tend to have a short life and they're known to cause problems, even if they initially test error-free. In addition, to detect fakes or defective media even when new; all SD-cards and USB thumb-drives should be formatted and tested in accordance with the process outlined under Format and Testing Flash Media. If they fail error testing, return them for a refund. | |
Hardware - The Bottom Line
Again, openmediavault/Debian's hardware requirements are modest. Nearly any IBM
compatible PC or Laptop produced in the last 15 years could be re-purposed as an
openmediavault server.
However it should be noted that newer hardware is, generally speaking, more power
efficient and higher performing. The power costs of running older equipment
that is on-line, 24 hours a day, can easily pay for newer more power efficient
equipment over time.
Further, the supported ARM platforms are both power efficient and capable of
providing file server functions in a home environment. (Again, performance
expectations should be adjusted in accordance with the capabilities of the hardware.)
Installing OMV7 on Single Board Computers (SBC's)
Installation guides for SBC installations are available → for Raspberry PI's and Armbian Supported SBC's.
Installing OMV7 on i386 32-bit Platforms
An installation guide for 32-bit platforms is available → here.
amd64 (64-bit) Platforms
This guide assumes the user will be installing from a CD, burned from an image found
in openmediavault's files repository,
using 64 bit hardware.
Information for creating a bootable USB thumb-drive, using Rufus, is available → here.
Downloading
Beginners should download the latest stable version from
openmedivault.org and
copy the SHA 256 checksum for the ISO. OMV7 is, currently the Stable version. The checksum value will
be used with the MD5 SHA checksum utility. (Windows Notepad can open MD5 files by
selecting “All Files”, next to the file name drop down.)
| Warning | |
| If users install "Testing", "Beta" or "Release Candidate" versions of openmediavault, they are agreeing to be a “tester”. As part of being a tester, users may experience issues or bugs, that can not be resolved, which may result in lost data. Plan accordingly, with full data backup. | |
Verify the download
After the download is complete, verify the download with a MD5 & SHA chechsum utility.
MD5 and SHA hashes check for image corruption that may have occurred during the download.
| Note | |
| Beginners - DO NOT SKIP THIS STEP. The chance of image corruption is higher when downloading and it's pointless to build a server with flawed software. Even the slightest corruption of the installation ISO may ruin your installation and the effects may not be noticed until well after your server is built and in use. Headaches can be avoided by checking the image. | |
Burning a source CD
Assuming a CD/DVD drive is installed; in most cases, double clicking an installation file, with an “.ISO” extension, will
trigger a CD burning utility on a Windows Computer or a MAC. If help is needed for
this process, see the following link.
How to burn an ISO image in Windows 7, 8, 10
Creating a Bootable ISO Thumb-drive
For PC's without an Optical drive; the openmediavault ISO can be installed using a
Thumbdrive as the ISO source, and install the Debian/openmediavault system to a second thumb drive or hard drive.
For assistance in creating a bootable ISO thumb-drive, see the following link.
How to install an ISO file on a USB drive
*Before creating an ISO thumb-drive, consider checking the thumbdrive, to be used as a software source, using the
utilities and process described below in, Preparing Flash Media.*
If installing to a standard hard drive or SSD, skip
to → Openmediavault_Installation.
Preparing Flash Media
To use flash media as a boot drive, a couple utilities are recommended:
SDFormatter (get the latest version), and
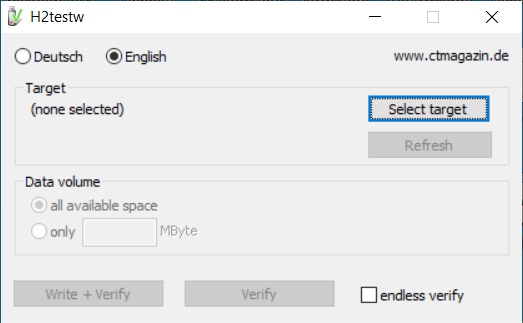
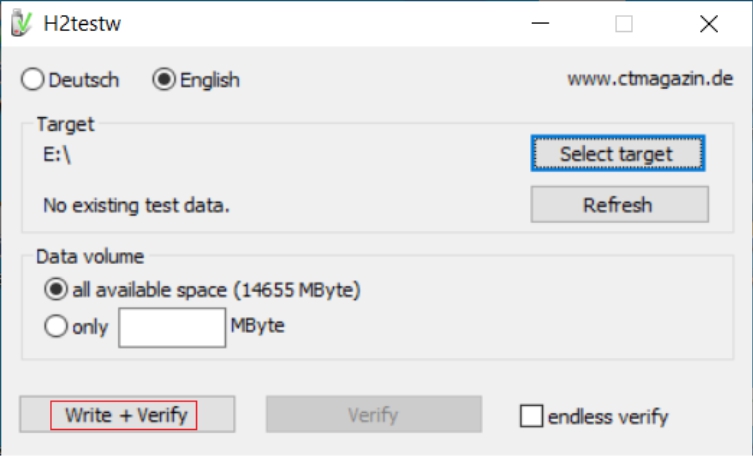
h2testw1.4 .
- SDFormatter installs in the same manner as a typical Windows program.
- h2testw1.4 is stand-alone “portable” application.
Simply unzip h2testw_1.4 onto the desktop, open the folder, and double click the
executable.
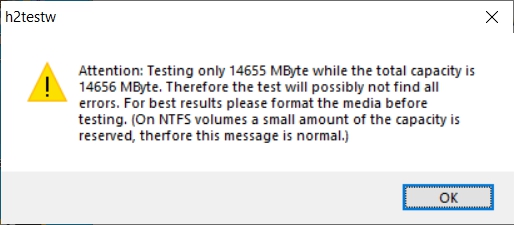
Due to the rise in counterfeit media and media that reports a fake size, it's
recommended that all USB thumb-drives and SD-cards, new or used, be formatted with
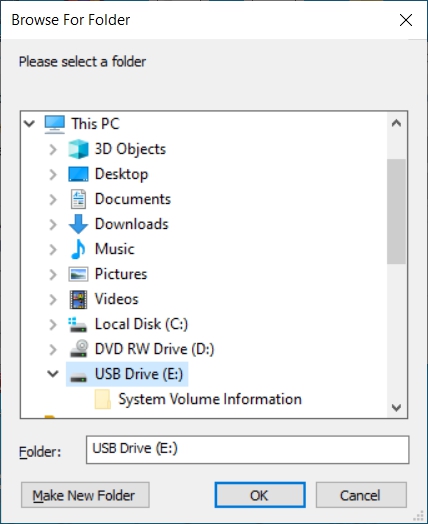
SDFormatter and tested with h2testw1.4 before using them.
Format and Test Flash Media
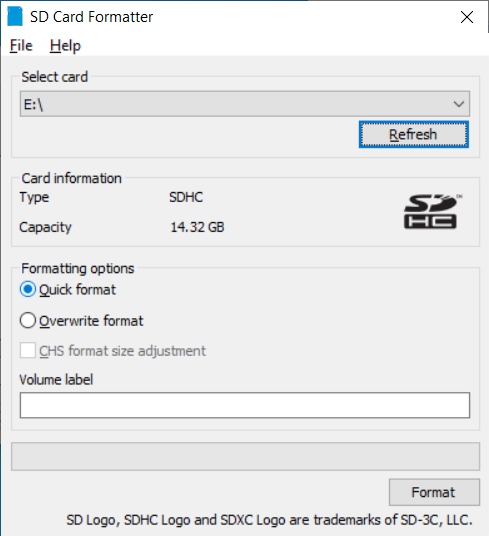
Using SDFormatter, do a clean format:
(While SDFormatter was designed for SD-cards, it can format USB thumb-drives for
error testing. SDFormatter will detect a USB thumb-drive.)
amd64 – Openmediavault Installation
If your PC platform won't boot onto a CD or USB thumb-drive with the installation
ISO, it may be necessary to change the boot order in BIOS, to set the CD/DVD drive
or USB boot to the top of the boot order. This link may provide assistance on
this topic. → How To Enter BIOS.
Regarding UEFI
UEFI (Unified Extensible Firmware Interface) is the proposed successor to traditional BIOS. While some of the intentions behind the development of UEFI were to increase security and add flexibility for hardware implementations, the real world results are as variable as the number of hardware manufacturers implementing the UEFI standard.
While the Debian project has worked diligently to address the installation and booting problems that may result when installing their OS on UEFI hardware, issues may still come into play during the installation procedure. Most of these issues can be resolved by taking one or both of the following actions in UEFI / BIOS.
- Disable Secure Boot. Secure boot is designed to prevent changes to the currently installed OS. Obviously, this has the potential to interfere with a new OS installation.
- Enable legacy BIOS. This may be represented as Enable Legacy BOOT, Enable Legacy BIOS and similar labels. Disable UEFI Boot may be an option as well.
For users who are unsure of how to enter into BIOS and set variables, guidance found → here may be useful.
If difficulties are encountered during the ISO installation, consider the
Alternate 64bit installation guide.
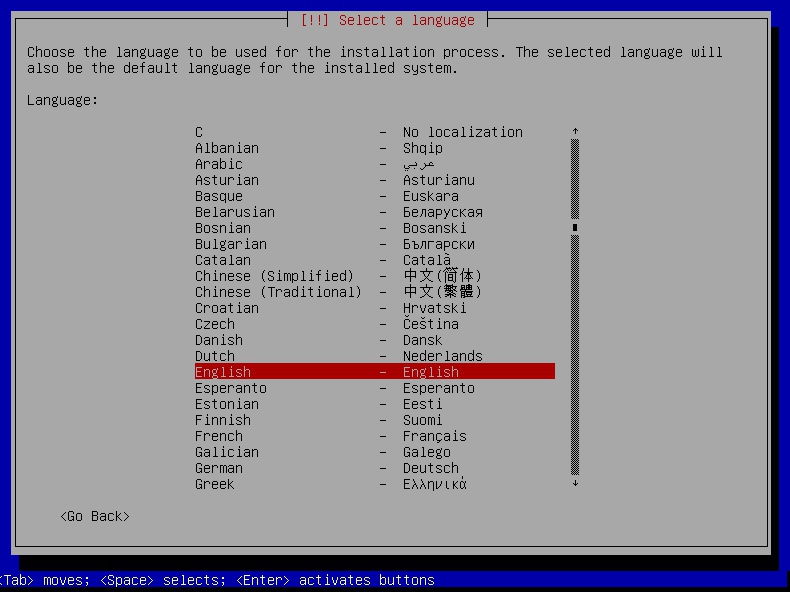
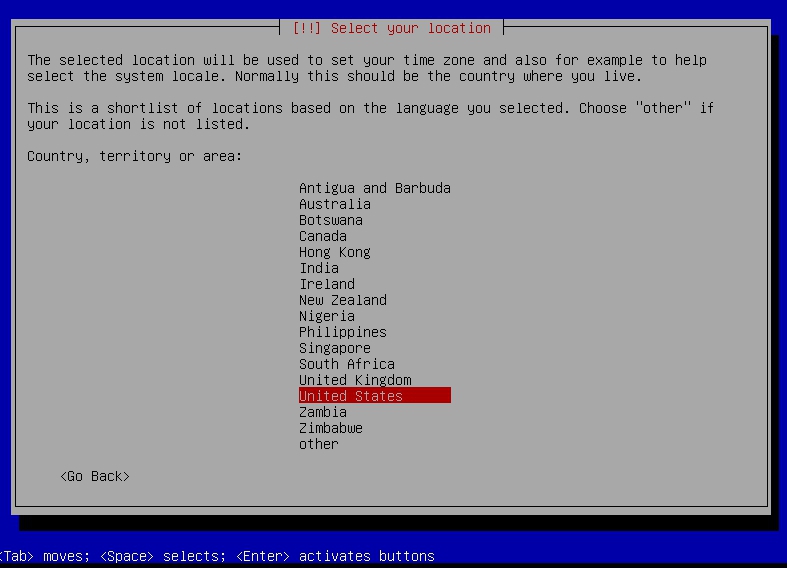
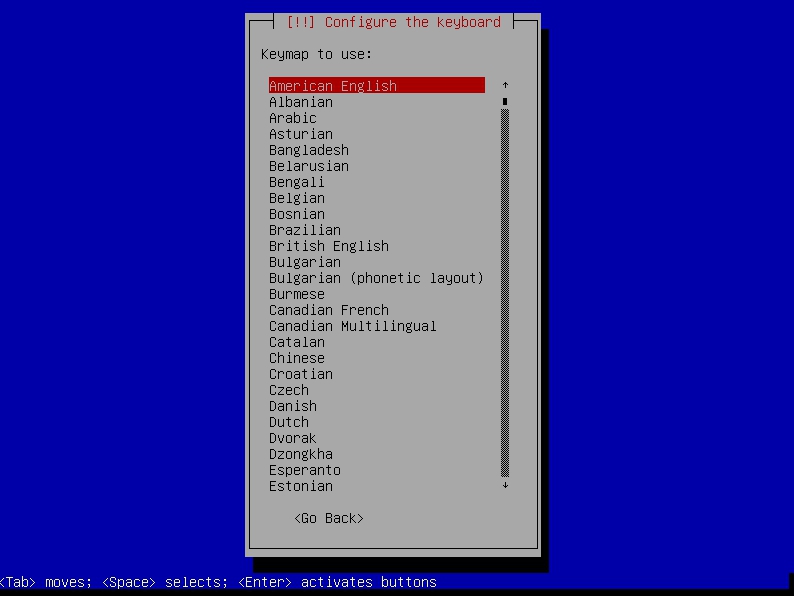
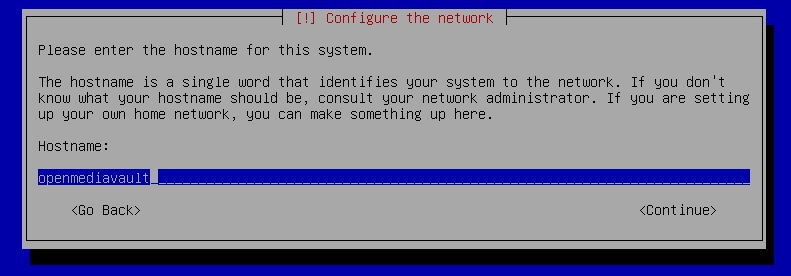
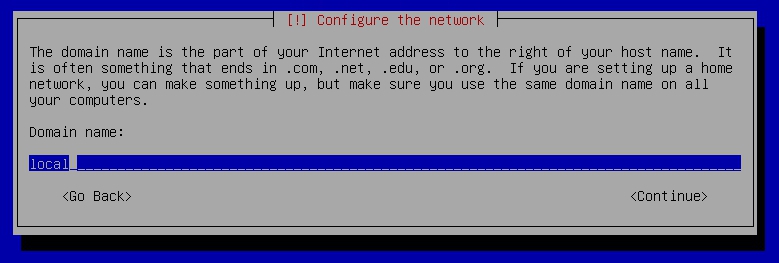
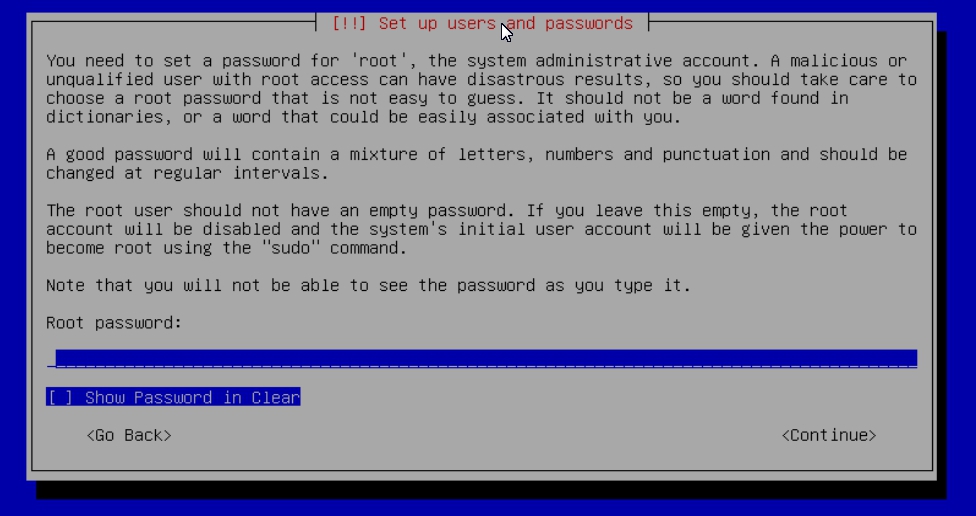
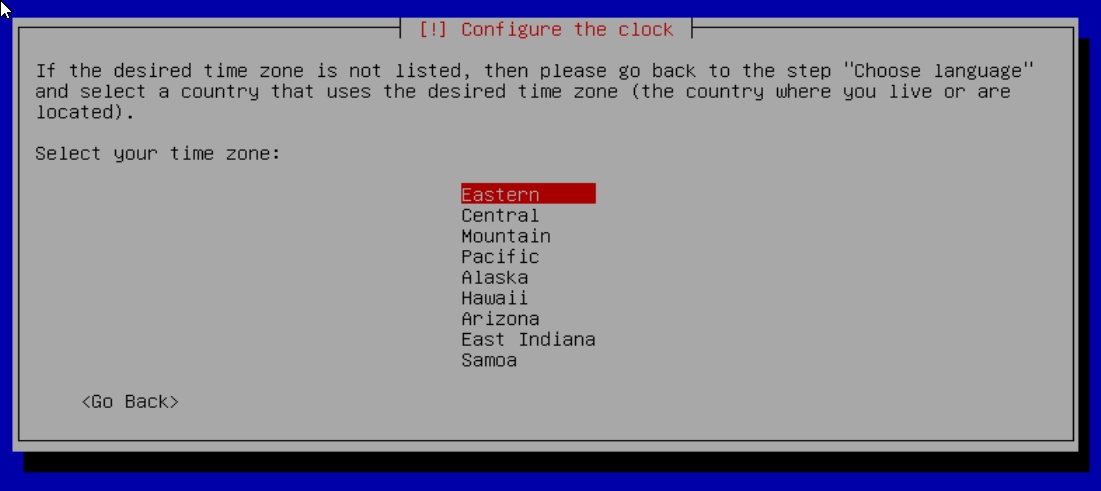

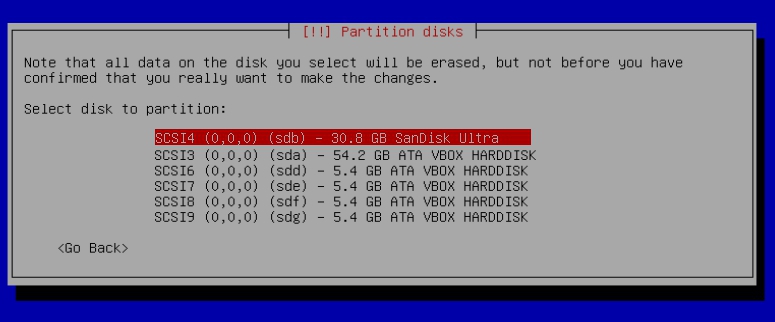
* If installing to a USB drive, at this point, it is possible to an error may pop-up regarding partitioning the drive, and recommend a reboot. Follow the recommendation. After the reboot, the partition operation should succeed the 2nd time around. *
The system installs……….
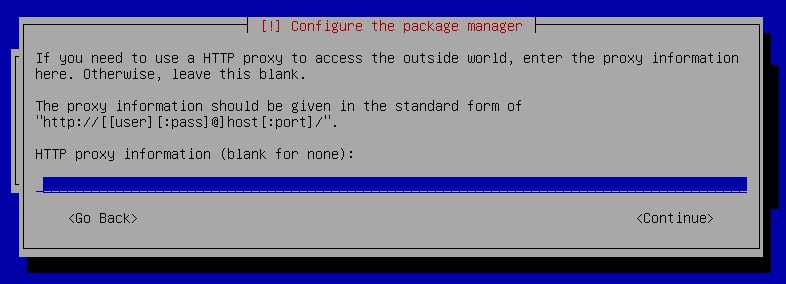
While the advice given in this screen is true, without testing, there's no way to know which Debian archive mirror is best. Without testing, picking your country or the closest location to your country would be the logical choice.

First Boot
Allow the installation to boot. Normally, the text above the login prompt will
provide an IP address to be used for opening the console in a web browser.
If an IP address is available, skip the following and proceed
to → Initial Configuration.
1.) No address from the DHCP server:
Normally, DHCP will assign an IP address to openmediavault and the address will be printed to the screen. However, on rare occasions the following issue may be observed.
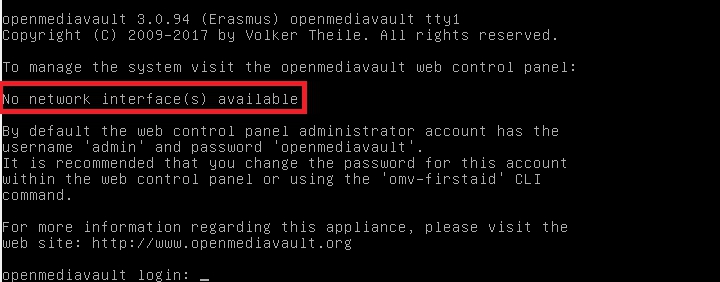
This is usually due to a slow response from your DHCP server, during a fast boot process.
An easy method of finding the IP address is:
At the login prompt type root
Enter your previously set root password.
At the # prompt type: ip addr
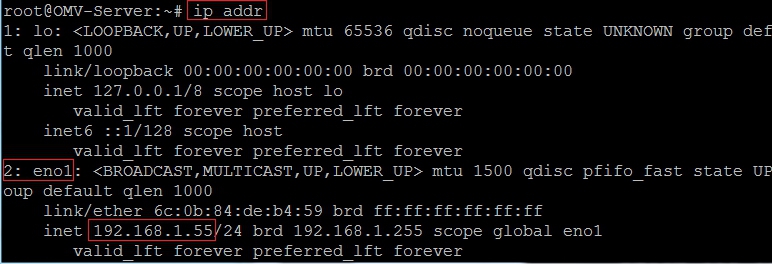
To access the WEB control panel, the IP address for the wired Ethernet interface
is needed. In this case it's 192.168.1.55 (/24, the subnet mask, can be ignored.)
2. A random IP address is assigned, that is not in the user's network:
In the following example, the actual network is 192.168.1.0/24
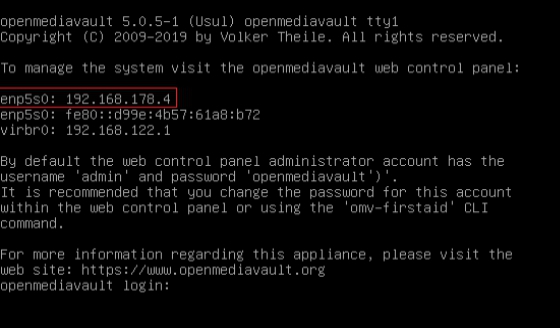
This is usually a one time event where the fix is simple – simply login as
root and type reboot on the command line. The address will be correct the
second time around.
3. On rare occasions, depending on the model and type of router, it may
be necessary to reboot the router AND follow that with a reboot of the OMV server.
With a known IP address, proceed to Initial Configuration.
Initial Configuration
Web console login
In a web browser's address bar, type in the IP address provided by the first boot screen:
Set the language of your choice.
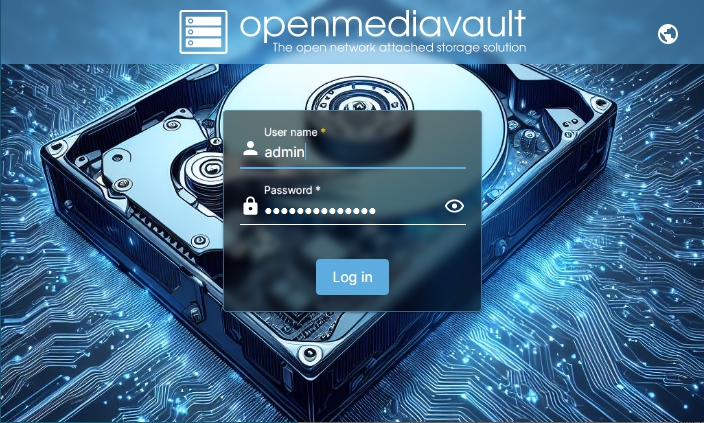
The user name is admin and default password is openmediavault
| Note | |
| Dashboard settings are stored in the web browser's cookies for the OMV7 server's web site. If browsers are set to erase cookies (this includes "incognito" or "private" browser mode), or if using a different client browser to access OMV, Dashboard settings will be lost or reset. | |
Quick Start Guide for Advanced Users:
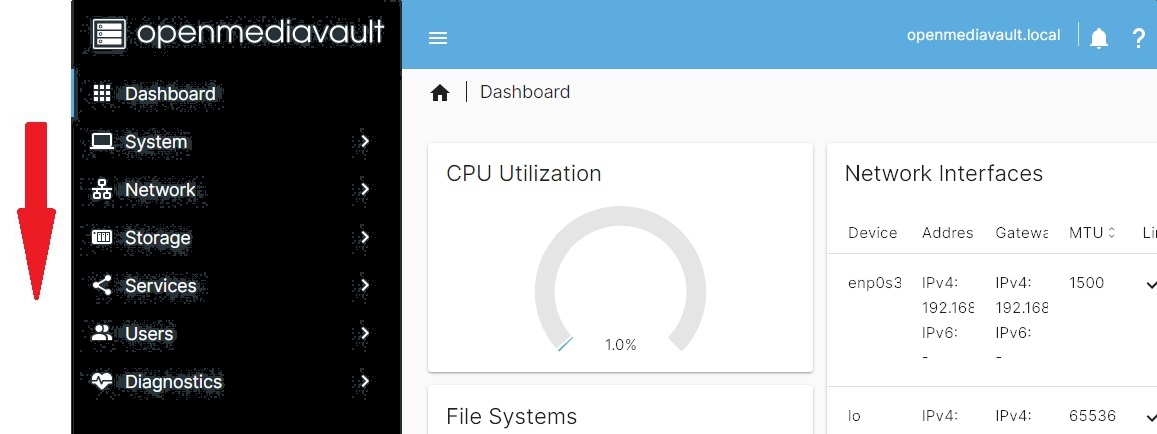
- In the left hand column, start at the top with System, and work your way down, choosing and activating the services and features needed for your use case.
- SBC users, see the section, Network Interfaces – SBC Users.
- Amd64 and i386 users; a static address for the openmediavault server and setting the address of a public DNS server is recommended.
As an example: Google's servers 8.8.8.8 and 8.8.4.4 support DNSSEC for better security, and ANYCAST which will direct DNS queries to a nearby server with low network latency. There are several choices for Public servers that support these features. List of Public DNS Servers.
- For a browseable network share, a minimum of one shared folder would need to be configured and that folder would need to be added to SMB/CIF to be visible on the network. NFS is also available.
Basic Openmediavault Configuration
This section will guide new users through the initial setup of openmediavault. It
addresses how to add a plugin, enabling OMV-Extras, how to setup a shared folder
and make it browseable on the network with an SMB/CIF share.
Change Password
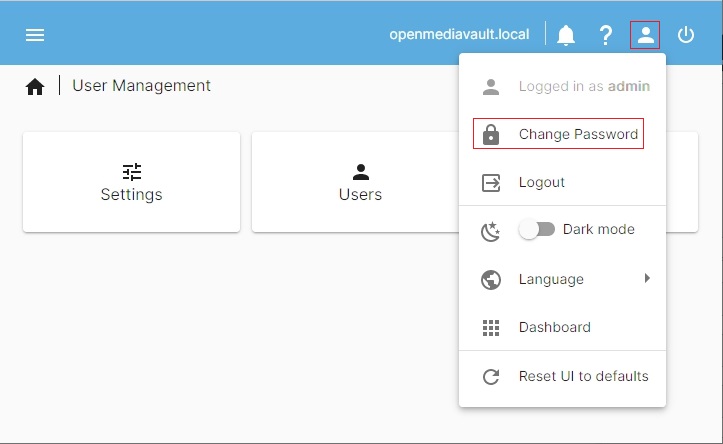
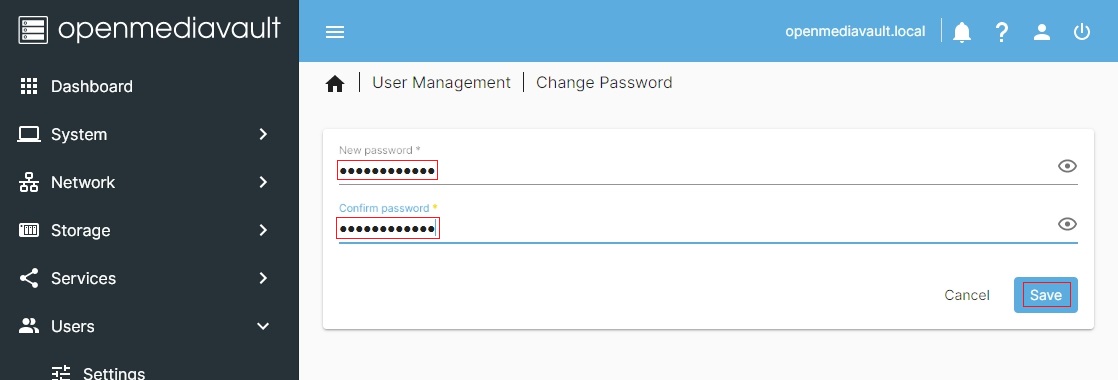
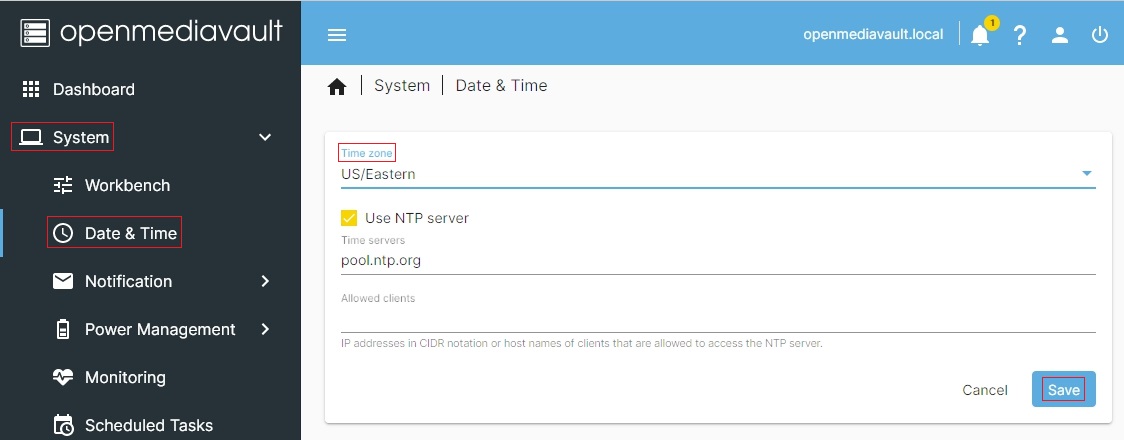
System Settings
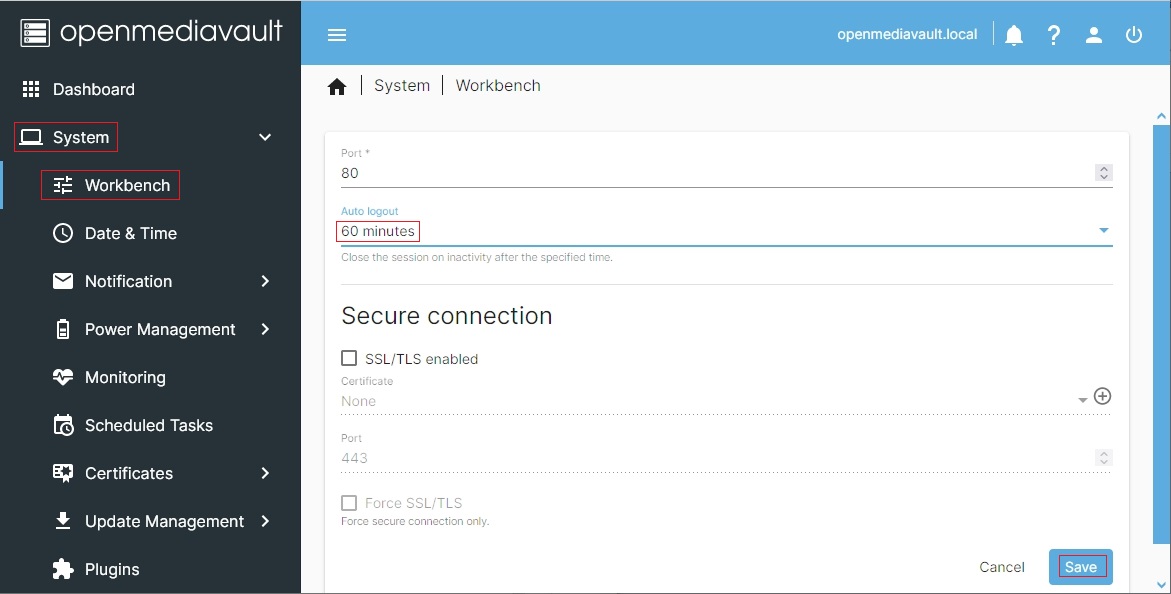
Under System, Workbench:
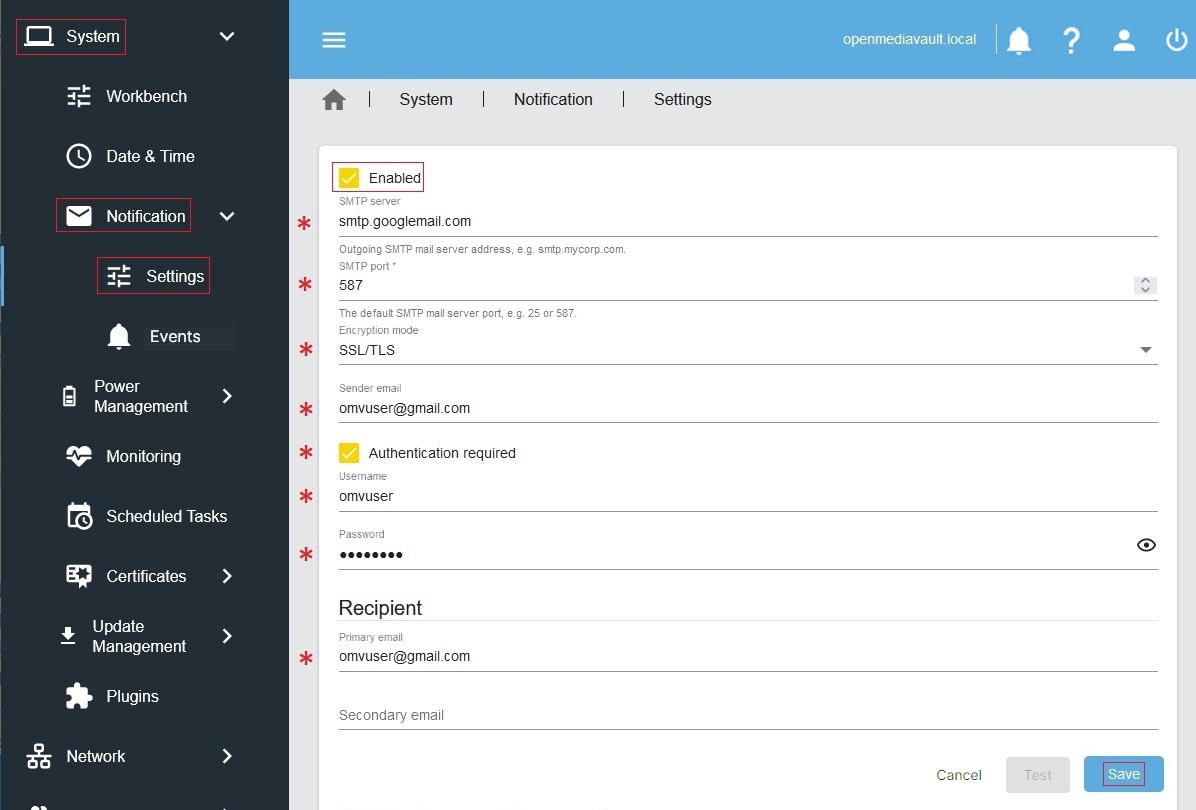
Server Notifications
Under System, Notification, Settings:
If enabled, E-mail setting entries are required if users want to take advantage of
automated server notifications and reports. (Highly Recommended.) Other actions
and scripts, in Scheduled Jobs for example, can use this information to E-mail a
report of task execution or status, as users may deem necessary.
To gather the required information for entry in the Settings window, users should
refer to the SMTP settings for their E-mail clients. Note that most ISP's are using
SSL/TLS secured E-mail connections.
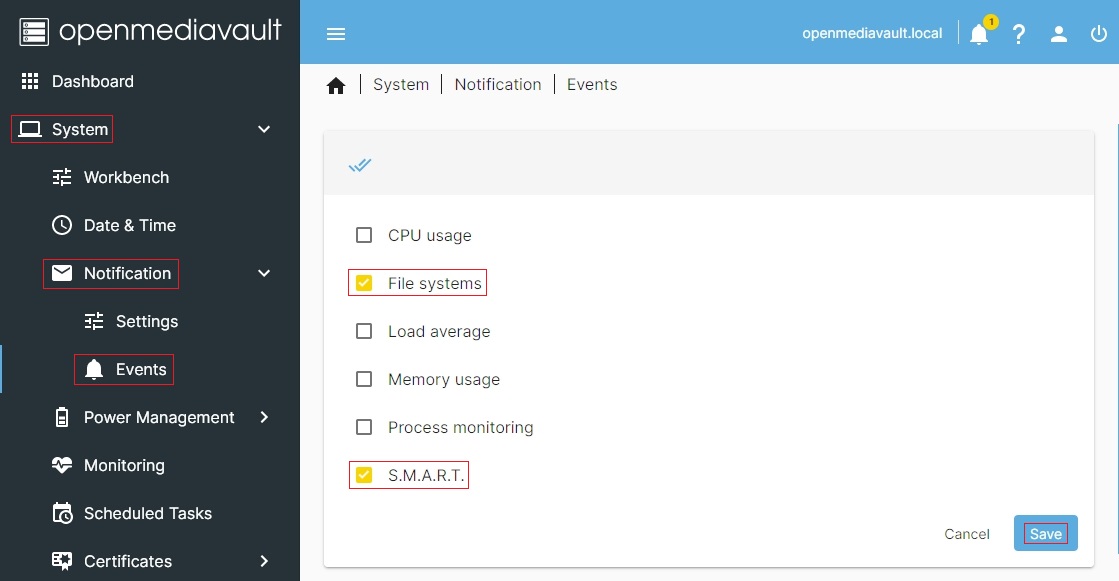
Under System, Notification, Events:
Select various functions for error reporting.
If using a minimalist platform, such as older hardware or SBC's, E-mails regarding
system resources, memory, etc., may become bothersome. Unchecking boxes as indicated
would reduce excess E-mails, while maintaining Storage reports on hard
drive health and File System errors.
| Note | |
|
Using Filesystems and SMART Notifications is | |
For an explanation of drive self-tests and an example of how to set up a drive self-test, see the section; Drive Self-Tests
Under, Network, General.
Hostname:
The hostname is the name that will appear on your network and on the command line. While the default is fine, if desired, the hostname can be changed here.
Domain name:
The default is fine. If needed, the Domain suffix can be changed here. (Very few users will use Fully Qualified Domain Names.)

Network Interfaces – SBC Users
Part of the SBC installation process was setting the wired interface to DHCP. SBC
users should consider leaving their wired network interface set to DHCP, until Docker is installed.
If a static IP address is needed for an SBC server:
Note that your SBC has been assigned an IP address by your LAN's DHCP server.
(Typically, a router.) See your router's documentation for information on setting a
“Static” or “Reserved” DHCP lease.
Network Interfaces – i386/amd64 Users
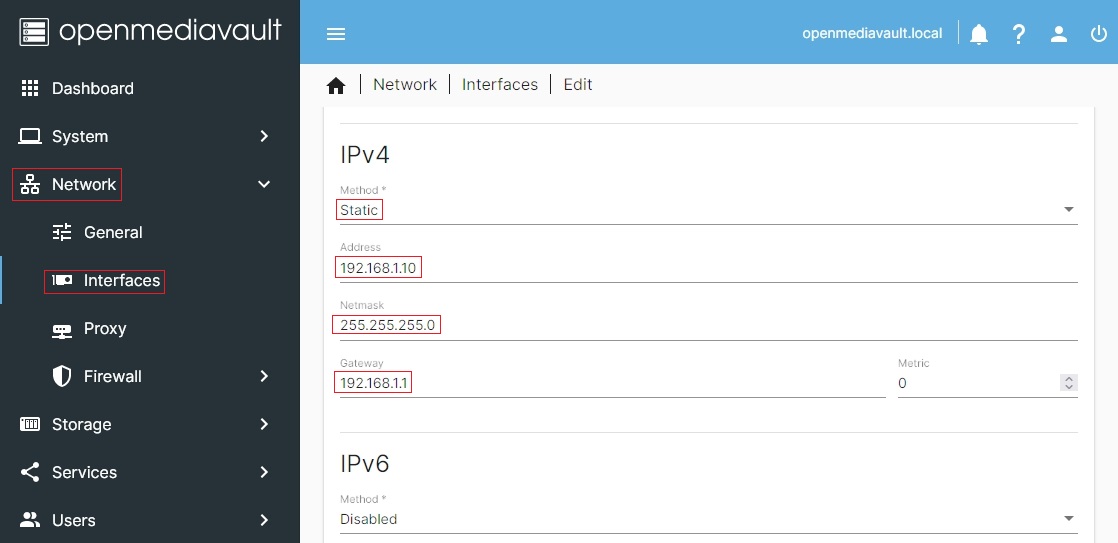
Under, System, Network, Interfaces:
Highlight / click on the interface line found under the Device column, and ]
click the Edit button. Use the first interface line/name found.
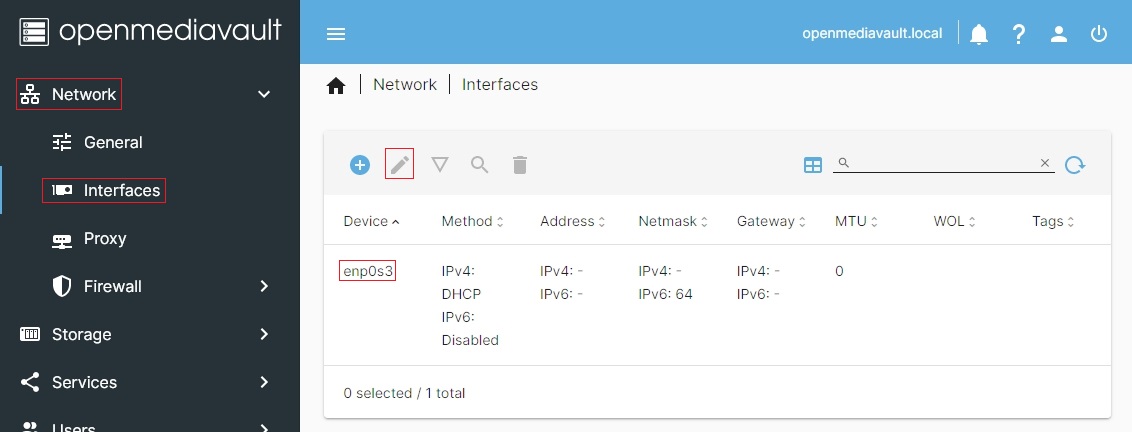
- It is recommended that users consider assigning a static IP address to the new Openmediavault server, that is outside the address range of the network's DHCP server.
- In many cases, the Netmask will be as shown and the Gateway address will be the address of the user's router.
- If Ipv6 is not needed, leave it at the default setting – Disabled.
- Scroll down and Save changes.
While not visible in the screen capture above, it is recommended that users consider using a public DNS server address. A list of public DNS servers is available → here. Use a server that supports DNSSEC, for better security, and ANYCAST, for low latency end point DNS servers that are closer to user locations.
Enter the selected address in the DNS IP address field. For the majority of users, the remaining fields under Advanced settings should remain at the defaults.
| Note | |
| When saving a new static IP address, the user will be “going out on a limb and cutting it off”. Since the address provided by the network DHCP server may be different from the static IP address chosen by the user, when the new address is changed, saved and applied, the GUI web page will stop responding. This is normal and expected. Type the new IP address, entered in the dialog box, into the URL line of your Web browser to reconnect. | |
(Optional)
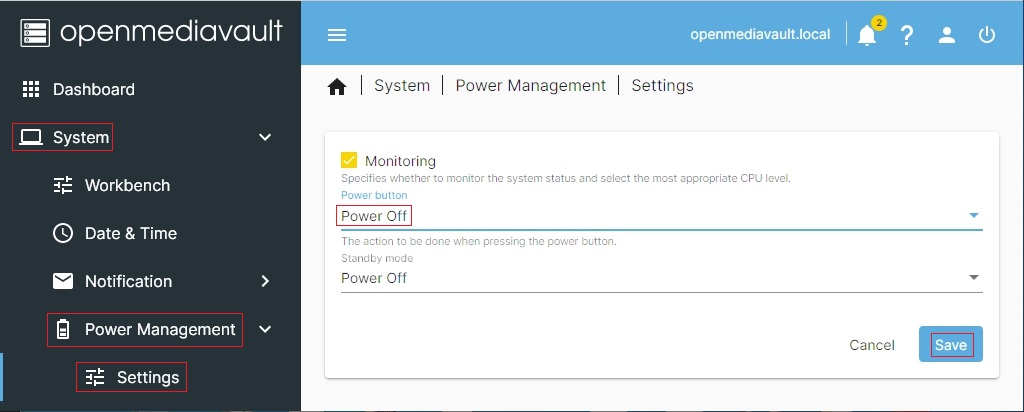
Under System, Power Management:
The Settings window allows for the automation of various power related tasks, such as an scheduled reboot.
In the Power button drop down, amd64 and i386 users should select the action preferred.
Since power buttons are not available on some SBC installations, SBC users may chose to select “Nothing”.
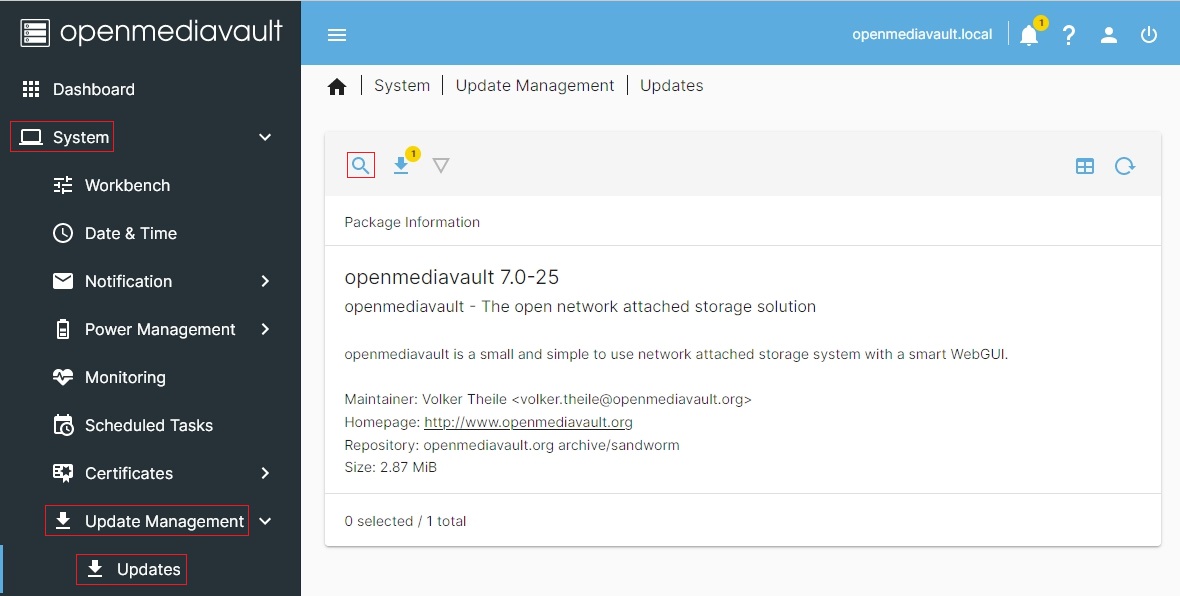
Under System, Update Management, Updates:
First, click on the Check button , to refresh available updates for your platform.
(This may take a few minutes.)
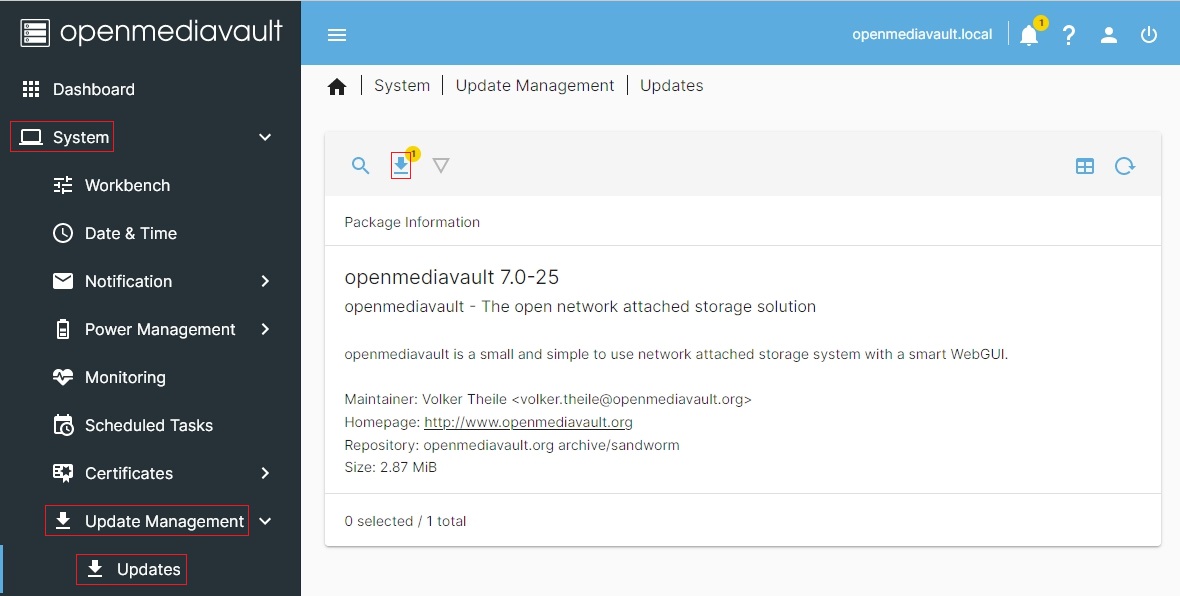
When the Install button is clicked, all applicable upgrades will be installed.
(Recommended for beginners.)
While upgrades are taking place, a progress window will appear. During the upgrade,
the “Close” button will be grayed out.
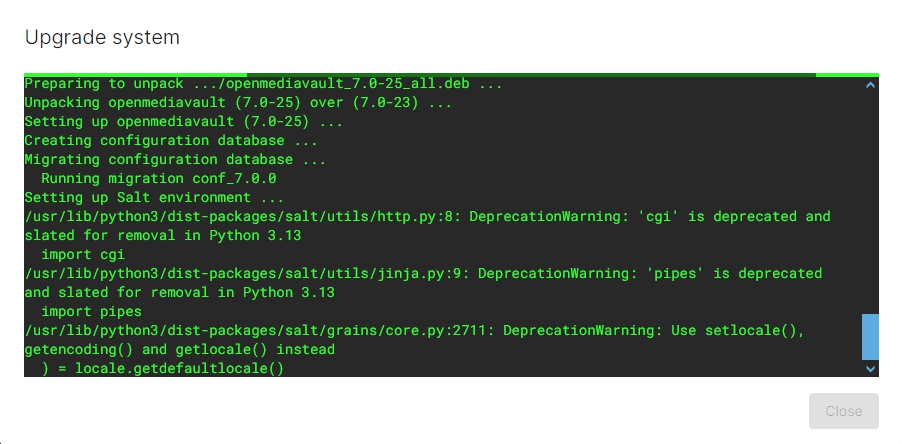
When upgrades are complete, END OF LINE will be displayed. Click on the Close button. In some cases, the page may recycle to the Dashboard Page. Also, the Yellow
confirmation banner may appear. Confirm changes to complete the update.
OMV-Extras
(The following does not apply to SBC or i386- 32bit users. When using the scripted
install, OMV-Extras is installed with openmediavault by default.)
amd64 users will have a basic set of plugin's appropriate for a basic NAS /
File Server. To enable the full range of plugin's available, to openmediavault, the
installation of OMV-Extras is required.
| Note | |
| For amd64 users who installed openmediavault on SD-cards or thumb-drives; installing OMV-Extras is a prerequisite for installing the flash-memory plugin. The flash-memory plugin is required for flash media boot drives. | |
Installing OMV-Extras
To enable OMV-Extras, running the following command line is required:
wget -O - https://github.com/OpenMediaVault-Plugin-Developers/packages/raw/master/install | bash
This can be done in two different ways, by SSH client or a scheduled task. Chose
one of the two methods as follows.
Installing OMV-Extras using an SSH Client (Preferred)
New users should consider installing and using PuTTY. PuTTY allows users to log
into their server from a Windows, Mac, or Linux client. PuTTY will be helpful for
on-going maintenance tasks and, if needed, repairs. (Instructions for installing
and using PuTTY can be
found → here.
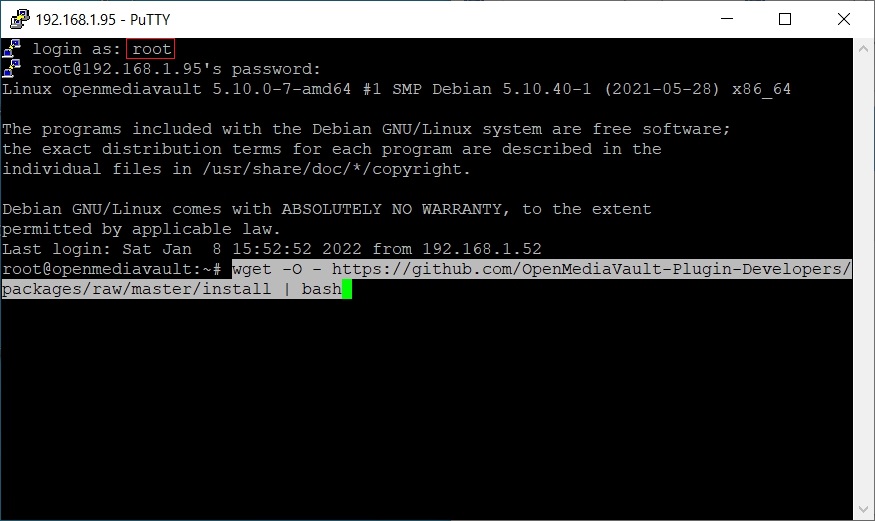
- Open PuTTY and connect to the server's IP address.
- Login as
root, using the password installed during the installation. - Copy the command line (above) with (Ctrl+C). Click on the PuTTY window and paste the command line in using the right mouse button.
- Hit Enter.
- DO NOT close the PuTTY window or the command will abort. (The window can be minimized.)
When finished, the script will state Done and the root prompt will return. PuTTY's window can now be closed.
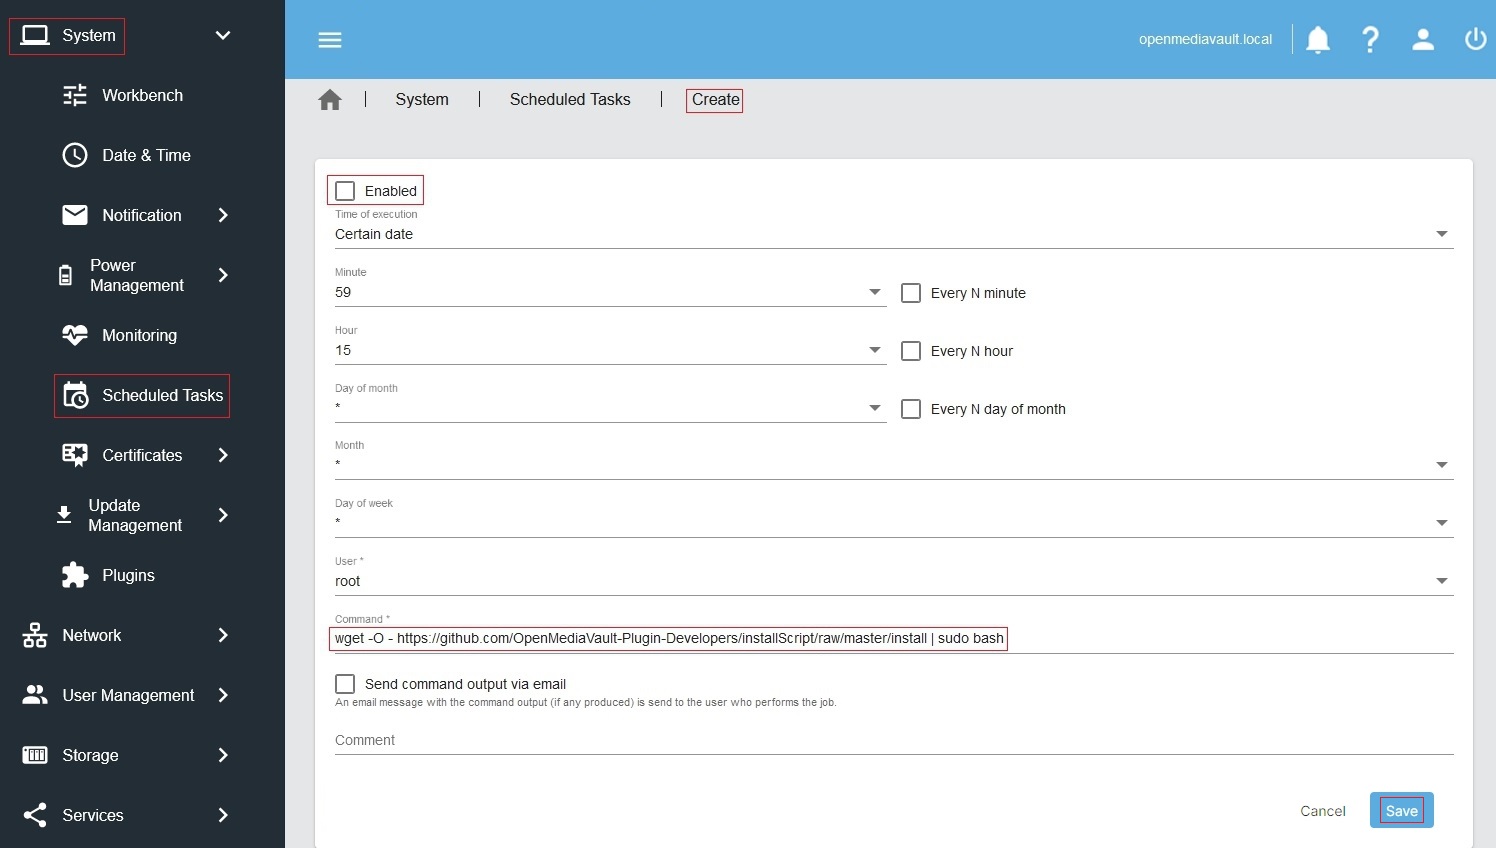
Installing OMV-Extras using a Scheduled Task
A scheduled task allows Admin's to run a command line from Openmediavault's GUI.
Under System, Scheduled Tasks, Click the Create button.

In the Create Window:
- Uncheck Enable. (In this case, this job will be run manually, using the Run button.)
- Copy the Command line above with (Ctrl+C) and paste it (Ctrl+V) into the Command field.
Highlight the Task and click the Run button.

When the “Run Scheduled Task” dialog box pops up, click Start. (While the task is
running, the Close button will be grayed out.) When the task is finished, click
the Close button.
A reboot may be necessary, for OMV-Extras to show up in the left column under
System.
This task as a “one time run and done”. It can be deleted by highlighting the task and clicking on the trashcan icon.
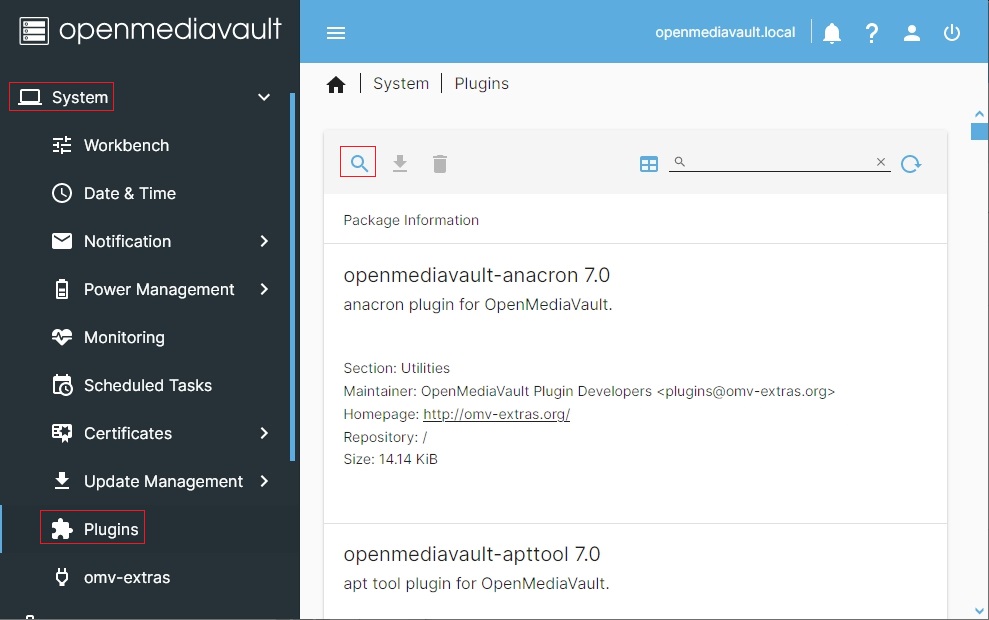
To insure that all plugins are available, go back to System, Plugins, and click
the Check button. This will refresh the page and fully populate it with several
additional plugins, beginning with openmediavault-anacron.
A Basic Data Drive
General
Openmediavault is capable of setting up basic Linux file systems in the GUI up to, and including “Copy on Write” file systems such as BTRFS and ZFS which combine check summed files, RAID functions, and Logical Volume Management into a single package. However, advanced file systems add complexity which can make administration of a NAS server more challenging for a beginner.
Until some experience is gained, it is recommended that Linux/NAS beginners use
single disks with a native Linux file system. In the processes described in the
following, EXT4 will be used with a single data drive.
Some Windows users will want to use USB attached hard drives that are formatted NTFS by Windows. This is NOT recommended. While connecting an NTFS drive is possible, there are technical limitations and the potential for file/folder permissions issues that are beyond the scope of this guide.
A better and far easier approach would be to format all server connected drives,
using openmediavault's GUI, with a Linux native filesystem like EXT4. Then create a Samba share (SMB/CIF) for Windows clients
as described in Setting up a Shared Folder
and Creating a SMB/CIF “Samba” share which is covered later.
Samba (SMB/CIF) network shares understand the Windows file format and can be
configured to accommodate DOS and extended file attributes. Samba network shares serve as a
“transparent translator” for Windows data storage that will work very well with Windows Clients.
RAID+USB = Potential Problems
Setting up RAID of any type using “USB to drive” connections is highly
discouraged. RAID over USB has known problems. The USB interface
(there are several varieties) may filter some the characteristics of hard
drives, fail to pass SMART stat's and ATA drive commands, delay the assembly
of a RAID array, etc. While USB may work in some RAID cases, it's not as
reliable as using a standard hard drive interface. If RAID of any type is
considered to be a requirement, drives should be connected with SATA or SAS ports.
If users choose to use RAID over USB connections, it is done at their own risk with the potential for the total loss of stored data. RAID issues involving SBC's, USB connected hard drives, or USB RAID enclosures are not supported by the forum.
RAID is often confused with backup which is far more important. For more
information, see the explanation of backup,
in Backups and Backup-strategy.
Data Storage - Size matters
In general terms, beginners should do a rough calculation of their storage
requirement. When selecting a data drive, the initial fill rate should be between
25 and 50%. As an example, if the calculated data to be stored on the NAS is 1TB,
the selected drive should be between 2 and 4TB. With 50%+ drive free space
(2 to 3TB) additional data can be accommodated, without the need to expand in the
immediate future. When the fill percentage reaches 75%, it's time to plan for more
storage.
Data Drive Set Up
| Note for Beginners and SBC users | |
| Openmediavault is designed to separate the Operating System (the boot drive) from data storage. This is “best practice” when setting up a server. Accordingly, openmediavault reserves the drive it is installed on exclusively for the OS. By default, the GUI will not allow the boot drive to be selected when creating a data share. A second hard drive or SSD is required for data storage. | |
(With a data drive installed or connected)
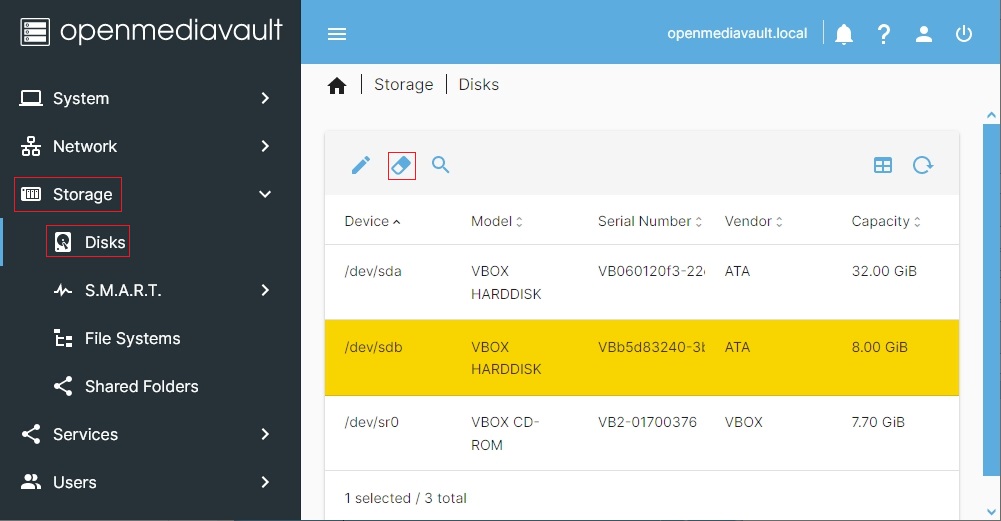
Under Storage, Disks:
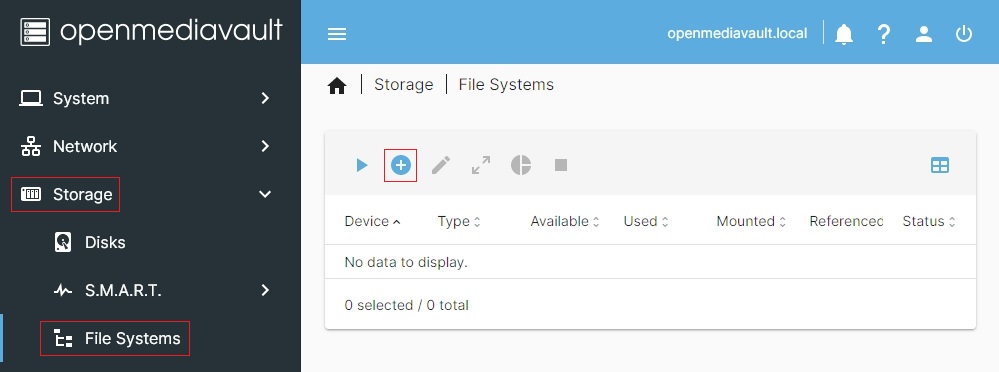
Under Storage, File Systems:
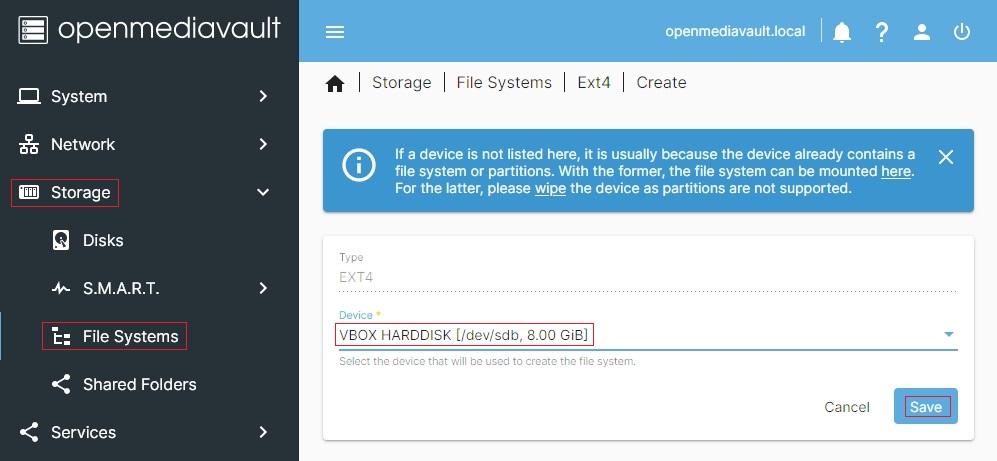
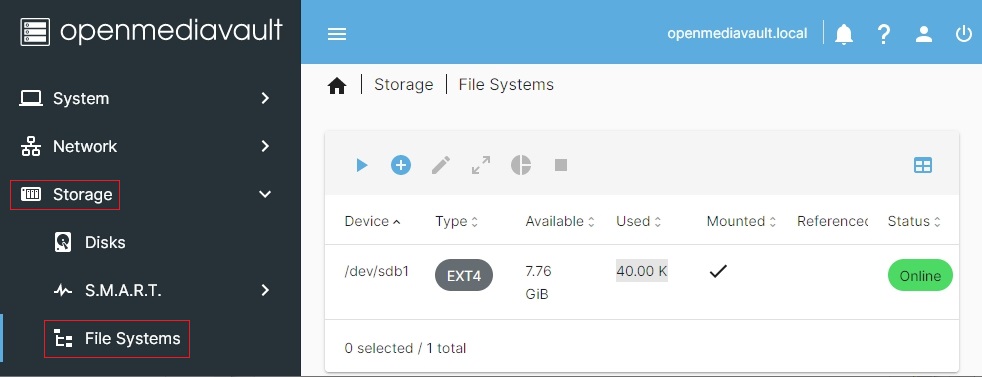
When the format is complete and the Format dialog box is closed, the
File Systems - Create window will, automatically, change to the File Systems - Mount window.
If needed, the Mount Window can be found again under, Storage, File Systems.
Click the leftmost Right Arrow icon to mount a previously formatted drive.
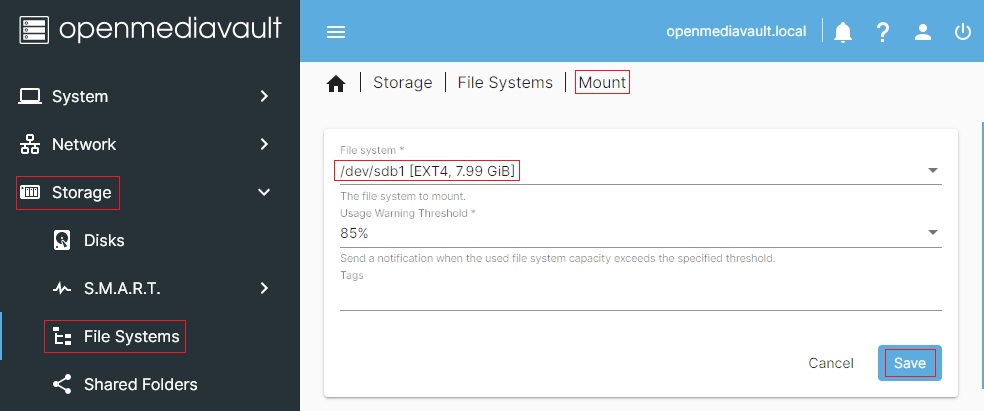
| Note | |
| Again, the the arrow icon, next to the create button, will mount a previously formatted disk. This may be useful when importing a disk with data. | |
Creating A Network Share
Network shares are the primary reason for setting up and running a NAS. While easy access to network data shares provides convenience to users, storing and backing up data in a centralized location makes it much more manageable for admin's.
Setting up a Shared Folder
The majority of the files and folders in a new openmediavault installation are
controlled by the root user. One of the purposes of a Shared Folder is to set
permissions that will allow regular users access to folders and files used for
data storage. A shared folder could also be called a “base share”. The shared
folder created in the following will be the foundation for creating a “Network
Share”, covered later.
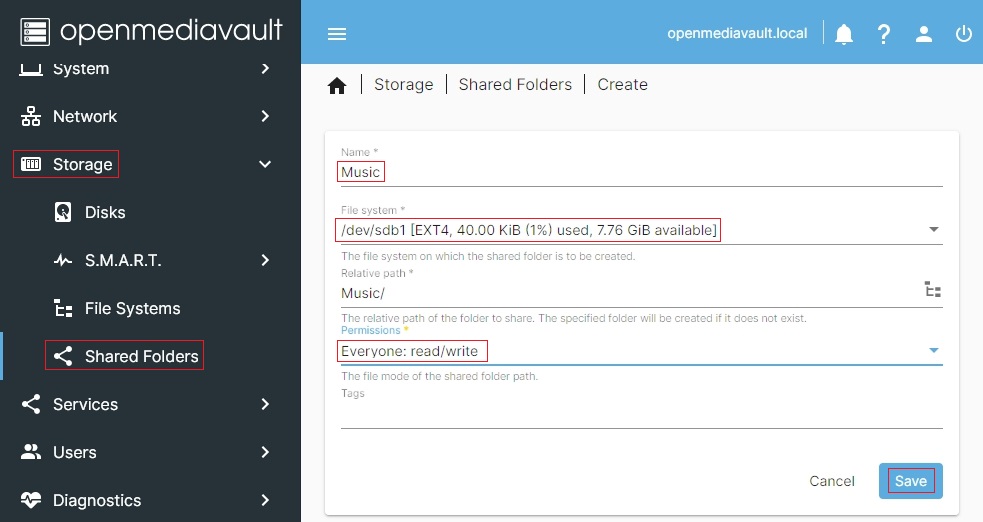
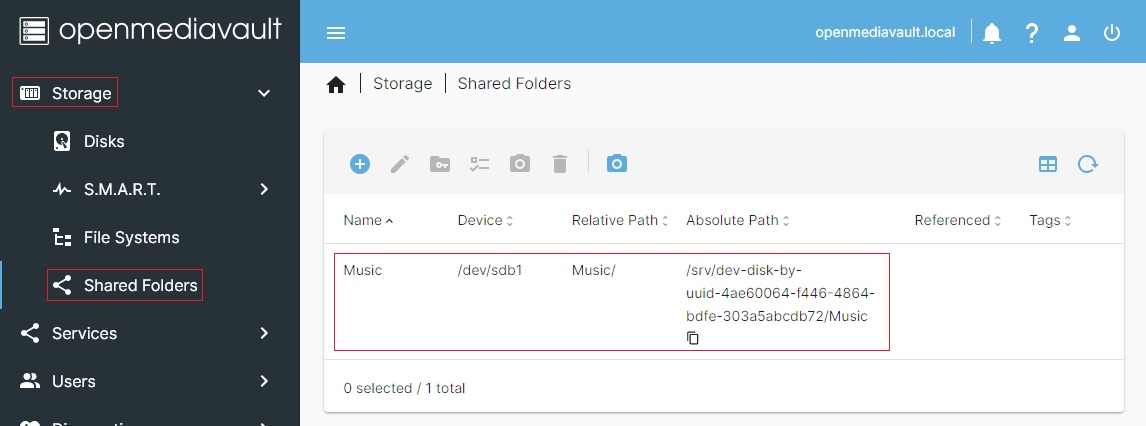
Under Storage, click on Shared Folders, then click on the Create button (The blue + button).
In the following example, next to;
Name: Add your new shared folder's name.
Device: Click on the drop down and select the drive that was previously added and formatted.
Path: Accept the default
Permissions: Click on the drop down and select Everyone: read/write
Creating a SMB/CIF “Samba” Network Share
In order to make your shared folder viewable in a client's Windows Explorer,
under Network, it's necessary to set up a Samba share using the SMB
(Server Messaging Block) protocol. Openmediavault makes setting up a Samba
network share an easy task.
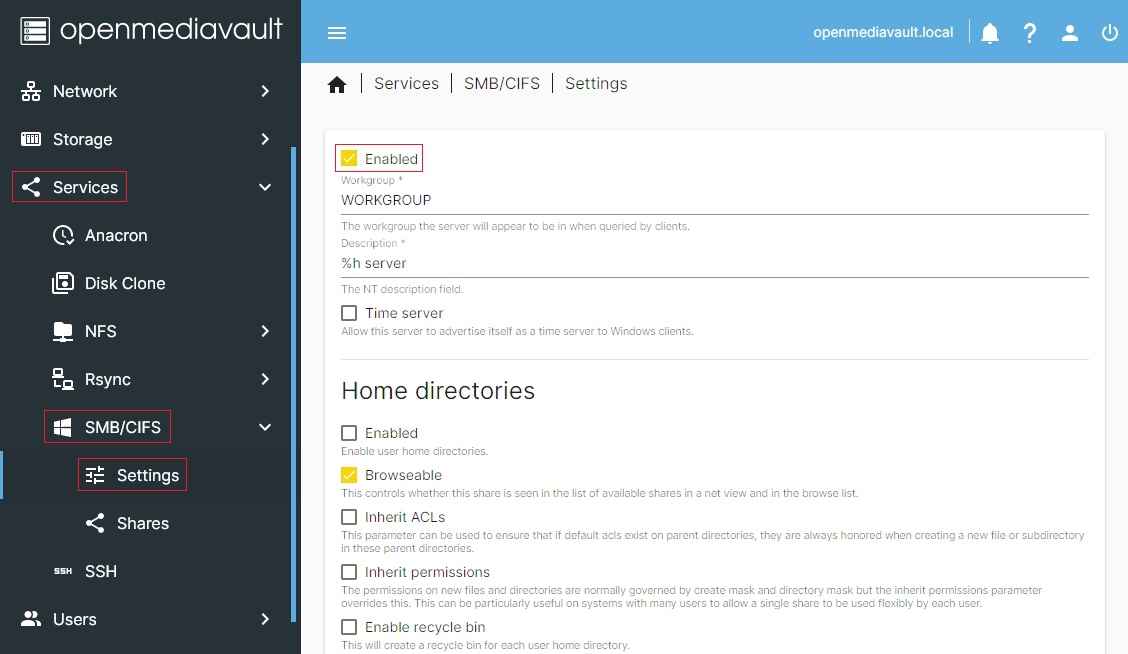
Under Services, click on SMB/CIF then Settings. Click in the Enable box. If the
LAN's workgroup name has been changed from the default, WORKGROUP, enter the name
in the Workgroup field. Leave the remainder of settings in this tab at their
defaults.
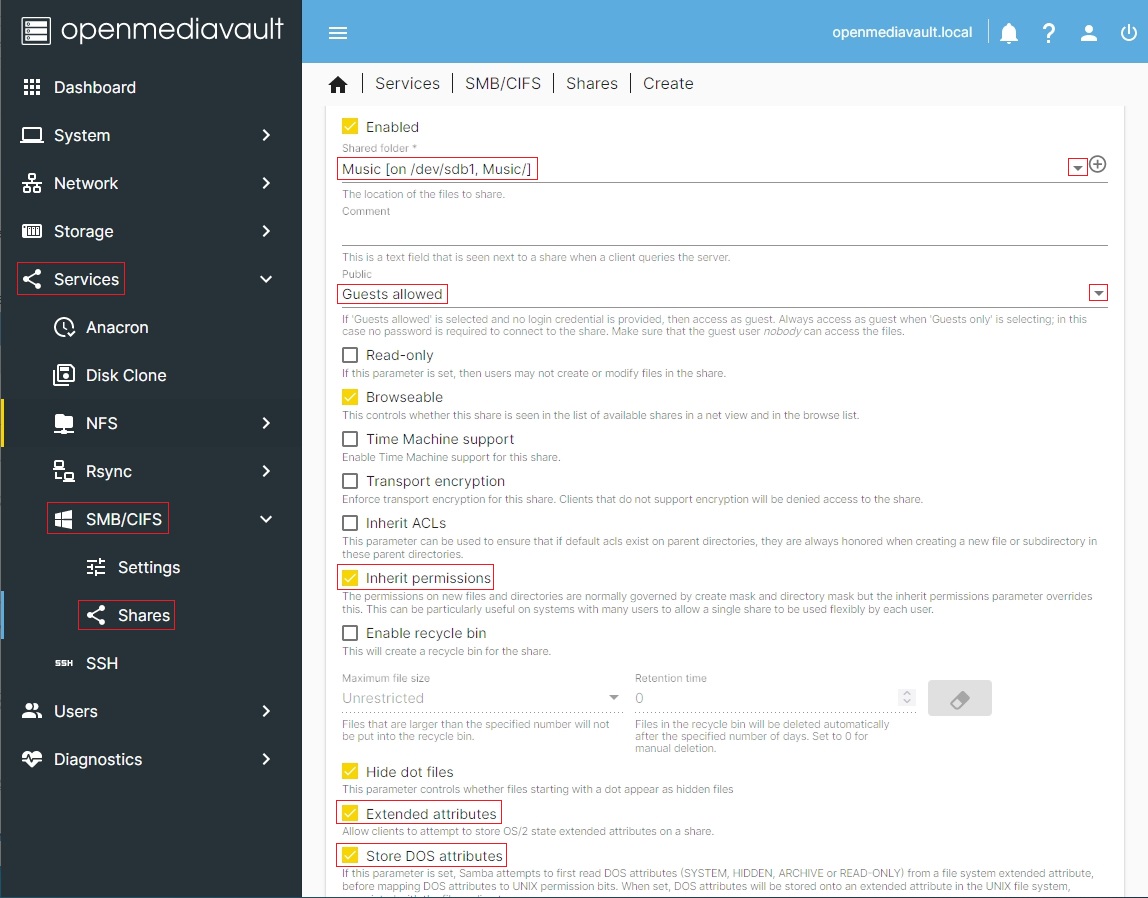
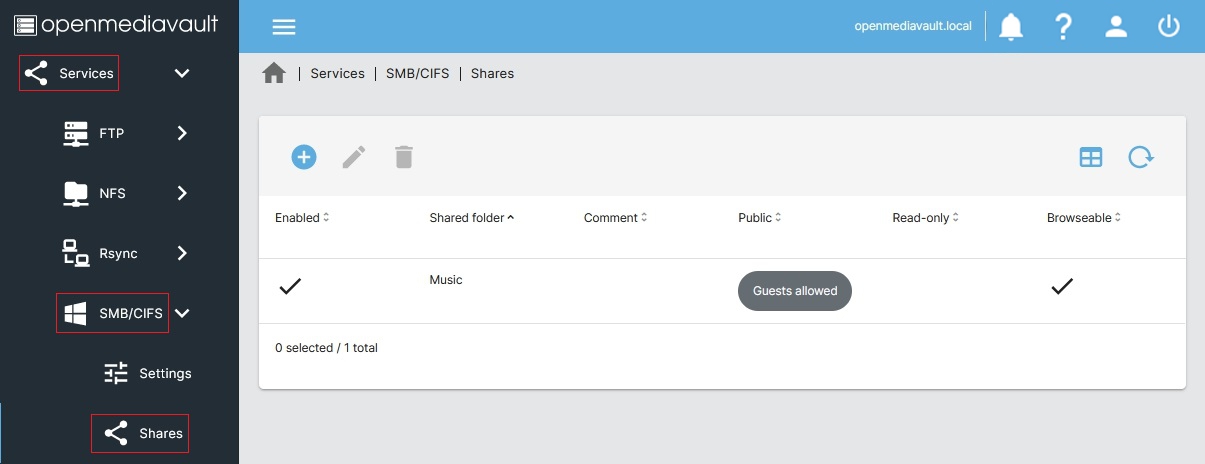
Under Services, SMB/CIF, Shares, click the
Create button (The blue + button).
In the Create window, set the following:
Shared folder: Click on the drop down and select Music (or the name for
the shared folder previously created.)
Public: Click on the drop down and select the Guests Allowed
Check the boxes for, Extended attributes and Store DOS attributes. (Leave
the remaining settings at defaults.)
Explore the New Network Share
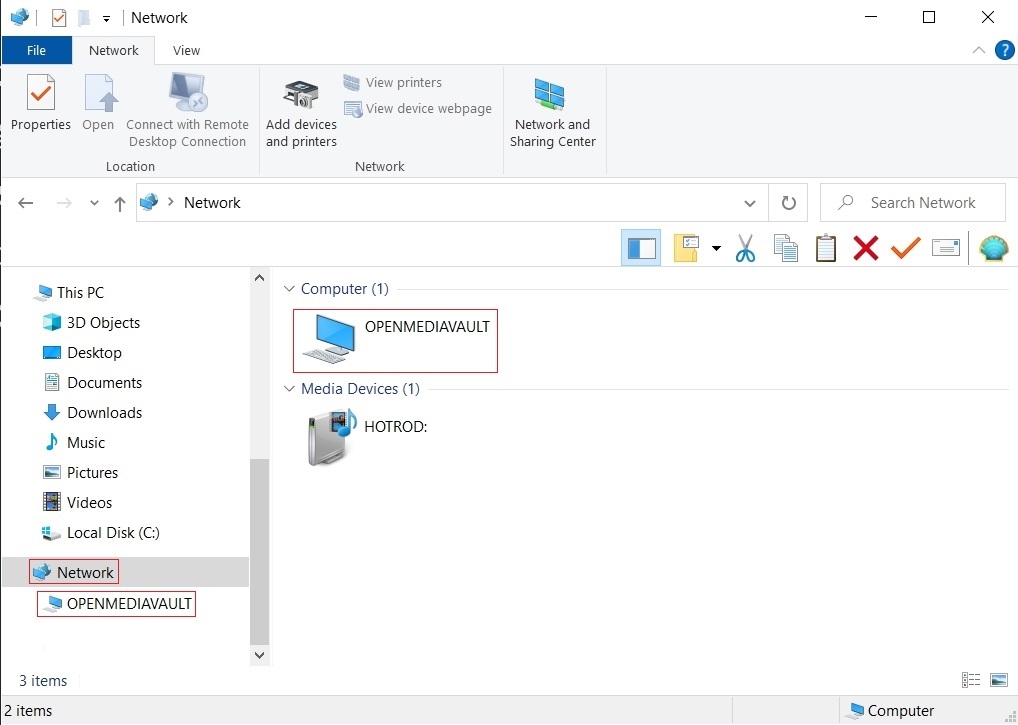
You should now have a browseable Server with a Network share named Music, so let's take a look.
At a network client, open Windows explorer. Scroll down to Network and click on
it. There's the new server, OPENMEDIAVAULT.
| Note | |
| A few minutes may be required for the Windows Network to “Discover” the new server. | |
If users are using Windows 10 PC's, and the server and share does not appear at a client, see this networking How To.
Now let's look at the server's new Music Samba share. It's there and browseable.
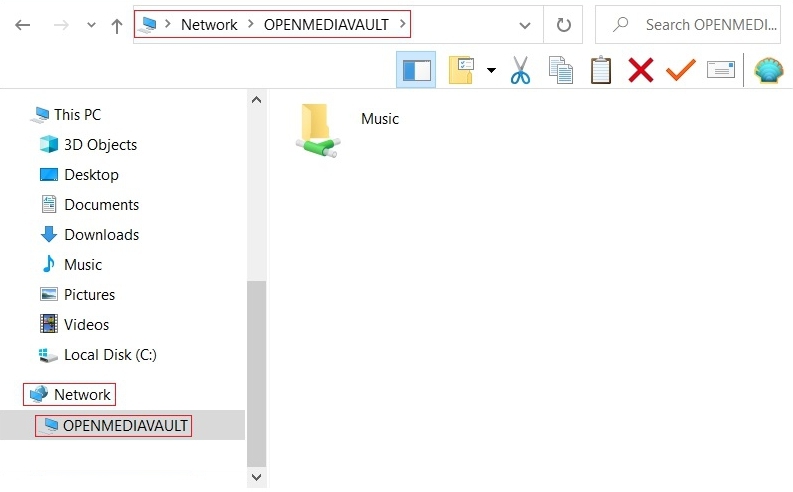
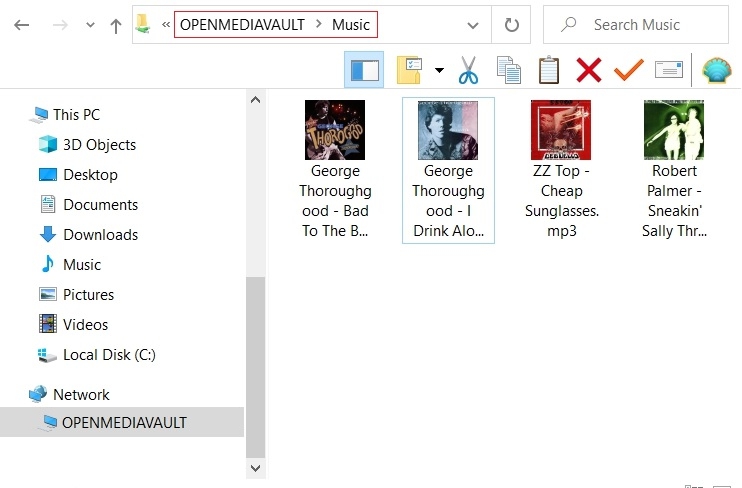
Congratulations! You now have a functional NAS that can be expanded to accommodate additional network shares. Simply repeat the processes in Creating A Network Share to create and make additional shares visible on your network.
The Flash Memory Plugin - amd64 users only
amd64 users who installed openmediavault from the ISO image to a flash media drive:
The installation of the Flash Memory plugin is required.
For an explanation of the Flash Memory Plugin, with installation instructions, see
the → Flashmemory Plugin Document.
Hard Drive Health and SMART
Hard drives are the hardware component most likely to fail, in a server, over
time. With continuous use, spinning hard drives last roughly 4 to 7 years,
but there are notable exceptions where hard drive life may be significantly
shorter or longer.
Given that storage failure is inevitable, the best overall strategy to avoid
losing data is 100% backup of the entire data store. Further, it is equally
important to monitor the condition of a server's storage media to prevent
silent data corruption and, unknowingly, replicating corrupted data to a
backup device.
Another characteristic of hard drives is that they rarely fail all at once.
While it is possible for a drive to fail abruptly, and without notice, this is
a fairly rare occurrence. Typically hard drives begin to fail slowly,
gradually accelerating toward a point in time where they become unreadable.
This unfortunate circumstance, where data lost to a corrupted or completely
unreadable hard drive, might be avoided with automated testing and
monitoring.
To protect the server's data, monitoring devices with SMART is strongly
recommended.
Enable SMART
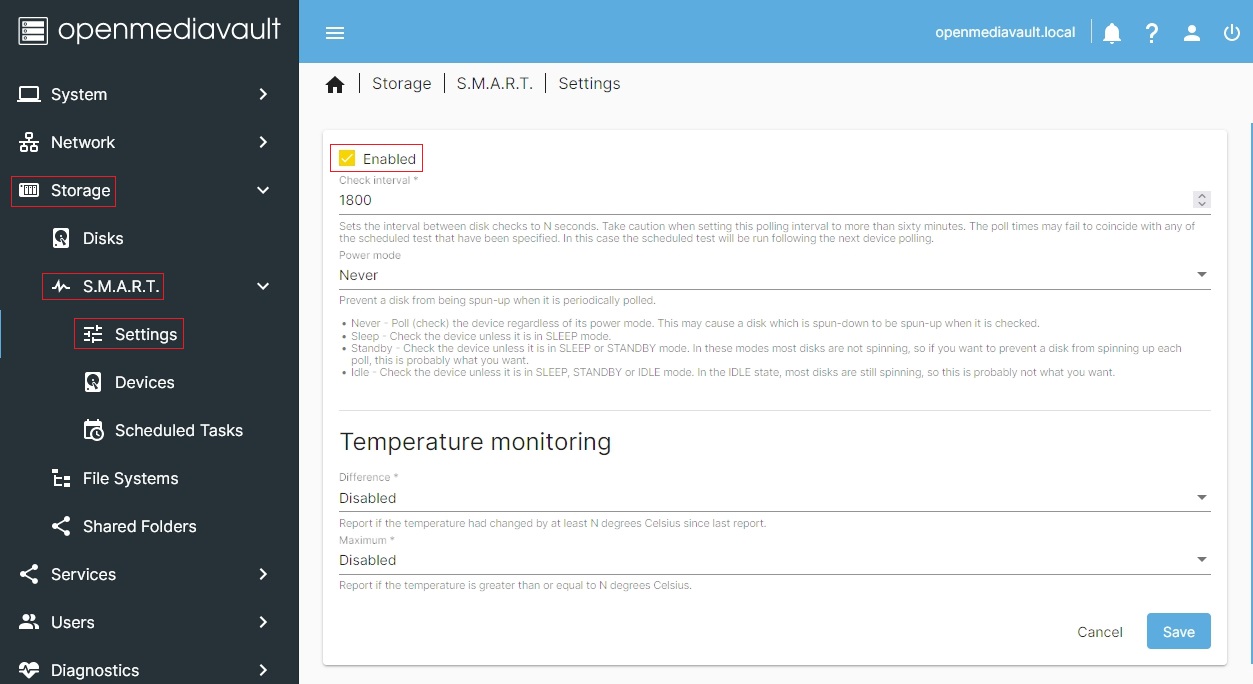
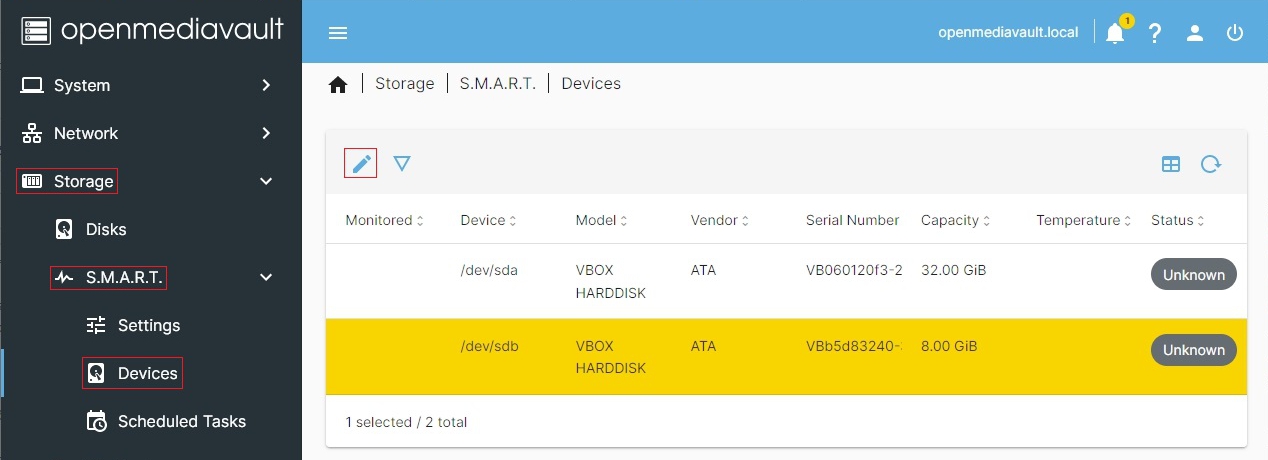
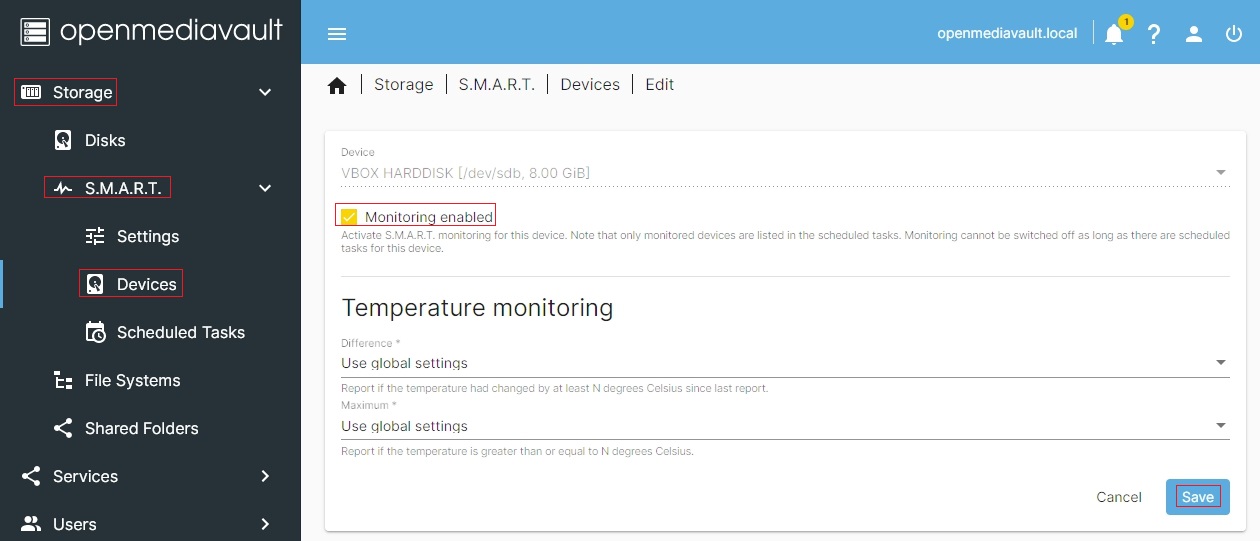
In Storage, S.M.A.R.T., Devices, Edit:
In the Device field: Select the drive to monitored with the drop down arrow.
Drive Self-Tests
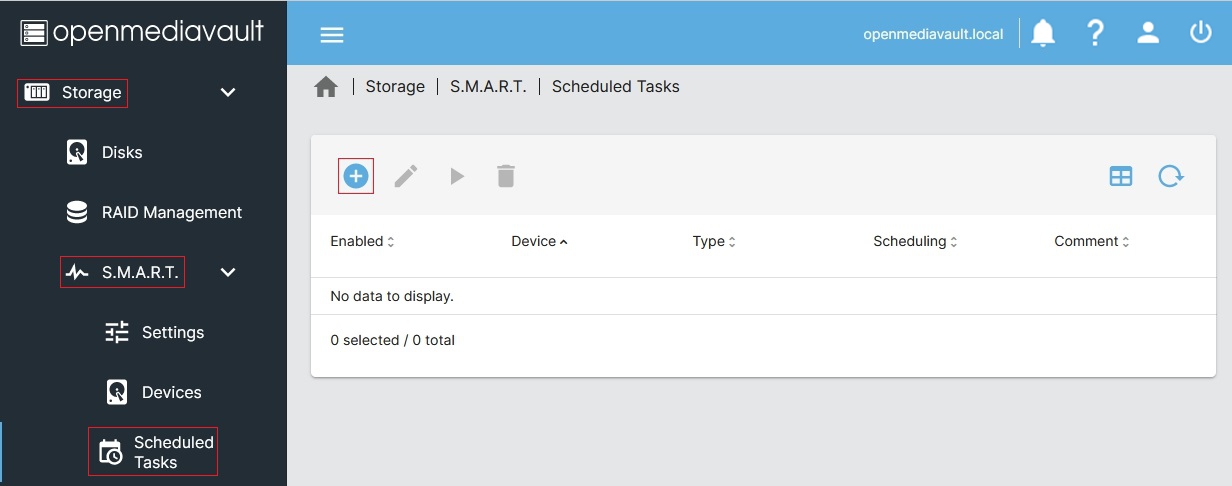
Drive self-tests are a tool for early discovery of hard drive issues.
Periodic testing of hard drives will uncover the majority of hard drive
issues as they begin to develop and, hopefully, before a drive fails
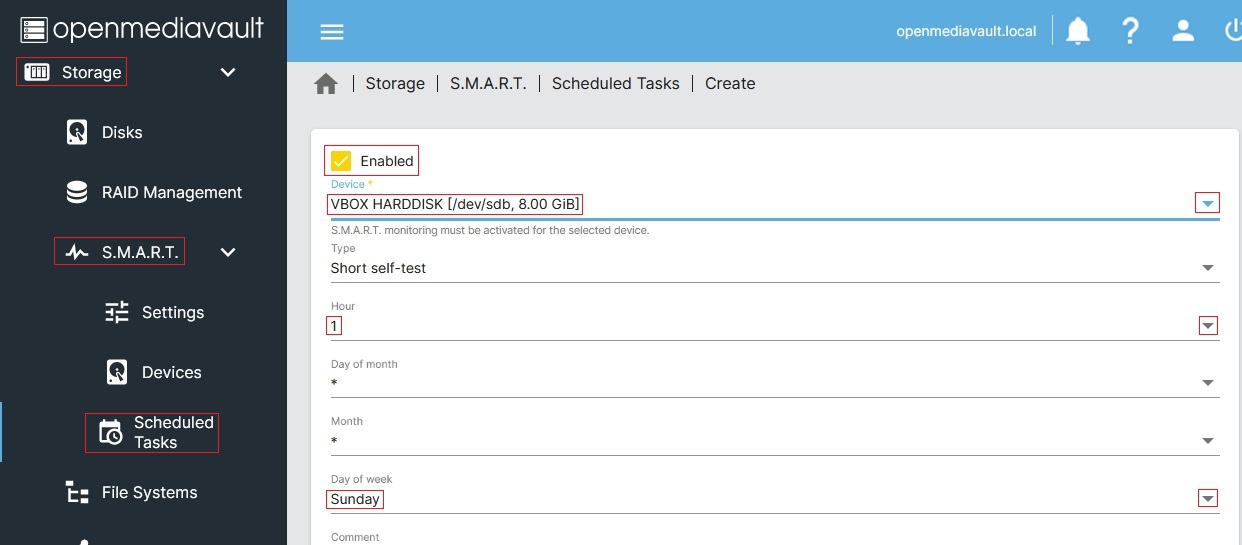
completely. The following illustration shows the setup for automated
short tests, for an individual hard drive. In this example, a short
self-test is run every Sunday at 1:00AM)
A Short self-test runs for a few minutes and is an “on-line” procedure,
meaning that drives are still accessible during the test. A Long self-test
is an “off-line” test, meaning drives are not accessible during the test.
While a Short test does a quick check of a drive's components, a Long test
does everything in a Short test then checks the media (platters) for bad
sectors and other imperfections. Repairs are made, if possible, such as
reallocating bad sectors.
The down side of a Long test is that it is L-O-N-G, where drive size and spindle speed are factors in the length of the test. Long tests are off-line and, since entire platter surfaces are scanned, it may push a drive that's beginning to fail closer to an actual failure as the test detects and attempts to repair problems.
There are many opinions on which tests to use and the frequency of testing.
- Some data center admins schedule short self-tests once a week and a long test once every 30 to 60 days. (Remember, when scheduling a Long self-test, schedule it for after-hours periods where the server is not in use.)
- Some home NAS admin's schedule a short test, once a week, skipping Long tests altogether.
There's no exact right or wrong but drive self-tests are a tool that should be used as an aid to
monitor drive health, in avoiding data corruption and loss.
Enable Drive Self-Tests
SMART Attributes
There are numerous SMART attributes to consider. Unfortunately, only a handful are
standardized among the various drive OEM's and many have little to no practical meaning
to the end user. Given the variation between drive OEM's, the interpretation of a specific
SMART stat may require going to the drive OEM's support site.
A explanation of SMART and SMART's individual attributes, can be
found → here. (Scroll toward the bottom of the page.)
Where spinning drives are concerned, thanks to the ongoing
BackBlaze drive study, a loose
correlation has been made between impending drive failure and specific SMART stat's.
A synopsis of drive failures, versus the following SMART stat's, is available → here.
SMART stats loosely related to the failure of spinning drives:
SMART 5 – Reallocated_Sector_Count
SMART 187 – Reported_Uncorrectable_Errors.
SMART 188 – Command_Timeout
SMART 197 – Current_Pending_Sector_Count.
SMART 198 – Offline_Uncorrectable.
Any one count of the above stats may be meaningless, but it should be noted and closely monitored. If any of the above begin to increment upward, as of the 3nd or 4th count, home or small business admins might want to consider ordering a replacement drive.
SMART 199 - UltraDMA CRC errors
While not directly linked to drive failure, it's worth noting that counts on SMART stat 199 are usually hardware or cable related. This may be due to loose or a bad SATA / SAS cable, a connectivity problem, or an interface issue of some kind with the motherboard or the drive interface board.
Drive Failure - The Bottom Line
When using scheduled drive self-tests in conjunction with SMART E-mail notifications (see Server Notifications), server admin's and home users will be afforded better protection against the data corruption and data loss due to a failing hard drive.
Final Installation Notes:
1. Permissions for the shared folder created in this guide, and the SMB network share layered on top of it, are completely open. While these permission settings are OK for home environments, the server should not be exposed to the Internet by port forwarding. (Ports 80 or 443, for example.)
As users gain knowledge and experience, they should consider tightening up permissions on the underlying Shared Folders and SMB/CIFS network shares. The → NAS Permissions Document can provide guidance on this topic.
2. Important Put your new server on a good surge suppression power strip, at the absolute minimum. An UPS system is preferred and is best practice. In consumer electronics, the majority of failures are related to power supplies and adverse conditions created by line power. The prime causes of power issues and failures are short duration surges, high voltage spikes, brown-outs, and sustained over-volt or under-volt conditions. A good UPS system is designed to counteract these problems. Further, the file system on the boot drive is at risk of corruption from sudden (dirty) shutdowns due to power loss. An UPS minimizes these risks.
New User - Server Utilities, Maintenance and Backup for OMV7
The Utilities, Maintenance and Backup document for OMV7 can provide users with information on freeware utilities that will allow them to better manage an Openmediavault server. Other topics covered are maintenance items and easy to understand Operating System and Data backup processes.
A Closing Note
We, who support the openmediavault project, hope that you’ll find your openmediavault server to be
enjoyable, efficient, and easy to use.
If you found this guide to be helpful, please consider a modest donation to support the
hosting costs of this server (OMV-Extras) and the project (Openmediavault).
OMV-Extras.org
www.openmediavault.org
