SnapRAID Plugin For OMV6
Summary
SnapRAID is a backup program for JBOD disk arrays. SnapRAID stores data parity information which enables the recovery of disk failures. SnapRAID is targeted toward home media centers, with a lot of large files that rarely change. However, SnapRAID works well in similar environments were data stores are largely static.
Beside the ability to recover from disk failures, other features of SnapRAID are:
- All data is hashed to ensure data integrity and to avoid silent corruption.
- If failed disks are too many to allow a recovery, only the data on the failed disks is lost. All data on the remainder of disks is safe.
- If files are accidentally deleted, they can be recovered.
- SnapRAID can be used with disks that already filled.
- The disks of the array can be different sizes.
- Data disks can be added at any time.
- SnapRAID can be removed at any time without the need to reformat or move data.
Third Party Software Note
While this OMV plugin makes the SnapRAID package easy to integrate into openmediavault, the SnapRAID package itself was created by a third party. See the project / author's → web page for more detailed information and the SnapRAID forum for technical support.
Prerequisites
- OMV-Extras must be pre-installed.
- An additional (dedicated) drive is required to store SnapRAID parity data. SnapRAID's parity drive must be the same size, or larger, than the largest protected drive. This is a hard requirment.
- For reports on drive health and automating SnapRAID administrative tasks, setting up → Server Notifications is required.
- Enabling → SMART and scheduling a weekly short test, for all protected drives, is recommended.
- Consider testing the server's ram with a test program like → memtest86. Faulty ram is a known cause for data loss when using SnapRAID.
How SnapRAID Works
To explain how SnapRAID works, a comparison to RAID5 may be helpfull.
SnapRAID is in between RAID and a Backup program, trying to get the best benefits of both. During normal operation SnapRAID does not affect data in any way.
Features:
- Can protect the contents of multiple disks. Whether disks are independent or pooled is irrelevant.
- Filesystem types are irrelevant but simple filesystems, like EXT4, are recommended.
- Calculates file parity information on demand.
- Different sized disks can be protected without losing storage space.
- Can reconstruct a failed hard drive.
- Can restore deleted files.
- Uses a check summing hash that protects against silent corruption (bit-rot), with the ability to reconstruct corrupted files.
- A disk can be added or removed at any time.
- Can be removed at any time without the need to recover or move data.

Traditional RAID5 stripes data and interleaves parity information across multiple drives.
Features:
- Can aggregate a collection of disks into a pool that appears, to the OS, to be a single drive.
- Can use dissimilar sized disks (software RAID) but the array total will limit larger disks to the smallest disk size. (Hardware RAID may require identical disks.)
- Calculates parity on the fly.
- An array can operate with one member disk disabled.
- Can reconstruct a failed hard drive.
- Provides a parallel I/O speed boost. (However, this feature is irrelevant for NAS servers running in 1GB networks.)

Installation
In OMV6's GUI:
Under System, Plugins, find and highlight openmediavault-snapraid 6.X, and click the install button.
Initial Configuration
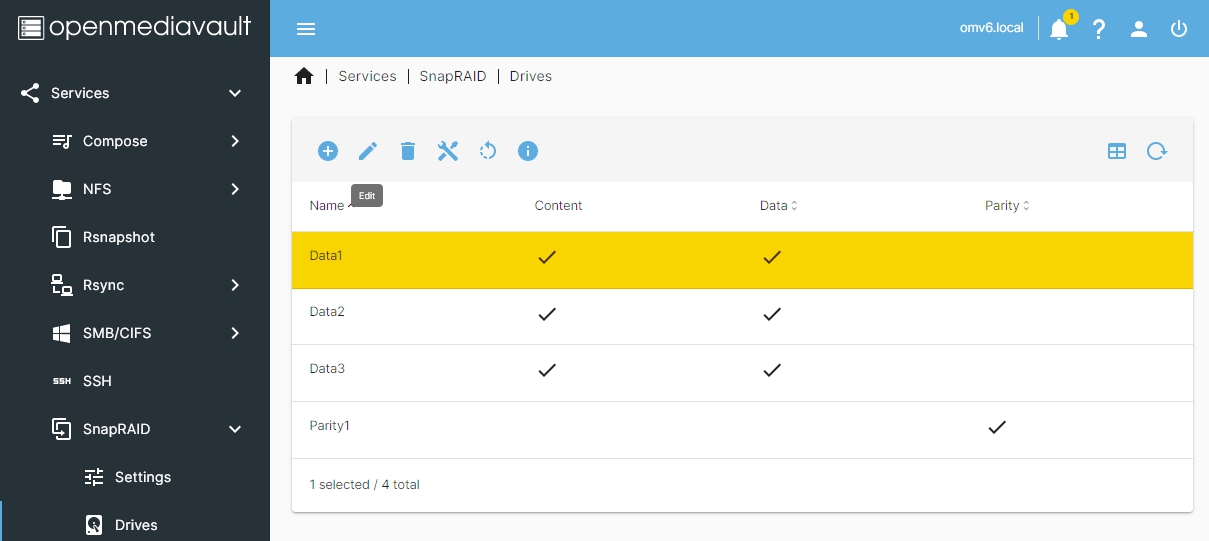
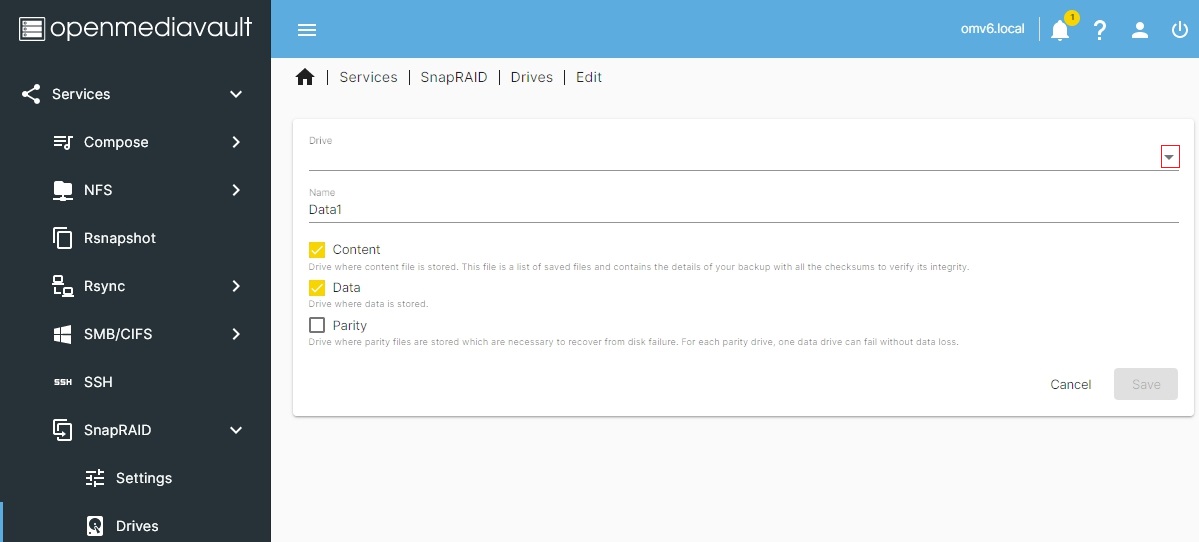
Under Services, SnapRAID, Drives, click the Create button
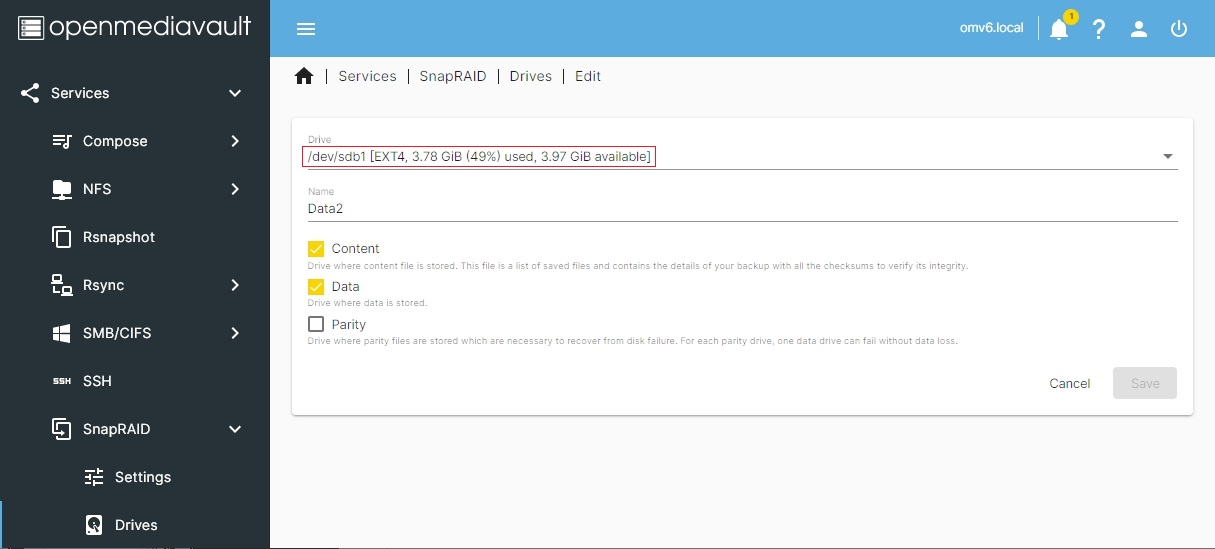
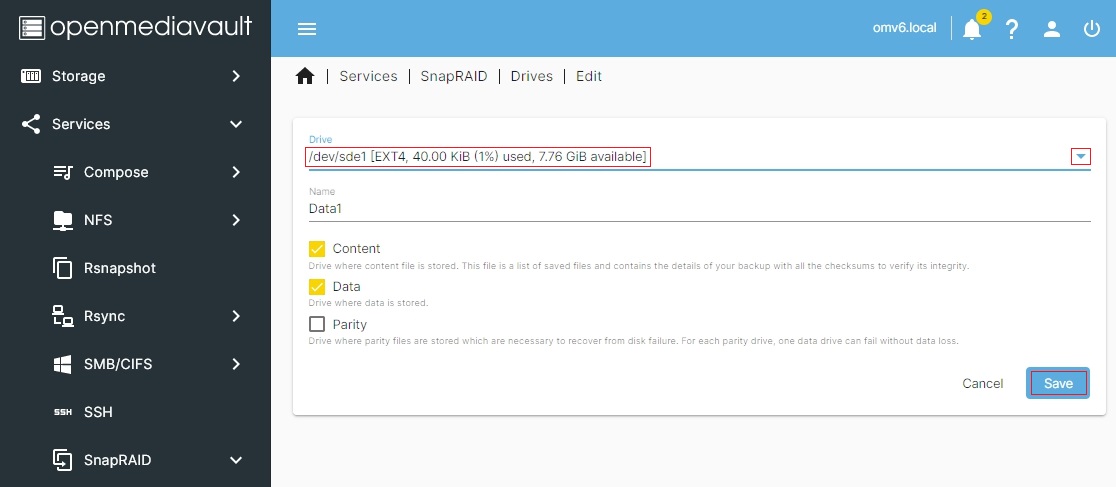
- In the Drive field: Select the drop down menu button on the right. Select the first drive to be protected by SnapRAID.
- In the Name field: Provide a name for the drive.
- Check the boxes for Content and Data
- When finished, click the Save button.

| Info Note | |
| Since at least one good copy of the Content File is required for a full drive restoration, it's best to have a copy of the Content File on all protected drives. | |
Again, the parity disk must be the same size, or larger, than the largest drive in the collection of disks to be protected. This is necessary for storing parity data.
In the Drive field: Select the drop down menu button on the right. Select the drive be the SnapRAID parity disk.
In the Name field: Provide a name for the parity drive.
Check the box for Parity.


SnapRAID Initialization
The functions of SnapRAID are supported after the first running of the sync command. Depending on the amount of data present on protected disks, the initial sync operation may take considerable time. Potentially, it may take hours. If little or no data is present on a protected disk, or set of disks, the sync operation will be near instant.
Under Services, SnapRAID, Drives, select the Tools Icon ![]() . Click on Sync.
. Click on Sync.
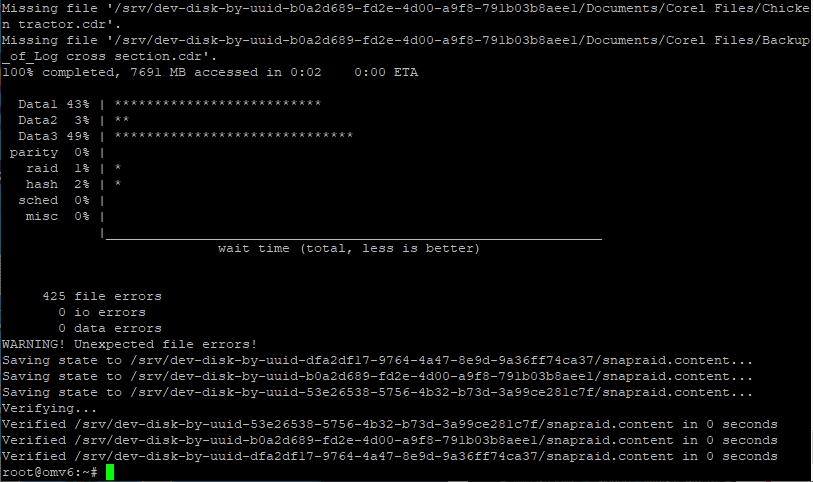
A window will pop up that will show the progress of the Sync operation. (Again, depending on the amount of data, the Sync operation may take considerable time.) When it's done, all files on protected disks will be logged into content files along with their checksums, timestamps, parity data and other information. When the command completes, END OF LINE will be displayed. At this point data on protected disks is SAFE.
The remainder of the tools, under the tools icon, can be used for manual operations within the GUI. Some of these tools are discussed in manual operations.

SnapRAID Administration
There are two methods of SnapRAID Administration and maintenance; Manual and Automated. This guide will focus, primarily, on using the automation provided by this plugin for managing SnapRAID. However, brief explanations of the manual tools available will be helpful in understanding processes that are automated.
Basic Order of Operations
The basic order of SnapRAID maintenance operations is; Diff, Sync and Scrub.
Diff
The Diff plugin tool is found under Services, SnapRAID, Drives, under the Tools Icon. ![]()
(The CLI command is snapraid diff)
Diff (short for “differences”) is the first tool used to check protected disks. The Diff tool tallies and displays files added, deleted, modified, etc., since the last sync operation. This information requires administrators to decide, whether or not, the next sync operation should take place. Why? After a sync operation, parity and content information for added, changed or deleted files is reset. Once this information has been reset, changed or deleted files before the last sync operation can not be recovered.
In accordance with the above, it's important to determine the following:
- Were there excessive deletes?
In normal data operations a hand full of user deletes are expected. In some cases, where media servers or downloaders are involve, the number of automated deletes may be higher. Excessive deletes may indicate a data disaster.
- Were there an excessive number of updated or modified files?
In most cases, administrators will have a rough idea of what is normal for updated or modified files. As an example, a huge number of file modifications may indicate a ransomware attack.
In either case, if there are excessive deletes or an excessive number of updated / modified files, Diff settings within this plugin can be used to stop an automated Sync operation, allowing for the recovery of deleted or modified files. (For recovery information see the → Fix tool.)

Sync
The Sync plugin tool is found under Services, SnapRAID, Drives, under the Tools Icon ![]() .
.
(The CLI command is snapraid sync)
After the initial sync, subsequent sync operations log only new or changed file information into content file(s). Sync also creates new checksums and updates parity information for the same files. Sync does not change checksums or parity information for unaltered files from previous sync operations. After the initial operation, with a small number of added or changed files, sync tends to run quickly.
Sync considerations:
- It's important to note that when checksums and parity information are updated for changed files, it won't be possible to restore files or folders to their previous state. For the same reason, previously deleted files can not be recovered after a Sync.
- When Sync is running, avoid adding or deleting files during the process. Otherwise file errors may result.
- If automation is used, schedule Sync operations for after hours periods where changing or adding files is unlikely to occur.
Scrub
The Scrub plugin tool is found under Services, SnapRAID, Drives, under the Tools Icon ![]() .
.
(The CLI command is snapraid scrub)
Scrub uses file information and their checksums, to check for the presence and health of files and to detect bad blocks.
If bad blocks are found, during the Scrub, SnapRAID status will list them. (In the GUI, SnapRAID status is found under Services, SnapRAID, Drives, under the information icon.

The Fix command, executed on the command line, will repair bad blocks.
Use snapraid -e fix to recover them.
Then use snapraid -p bad scrub
Fix
The Fix plugin tool is found under Services, SnapRAID, Drives, under the Tools Icon ![]() .
.
(The CLI command is snapraid fix)
If files are missing, that were not intentionally deleted, use the Fix tool to recover them.
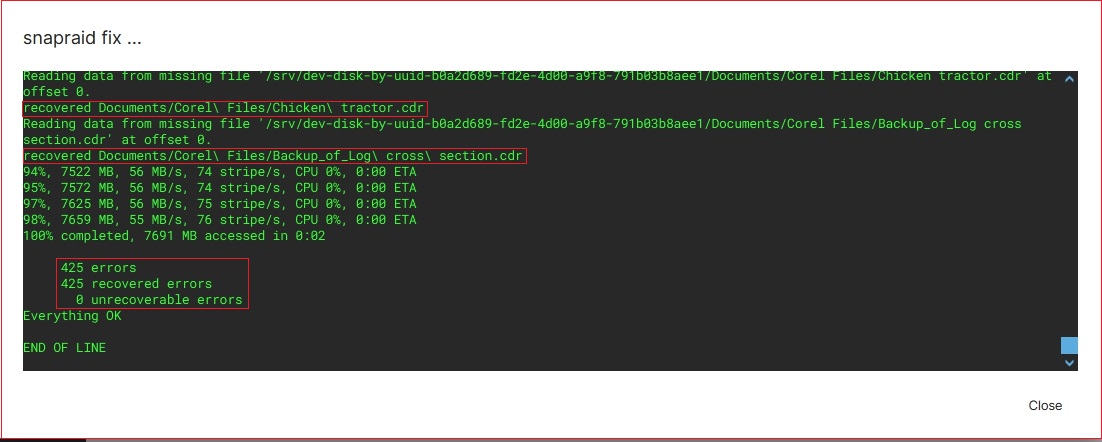
If using the plugin's Fix tool for undeleting files or for returning files to their previous state, realize that using the tool is a “shotgun” approach. The Fix tool will restore ALL deleted files and restore ALL changed files to their previous state, as of the last Sync operation. (However, when in doubt, this may to be the safest approach.)
For guidance on using the Fix command more selectively on the command line, on a “per file” basis, see the → SnapRAID Faq for details.
Summary
- Diff checks for the number of added, deleted, changed and/or restored files, before a Sync operation. If Diff output is found to have excessive deletes or unexplained changed files, Diff output can be used to halt a Sync operation, until the administrator can examine potential issues. If an excessive number of files have been deleted or changed, the Fix command should be used to correct potential problems. Correcting potential issues is necessary, before running Sync. (After Sync runs, previous file alterations or deletions will be permanent.)
- Sync adds new files to content file(s), assigns checksums to new files and resets checksums to existing but changed files. Sync also calculates parity information for new files and updates parity information for changed files.
- Scrub checks for parity errors and bad blocks. Scrub should be done after a sync operation to avoid errors caused by deleted or changed files.
Automation
Automation of SnapRAID housekeeping is done with what is known as a “Diff Script”.
In a Diff script, the first command Diff, checks primarily for deleted, changed or added files. Inputs to this script set thresholds on what is (or is not) allowed before running the next command.
The second command, Sync, catalogues new files and assigns checksums and creates parity information for them. Sync also updates checksums and parity information for changed files.
Finally the third command, Scrub, is run to check the health of a specified percentage of existing files.
This plugin provides Diff script functionality, with user provided inputs, that can be varied according to the user's use case. After commands are run, the plugin will provide the user with an e-mail of the outputs from each command.
Diff Script Setup
Under, Services, SnapRAID, Settings:
The following screen is where various parameters for the SnapRAID plugin's Diff script are set.
1. The defaults in these fields are fine, for most users.
2. Send Mail will work only if users have configured and tested notifications, as outlined here → Server Notifications. Configuring Server Notifications and selecting Send Mail is highly recommended.
3. Run Scrub This is a recommended action to complete the SnapRAID maintenance cycle. While Diff and Sync run quickly, dependent of the size of protected disks and other factors, Scrub may take considerable time.
4. Pre-hash is an option that is used together with the Sync command. Pre-hash assigns a checksum before parity calculations are done. It's an extra safety measure that reads data two times to insure integrity.
5. Scrub Percentage and Scrub Frequency. These parameters are options that are used with the Scrub command.
- When Scrub Frequency is specified, (in this instance “10” is used) the scrub command will not scrub files that have been scrubbed at any time during the last 10 days.
- When Scrub Percentage is specified, (in this instance “25” is used) the scrub command will scrub 25% of all protected files that have not been scrubbed during the last 10 days. If more than 25% of all files have not been scrubbed in the last 10 days, the oldest 25% of these files will be scrubbed.
With a scrub percentage of 25, with scrubs scheduled to run once a week, the entire array will be scrubbed once a month. Depending on the amount of data on protected disks and the time involved in scrubbing protected disks, these parameters may need adjustment.
6. The Update Threshold and Delete Threshold are parameters for the Diff script.
- Update Threshold sets the upper limit allowed for new files and updated / altered files.
- Delete Threshold sets the upper limit for allowed file deletes.
If either of the above thresholds are exceeded, the Diff script will halt and an E-mail will be sent to the user admin advising of the result. Sync and Scrub will not be performed.
(As noted in the GUI, if these thresholds are set to 0, Sync and Scrub will be performed regardless.)

Scheduling the Diff Script
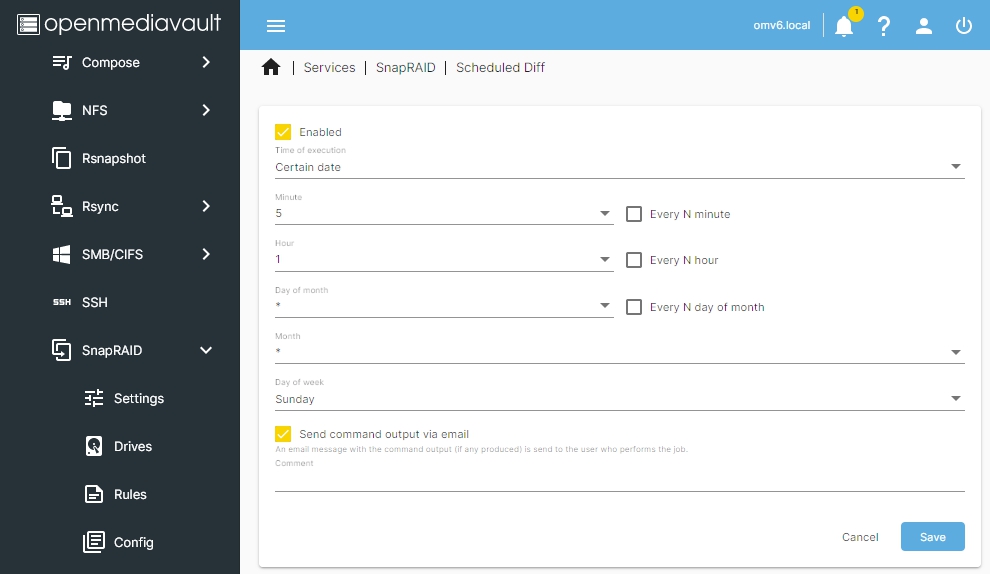
In the screen shown above, click on Schedule Diff. The Scheduled Diff window will appear as follows.
This example is configured as follows:
- The Enabled box is checked.
Under Time of execution:
- As shown in Minute and Hour, the Diff Script will start at 01:05AM
- In this case, under Day of the week, jobs are run only on Sunday.
- Check the Send command output via email.
- Finally, click the Save button.
Diff Script Considerations
A consideration, when running the Diff Script, is to prevent file changes, additions or deletions, between a Sync operation and the subsequent Scrub operation. If file changes occur during these operations, SnapRAID errors will result. To prevent these errors from occurring, it's best to automate the Diff Script and run it after-hours when users are unlikely to add or change files.
When it comes to speed of operations, in most use cases, Diff and Sync will be fast. However, depending on the scrub percentage chosen, the total amount of data on the collection of protected disks, the speed of protected disks and other factors, a Scrub may take several hours. If large amounts of data exist within a SnapRAID array, to keep the Scrub operation within a reasonable period of time, it may be necessary to reduce the percentage scrubbed. As an anecdotal example, if it takes 10 hours to scrub 50% of an array, it will take 5 hours to scrub 25% of the array. Adjusting the percentage scrubbed and the interval in Scrub Frequency may be necessary to keep a Scrub within an after hours window.
Notes
- Docker Containers that are stored on data drives should be paused or stopped during a sync. Otherwise Sync errors may result.
- It is recommended that SnapRAID's parity drive is relatively new and closely monitored using SMART. Without parity data, recoveries are not possible.
- For a better understanding of the SnapRAID works and it's features, reading the → SnapRAID manual is recommended.
Other Useful Command Line Tools
snapraid touch
If files are detected with “zero sub-second timestamps”, the command snapraid touch will correct this.
sync –force-full
If parity issues with the parity drive are persistent and the user admin is reasonably sure there are no data issues, the command sync –force-full may correct the problem. Since this command is the rough equivalent of the a “first sync”, depending on the amount of data on protected disks, it may take several hours to complete.
Normal Operations
As it is when using any “RAID like” package, hard drive monitoring is highly recommend. Advanced notice of the potential for hard drive failure, and taking action to replace a failing drive, will go a long way toward preventing the loss or corruption of data.
For the admin's convenience, much of the monitoring processes can be automated as follows:
Configuring → Server Notifications and configuring → SMART, as recommend, will go a long way toward providing as much notice as possible that a hard drive is beginning to fail. If user / admins receive SMART advisory E-mails regarding a particular drive, take note of the → SMART attributes that are associated with drive failure. In addition, the SnapRAID plugin has a “drive failure probability” indicator. It can be found under; Services, SnapRAID, Drives. Under the Info button ![]() select SMART from the drop down menu.
select SMART from the drop down menu.
If symptoms of a failing drive are noted, see Recovery Operations (below).

Recovery Operations
Recovery examples for single files, missing files, etc., are provided in the → SnapRAID FAQ page.
Recovering a Failed Drive
General
One of the more desirable features of SnapRAID is it's ability to restore data to a replacement drive. There are, however, many factors to consider when dealing with a failing hard drive.
Contrary to popular belief, spinning drives rarely fail “all at once” as if turning off a light switch off. In many cases, drives will begin to reallocate sectors among other symptoms that indicate that they are beginning to fail. If these symptoms are ignored, the drive may begin to corrupt data that is stored on it or written to it.
When it has been determined that a drive is beginning to fail, it is crucial that user / admins DO NOT run the Diff Script OR a manual Sync operation.
Prepare for Drive Replacement
Replacing a failing or failed drive, requires a number of preliminary steps:
- First it's crucial that the Diff script, if automated, is turned OFF.
- Do not run a Snyc operation until after the replacement is completed.
- If user / admins have automated processes (downloaders, media centers, etc.) that save or move files on SnapRAID protected drives, they should be paused or turned off.
- Server users should be informed to not use the server during the drive replacement. (This could be enforced by temporarily disabling file sharing services like SMB or NFS.)
Failure Scenario
In the following scenario, a SnapRAID protected drive has failed completely.
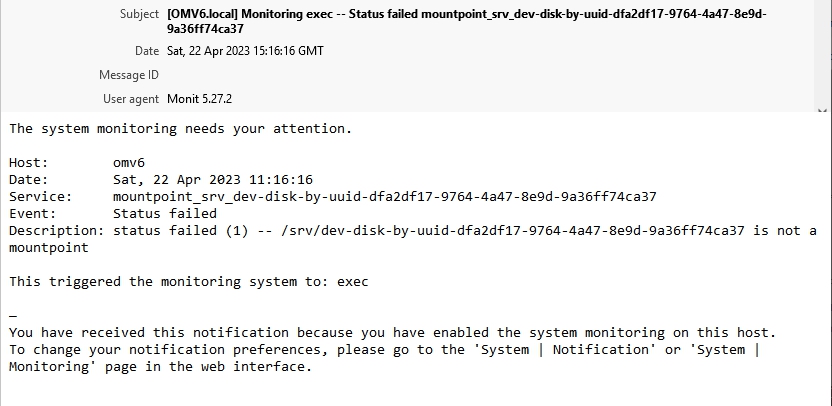
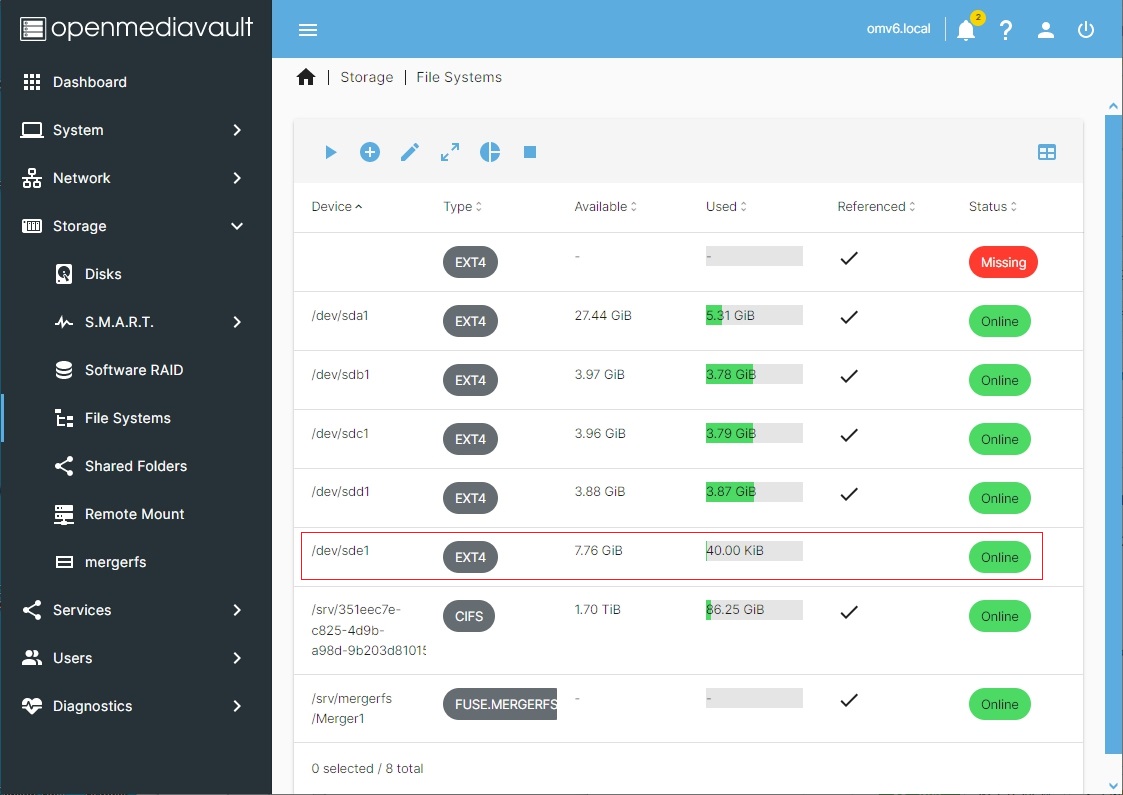
When server notifications are → configured as recommended , user / admins are notified by e-mail of file system failures and other issues.
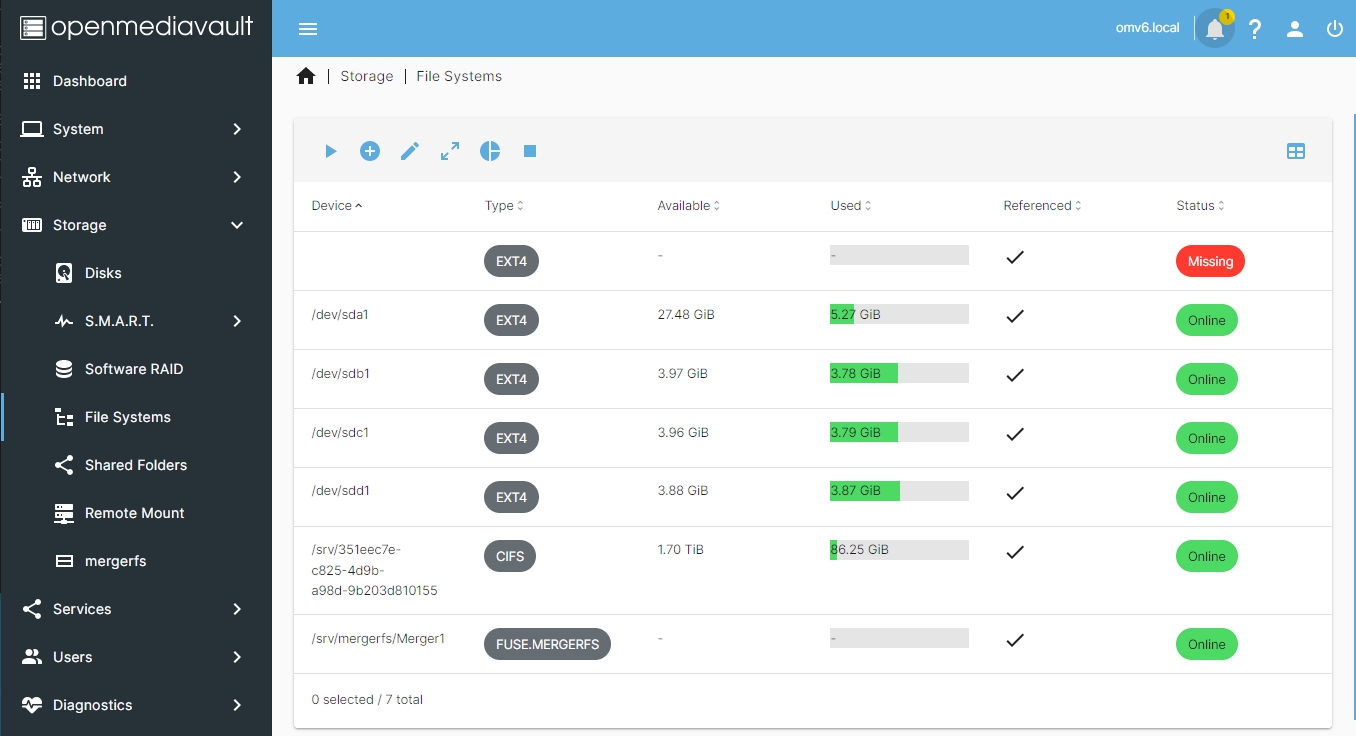
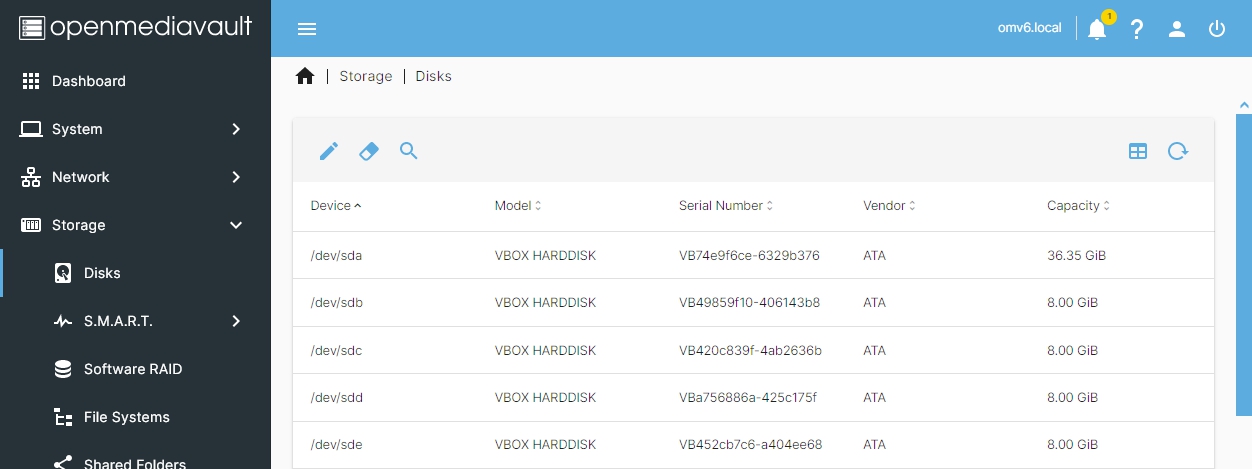
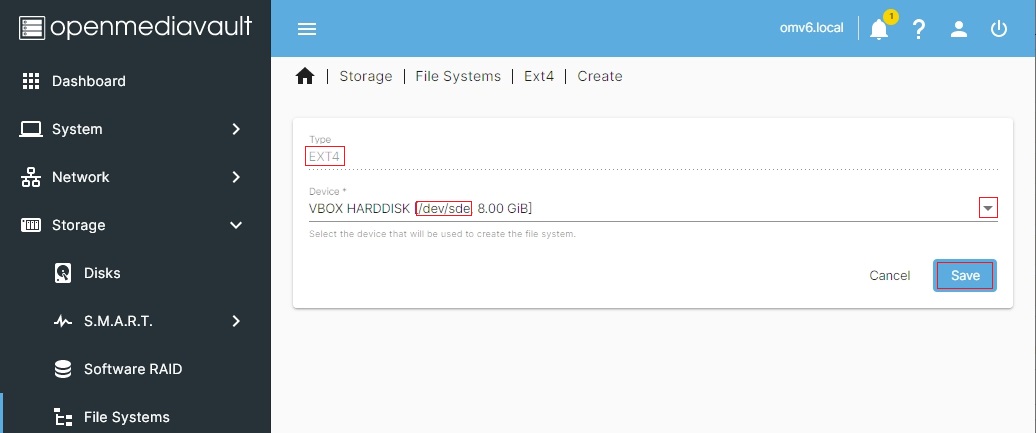
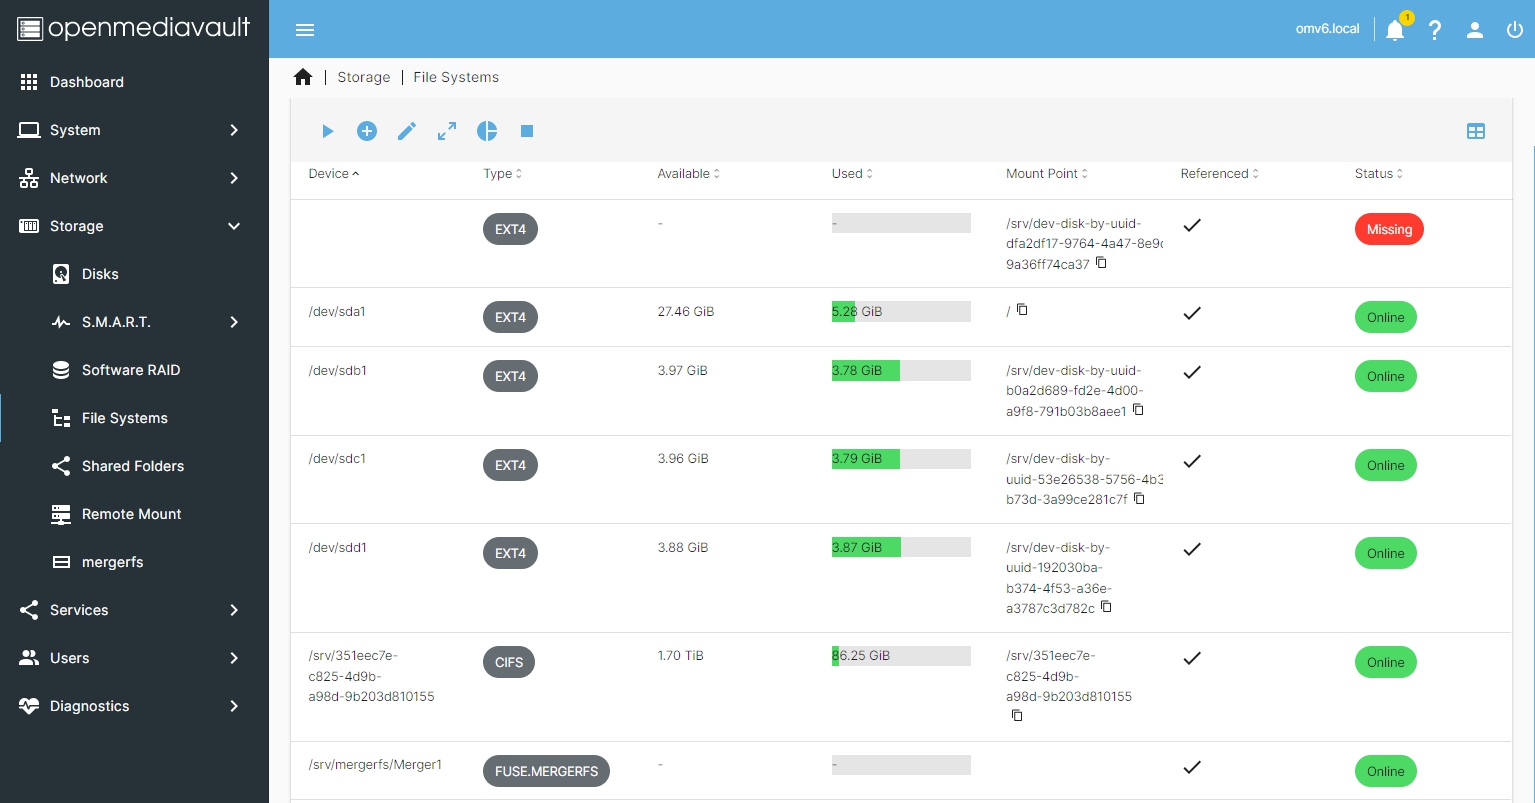
Under Storage, Filesystems:
- Click the “Create and Mount a File System” button ![]() .
.
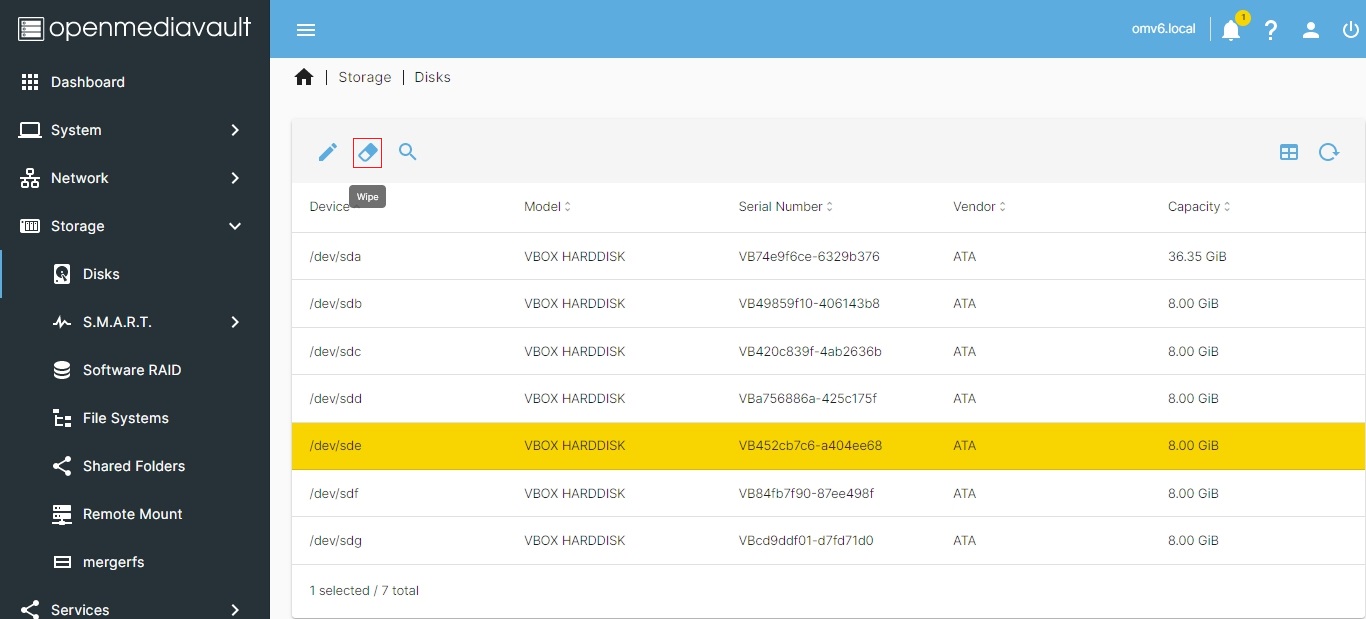
- In this example case, the file system selected from the pop-down will be EXT4.
- In the Device * pop-down, /dev/sde is selected.
- Click the Save button.
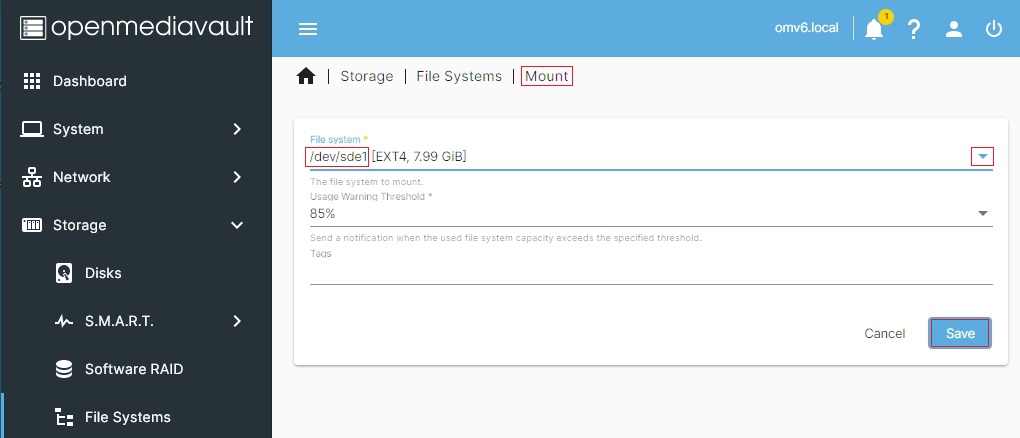
The following Mount window will be immediately presented.
In the File system * field, click the pop-down arrow and select the previously formatted drive (/dev/sde) to be mounted.
Restore Data
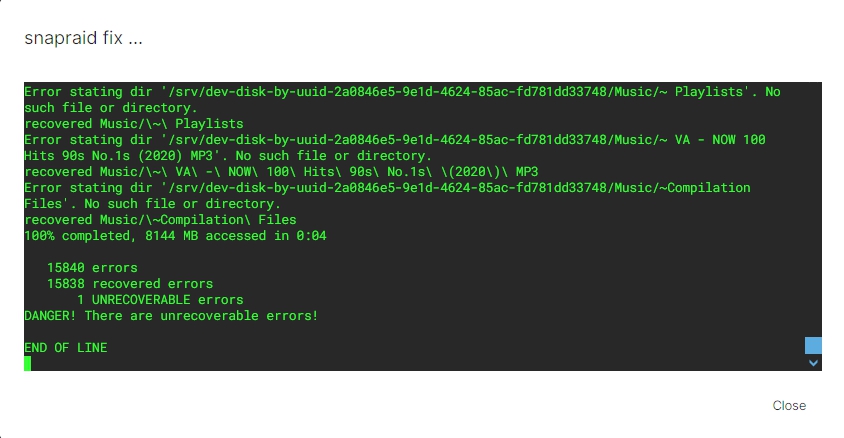
In the same window (Services, SnapRAID, Drives) select the Tools icon ![]() :, and select Fix from the pop-down menu list.
:, and select Fix from the pop-down menu list.
Depending on the size and speed of the drive and the amount of data, the Fix command may run for several hours.
When END OF LINE is displayed, the Fix operation is complete.
Under, Services, SnapRAID, Drives, select the Tools icon ![]() . In the pop-down menu select Sync. This will update the content file with the new drive's UUID. (This is noted in the Sync output window.)
. In the pop-down menu select Sync. This will update the content file with the new drive's UUID. (This is noted in the Sync output window.)
This concludes data restoration to a SnapRAID protected drive.
MergerFS users skip see the section below titled; Replacing a Failed Drive in MergerFS.
The remainder of tasks, within OMV, would be to repointing Shared Folders and other services to the replacement drive. To repoint shared folders, see the guidance provided → here.
When all references to the failed drive have been redirected to the new drive, or removed, under Storage, File Systems, the “Referenced” check mark should be removed. Highlight the missing drive, unmount it and Apply the change.
Finally, re-enable all automated tasks and enable SMB or NFS network shares (if previously disabled.)
Replacing a Failed Drive in MergerFS
| Note | |
| Device names, dev/sda1, dev/sdb1, etc., may be reordered when a device goes "missing". Device name designations are dependent on BIOS and are subject to change after a reboot. Mount Points, which are based on a drive's UUID, do not change. | |
Add the Mount Point column:
Under Storage, File Systems, Select the Column Icon, ![]() , and select Mount Point.
, and select Mount Point.

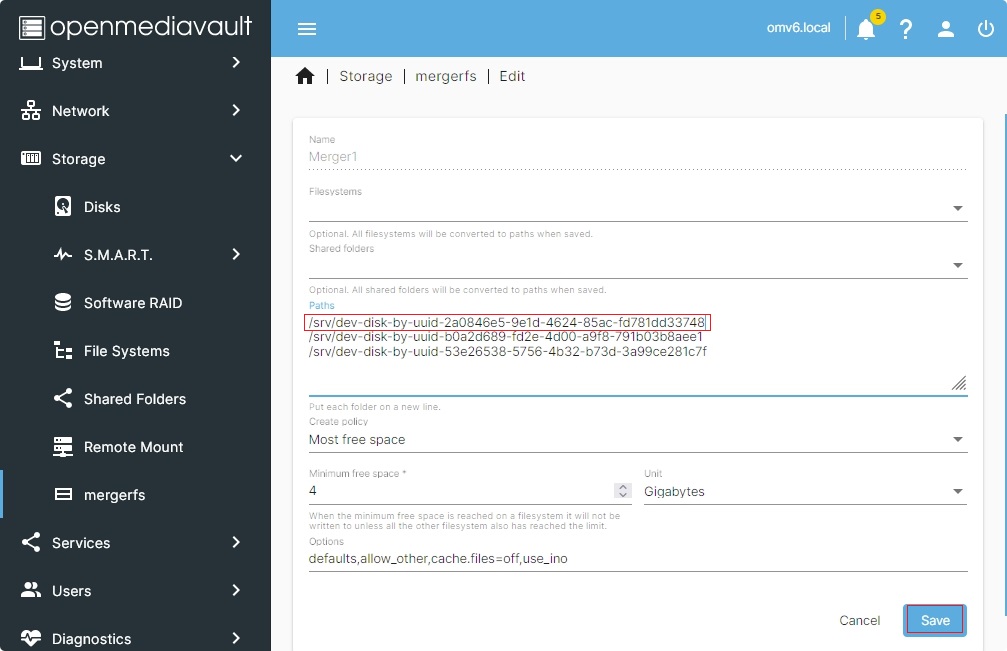
The result now shows mount points by UUID. Where device names may be reordered on bootup, UUID's do not change.
Note the “Copy and Paste” Icon![]() at the end of each drive UUID. This tool copies exact drive paths and UUID's to the clipboard.
at the end of each drive UUID. This tool copies exact drive paths and UUID's to the clipboard.
Under Storage, mergerfs, Highlight the MergerFS array click the Edit icon ![]() .
.
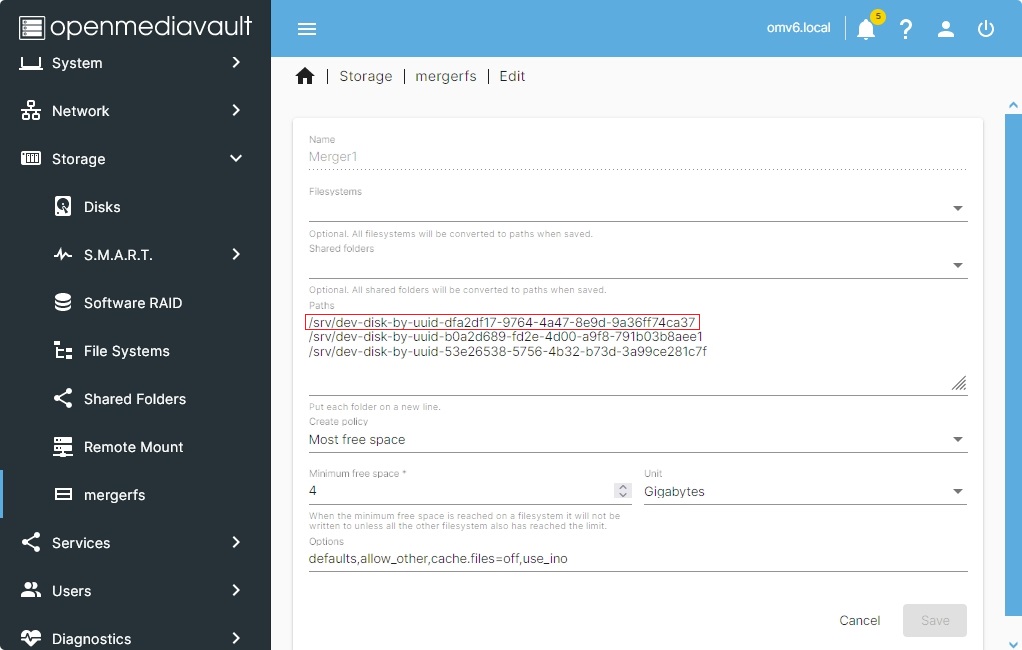
Under Storage, File Systems, the missing drive should no longer be “Referenced”. Highlight the missing drive, unmount it and Apply the change.
Finally, re-enable all automated tasks and enable network shares (if previously disabled.)
This concludes adding a SnapRAID restored drive to a MergerFS array.