Docker in OMV 6
Summary
This document establishes a method to successfully install a docker application on OMV.
- The OMV forum is a two-way tool. It provides users with solutions to their problems. It gives developers insight into the problems users are having and allows them to implement appropriate solutions in software and methods.
- In the case of docker, the forum has received numerous queries from users regarding docker configuration issues. Building on that experience from the forum, this guide lays out a simple docker setup method that fixes the vast majority of these issues right out of the box.
- We will use docker-compose due to its ease of use and the integration offered by the openmediavault-compose plugin in OMV.
This document is divided into four parts
-
- describes how we are going to design our system and what are the reasons for doing it this way.
-
- describes the steps to prepare and install docker as described in the previous part.
-
- is a practical case of installing an application, in this case Jellyfin, explaining the necessary steps to get the container working.
-
- explains some useful procedures for managing containers during the installation process.
What is docker?
 “ A container is a standard unit of software that packages up code and all its dependencies so the application runs quickly and reliably from one computing environment to another. A Docker container image is a lightweight, standalone, executable package of software that includes everything needed to run an application: code, runtime, system tools, system libraries and settings.
Container images become containers at runtime and in the case of Docker containers – images become containers when they run on Docker Engine. Available for both Linux and Windows-based applications, containerized software will always run the same, regardless of the infrastructure. Containers isolate software from its environment and ensure that it works uniformly despite differences for instance between development and staging. ”
Or, more briefly, it is a way to install any application on OMV without breaking the system.
That's all very well, but… What the hell is docker? :)
 After a while I read this definition again and I don't even understand it, so I'll try to explain it in a simpler way.
Docker is a system that allows you to run an application using the main resources of the system but in such a way that it does not have the capacity to modify (damage) the existing system. The operation is similar to a virtual machine but lighter.
Docker can be run from the command line directly. A single command with the right parameters will do all the work. Docker-compose was developed to make it easy to create that command and those parameters using easy-to-read configuration files. The openmediavault-compose plugin uses docker-compose for container management.
Docker is based on packages (images) that are usually created by a third party and downloaded from a remote repository. Using docker-compose we create a compose file that allows us to configure various parameters to define and create a container from that image. For example, the access ports to the application or the system folders that will be accessible to that container. If we run that compose file it will download the image and create the container following the instructions we have given it.
The author of the image we have downloaded will usually do maintenance and at some point create another updated image, at which point we need to update our container. The way to update a container is to delete it and recreate it again by downloading a new updated image. To recreate it simply run the compose file again after removing the container.
While we use the container, depending on the type of application it is, we will probably modify some files inside it, for example to define an access username and password, or other configurations. If we delete the container without doing anything else we will lose that data. This is what we will call persistent data. We need to keep this persistent data somehow if we want to be able to update this container, remember that to update it we must first delete it.
The way to keep persistent data is resolved in docker by mapping volumes. What we do is define a real folder on our system and “trick” the container into writing to that folder as if it were one of its internal folders. In this way, that folder will collect all that data and it will still be there when we delete the container.
Now yes, we can delete the container, download a new image, recreate the container, and when it starts you can continue to use the persistent data in that folder. Nice!

Basic concepts
This procedure aims to use docker-compose through the plugin in a simple and safe way.
We need to define several folders needed for docker-compose, the plugin will help with this.
We will also define a specific user to run the containers under this user.
FOLDERS AND LOCATIONS TO USE DOCKER-COMPOSE WITH THE PLUG-IN.
 appdata folder (or whatever you want to call it)
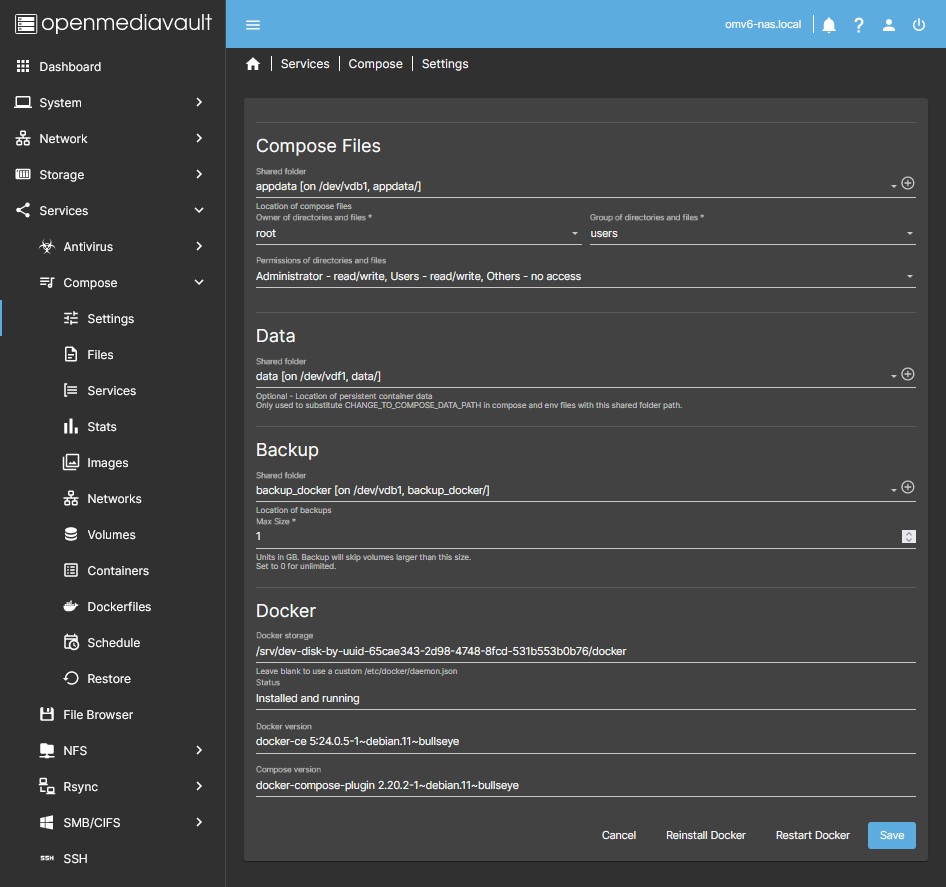
- In the plugin GUI this folder corresponds to the Shared folder field in the Compose Files section in Services > Compose > Settings.
- This folder will house the configuration files and persistent data of the containers by default.
- The plugin will create subfolders inside the appdata folder for each compose file we generate. The name of each subfolder will be the same as the compose file. This subfolder will contain a copy of the yml file and env file generated in the GUI. These are just backups, they should not be modified except in the plugin GUI.
- If we use relative paths for the volumes in the containers those volumes will be generated in these subfolders. For example, if we create a Jellyfin container and define this volume
- ./config:/configthe config folder will be created in the subfolder of that container in this case/appdata/jellyfin/config. - Generally it is not necessary and the simplest way is to use the procedure above, but if you need some volume to be stored elsewhere simply use the full path in the compose file instead of a relative path. Something like this
- /srv/dev-disk-by-uuid-384444bb-f020-4492-acd2-5997e908f49f/app/jellyfin/config:/configwill cause the files in the config folder of the container to appear in the path/srv/ dev-disk-by-uuid-384444bb-f020-4492-acd2-5997e908f49f/app/jellyfin/config. You can use openmediavault-symlink to simplify those paths with uuid, docker-compose accepts symlinks just fine.
data folder (or whatever you want to call it)
- There is no space in the plugin settings to define this or these folders. The GUI establishes a field where you define a folder to store the persistent data, the appdata folder defined in the previous section. If you use relative paths for this data, nothing else will be necessary. Then you can use this for another purpose, defining a path to the data folder that will make it easier for us to compose later. You can use this field as you see fit, this guide proposes using relative paths for persistent data and using this field to define the data folder.
- In the plugin GUI this folder corresponds to the Shared folder field in the Data section in Services > Compose > Settings.
- In many containers you will have the need to “tell” the container where the files it needs for its operation are, for example in Jellyfin we refer to movies, photos, etc. The plugin allows you to set a shared folder so that in the compose file we can refer to it using the
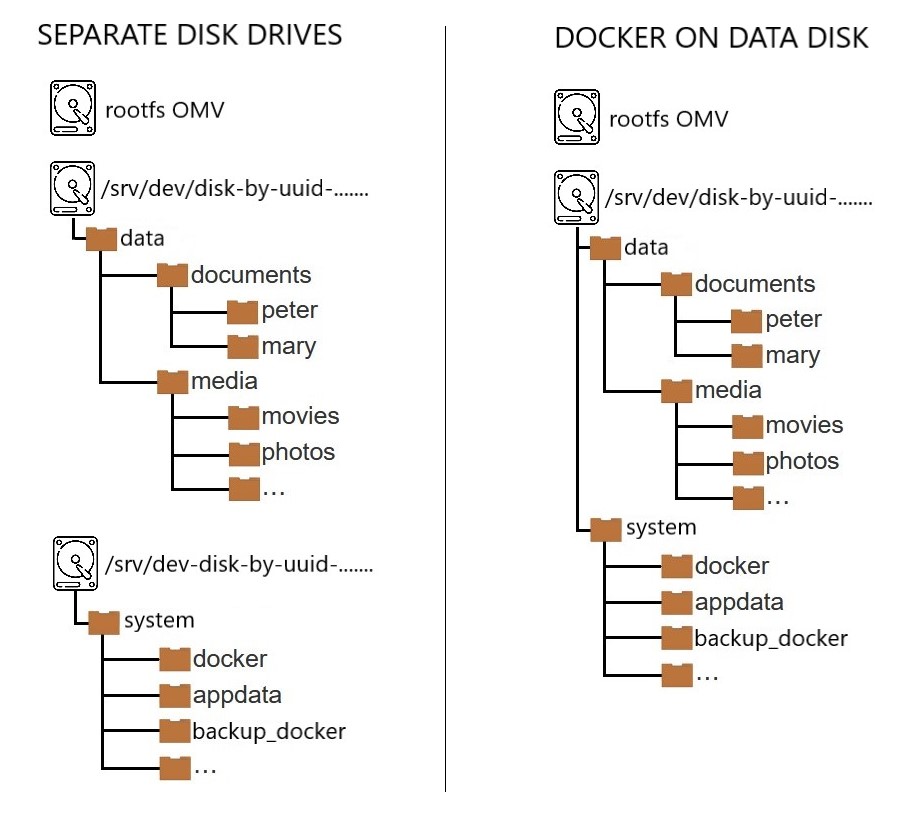
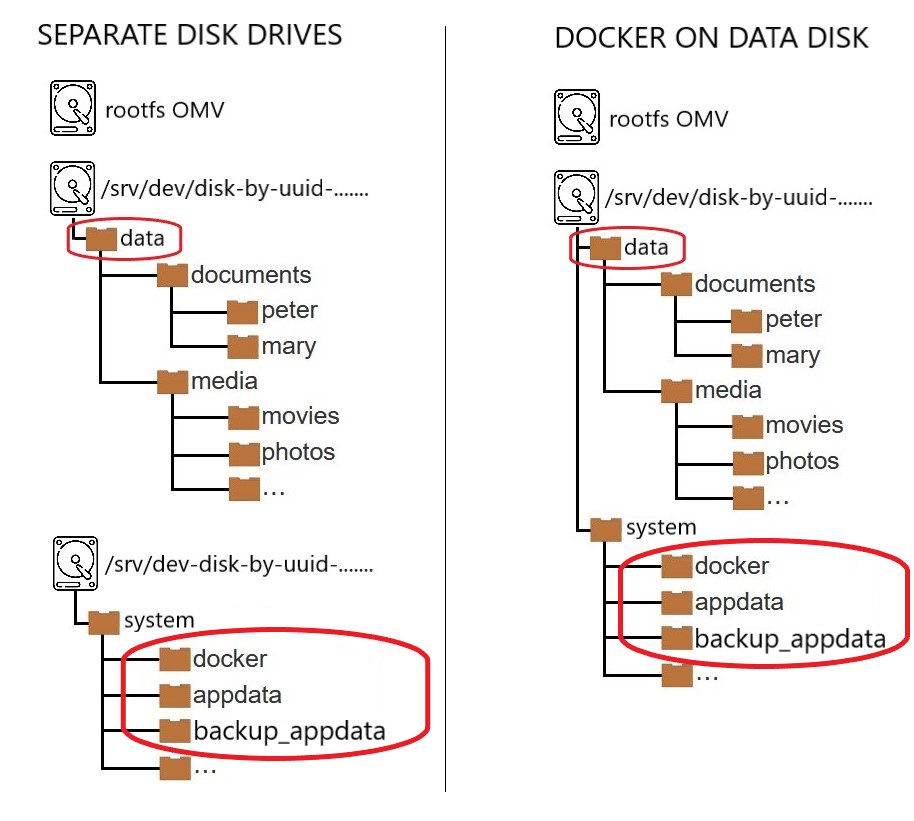
CHANGE_TO_COMPOSE_DATA_PATHexpression. This will allow easily reusable paths to be set in compose files. - For example, if our data structure is like in the attached image, we can create the shared folder
/datathat contains all our data (it is not necessary to share the folders, it is enough to create them in the OMV GUI). In the compose file we could do this to define the movies folder- CHANGE_TO_COMPOSE_DATA_PATH/media/movies:/moviesand the container will have access to the/moviesfolder on our server.
backup_appdata folder (or whatever you want to call it)
- In the plugin GUI this folder corresponds to the Shared Folder field in the Backup section in Services > Compose > Settings.
- This folder can be used to back up persistent docker-compose files. It is not essential but highly recommended. You can schedule the backups in the GUI of the plugin and the plugin will take care of stopping the containers, doing a synchronization of those files in the defined folder and starting the containers again. You can then use any specialized application to make versioned, compressed, etc. backups of this folder where the files are consistent because they were copied with the stopped containers.
docker folder (or whatever you want to call it)
- In the plugin GUI this folder corresponds to the Docker storage field in Services > Compose > Settings.
- Docker is installed by default in the
/var/lib/dockerfolder inside the OMV operating system drive. The necessary files for docker to work, containers, downloaded images, docker networks, etc. will be generated in this folder. This field allows you to modify the default location of this folder. - The fact that this folder resides on the operating system drive can cause problems, such as the operating system drive running out of space, or that this drive is a USB flash drive or an SD card and we are not interested in doing more writes of the essential ones in it, are also of low performance (this does not affect OMV but docker does). In addition, in case of reinstallation of OMV we would lose the containers and everything that is in that folder.
- All these problems can be easily fixed by relocating the docker folder to another drive on our system other than where the OMV operating system is. That unit must meet the following requirements:
- As a general rule we will choose a drive with an EXT4 file system.
- If the drive is fast, like an SSD or nmve, applications will run faster.
- Make sure you have enough space, the docker folder can take up a lot of space. 60GB may be an acceptable minimum depending on what you are going to install.
- mergerfs is not suitable for hosting the docker folder spanned across multiple disks. If you don't have alternatives you can use one of the disks in the pool instead of the pool to host the folder. If you want to do it this way create a folder in the mount path of one of the disks instead of using the pool path. This way the mergerfs logic will disappear from the docker procedures. If you do this never use the mergerfs leveling tool, doing so will break docker.
- BTRFS and ZFS have incompatibilities with docker. They can be used to host the docker folder but doing so requires additional actions. You can consult the docker documentation if you want to use these file systems, in both cases it can be solved by creating block devices.
- NTFS is prohibited. Docker won't work. Do not use NTFS to host docker folders or you will have permissions issues. Always use native Linux file systems.
| Note | |
|
If you don't want to use a dedicated docker disk you can use any disk formatted preferably in EXT4. Avoid mounting docker folders under mergerfs. If you have installed docker on another hard drive you can delete the contents of the /var/lib/docker folder to recover that space on the system drive. This will not affect how docker works. | |
| Warning | |
|
Never use an NTFS file system to host docker folders. NTFS is not native to Linux and will cause file permission issues. | |
USER FOR DOCKER. appuser. (or whatever you want to call it)
- A user that will be in charge of executing the container, which we will call appuser.
- Docker applications interact with the system, read or write files, access networks, etc.
- Docker makes the application behave on the system as if it were a user. If an application reads a file, the system doesn't “see” an application reading a file, it “sees” a user reading a file.
- The user that docker assigns to play the role of the application is decided by us when configuring the application, later we will see how to do this.
- From the above it can be deduced that the permissions that we grant to this user in our system will be the permissions that the application will enjoy in our system.
- If we want a docker application (for example jellyfin) to be able to read a data folder on our system (for example the movies folder) to be able to search for a file and work with this file (for example display a movie on a TV), the user defined by docker for that app must have read permissions on that folder.
- If we want a docker application to be unable to read or write to a folder (for example the root folder) because it could be a security problem, it is enough to deny that user access to that folder.
- Therefore, in order to ensure that the container only has access to the parts of our system that we want, we will create a user for this purpose, which we will call appuser.
- Generally, one user for all containers is sufficient. If you have any containers that need special permissions, it's a good idea to create a user for that application only.
- If you want more security you can create a user for each container, that way you can adjust the permissions of each application separately.
- As we are going to configure our system, the user appuser must have read and write access to at least the appdata and compose folders. We must also grant permissions to the folders where our data is located that needs to be read or written (for example, the movies folder for the jellyfin application)
| Beginners Note | |
|
Except for very controlled special cases, never designate the admin user (UID=998) or the root user (UID=0) to manage a container. This is a serious security flaw. If we do this we are giving the container complete freedom to do whatever it wants in our system. Have you created this container? Do you know what he is capable of doing? | |
GLOBAL ENVIRONMENTAL VARIABLES
Global environment variables will be used in the procedure that follows this document.
The plugin allows you to define global environment variables in a file that will be available to all running containers. This means that the variables defined in this file can be used in the different compose files, and when we do so, each variable in the compose file will be replaced by the value that we have defined in the global variable.
This is very useful for defining paths to folders or the user running the container. We define these values once and have them updated automatically in all containers.
Example:
- Variables defined in the global variables file:
PUID=1000
PGID=100
TZ=Europe/Madrid
SSD=/srv/dev-disk-by-uuid-8a3c0a8f-75bb-47b0-bccb-cec13ca5bb85
DATA=/srv/dev-disk-by-uuid-384444bb-f020-4492-acd2-5997e908f49f
- Now we could define the following compose file:
---
version: "2.1"
services:
  jellyfin:
    image: lscr.io/linuxserver/jellyfin:latest
    container_name: jellyfin
    environment:
      - PUID=${PUID}
      - PGID=${PGID}
      - TZ=${TZ}
    volumes:
      - ${SSD}/app/jellyfin:/config
      - ${SSD}/app/jellyfin/cache:/cache
      - ${DATA}/media:/media
    ports:
      - 8096:8096
    restart: unless-stopped
- And the file that would actually be executed would be this:
---
version: "2.1"
services:
  jellyfin:
    image: lscr.io/linuxserver/jellyfin:latest
    container_name: jellyfin
    environment:
      - PUID=1000
      - PGID=100
      - TZ=Europe/Madrid
    volumes:
      - /srv/dev-disk-by-uuid-8a3c0a8f-75bb-47b0-bccb-cec13ca5bb85/app/jellyfin:/config
      - /srv/dev-disk-by-uuid-8a3c0a8f-75bb-47b0-bccb-cec13ca5bb85/app/jellyfin/cache:/cache
      - /srv/dev-disk-by-uuid-384444bb-f020-4492-acd2-5997e908f49f/media:/media
    ports:
      - 8096:8096
    restart: unless-stopped
The advantage of using this system is that we define the compose file once and never need to modify it. Even if we reinstall the OMV system we just need to update those global variables and all our containers will be up to date and continue to work as before.
For paths you could combine this system with symlinks, if you still need to use symlinks for other reasons. If you don't need it you can skip the use of symbolic links, this system is more than enough for handling containers.
| Note | |
|
At this time, the plug-in backup utility does not resolve variables in volume paths. Define paths using global environment variables only for paths that you do not need to include in a backup. Alternatively you can use symlinks in the compose file. | |
Why use global environment variables
- If you change a path or any other variable that affects multiple containers, it is enough to vary this value in the global environment variables file. The value will change automatically in all containers. Useful if you change a data drive, or if you reinstall OMV and change routes, for example.
- It is integrated into the plugin, it is enough to press a button to access the file to directly introduce the variables without doing anything else.
- They allow us to define a value once and all the containers that we create will use this value automatically.
- Useful to define routes with UUID, it is only necessary to enter it once and we will have it available to use in each container.
- Useful to reuse containers if we perform a reinstallation of OMV. We just need to update the values of these variables and the containers will continue to work just like before.
- Avoid using symbolic links if you don't need them for another reason. Despite that you could still combine the two systems if you need to.
Why use symlinks
- It is integrated into OMV thanks to the openmediavault-symlinks plugin
- When working with container configuration yaml files, we may need to copy our filesystem mount paths if we don't want to use absolute paths with UUIDs. These routes are fluid, very long and cumbersome to manage.
- A symlink is a direct access to the folder that we need. This is useful to avoid copying and pasting the long uuid paths.
- It makes it easy to quickly change the path of a folder in all the containers without modifying them one by one. Just modify a symlink and all containers will be up to date.
- The use of symbolic links is not mandatory, the goal is ease of use. If you prefer to use full paths, you can skip this point. Also, unless you have a reason to use symlinks, it is recommended to use global environment variables, since they allow you to do the same not only with file paths but with any type of variable.
Why use docker-compose
- It is integrated into OMV thanks to the openmediavault-compose plugin
- It is easy to implement, manage, edit, configure…
- Most docker container publishers offer a ready stack for docker-compose in their documentation.
- Sometimes a container publisher does not provide a stack for docker-compose. In that case you can generate it yourself with a little experience. There are also tools to do it automatically online like this one. www.composerize.com
- If you already have a working container you can generate the stack automatically from the openmediavault-compose plugin with autocompose
Why use openmediavault-compose
- openmediavault-compose
- It covers all the needs of any user to use docker-compose. If you need anything else, ask on the forum and you will get an answer.
- It is integrated into the OMV GUI and into the system.
- It is automatically updated along with all other system updates.
- Makes it easy to manage and store container composition files.
- openmediavault plugins are under constant development and new features and fixes are added as the need arises.
- It has the support of the OMV forum to solve any problem.
- Portainer
- It is not integrated into the GUI, you have to access it through another tab and port of your browser.
- It is one more container, it needs manual updates periodically.
- It does not store the composition files, you have to do it yourself.
- If you have a functional problem you will have to request assistance from the Portainer developers.
- Disables container management from openmediavault-compose.
Why use 64 bits?
- You should use a 64-bit system if your hardware allows it.
- 32-bit systems have been out of use for many years now. The compatibility of many software packages is still maintained, but as time goes by they are disappearing.
- Docker starts to be inaccessible for 32-bit systems. Many reputable container builders are stopping releasing 32-bit versions. OMV can also cause problems on 32-bit systems with docker.

Preparing and Installing Docker
1. Previous steps
- If your system allows it, install a dedicated drive to host system data outside of the OS drive, preferably SSD or nvme for speed. This unit can be used for docker, kvm, or other purposes, format to EXT4 and mount to the file system. If it is not possible you can skip this step and use your data disk for docker. New User Guide - A basic data drive
- Install openmediavault-omvextrasorg.
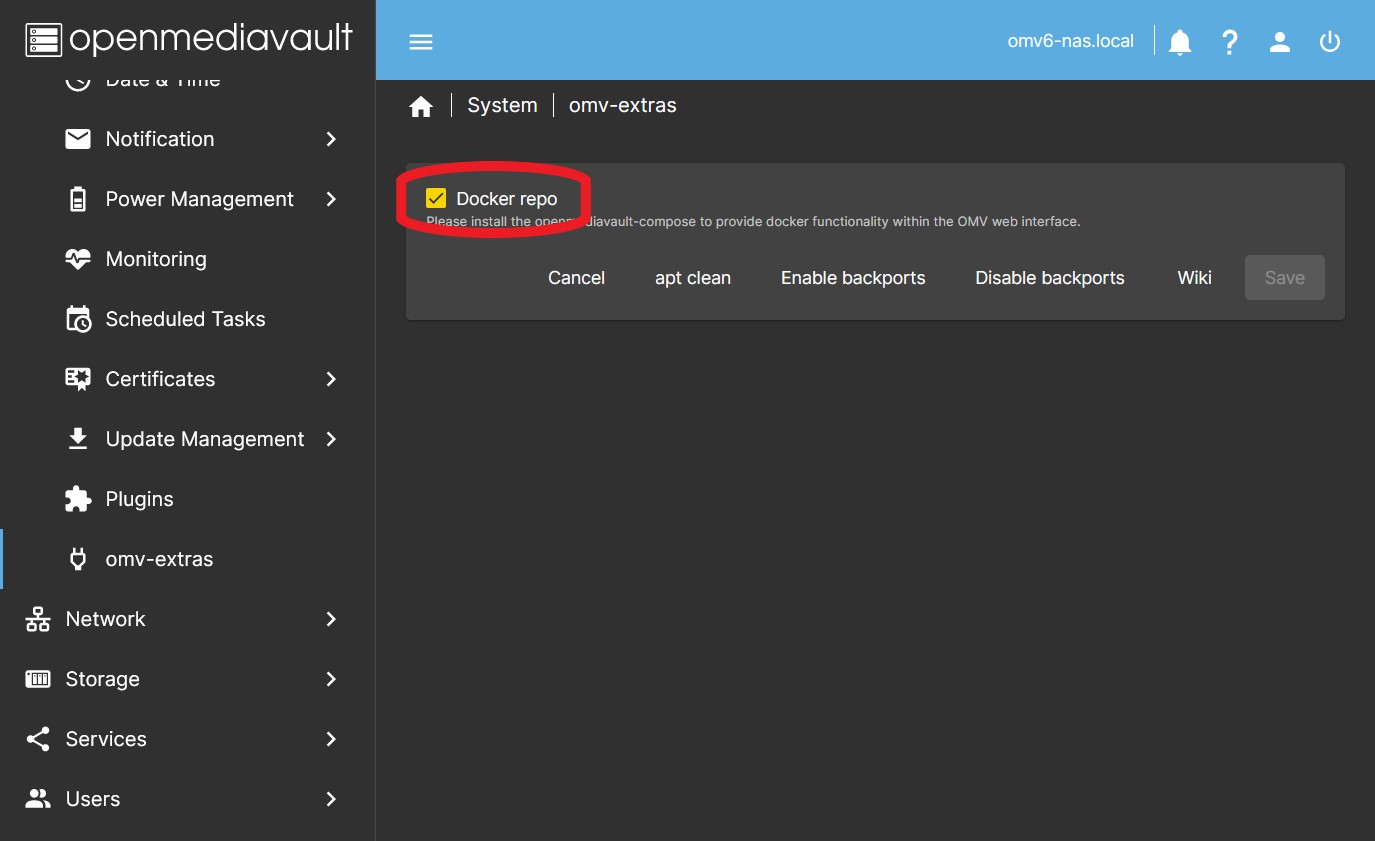
- Enable the docker repository. In the GUI in System > omv-extras click on the Docker repo button
- Press the Save button
- Install openmediavault-compose
2. Create folders for Docker: appdata, docker and data folders
- Create the shared folders docker, appdata and data (or whatever you want to call them).
- Go to the OMV GUI Storage > Shared Folders Click on +Create
- In the Name field write docker.
- In the File system field select the SSD disk or the one you are interested in. Press Save.
- Repeat the procedure for the appdata folder.
- As for the data folder, if you don't already have it created, you can follow the same procedure, make sure that this folder corresponds to the one you already have created in your file system, use the tree on the right in the relative path field in the GUI when creating it.
| Note | |
|
Folders created in the OMV GUI by default have 775 permissions, the owner is root, and the owner group is users. This way the procedure in this guide will work normally. If for some reason this is not the case on your system, make sure that the appuser user has read and write permissions on these folders. If you need to reset the permissions of a folder to the standard OMV permissions you can use the plugin openmediavault-resetperms. | |
3. Configure Docker and the openmediavault-compose plugin
- In the OMV GUI go to Services > Compose > Settings and define the necessary appdata, data, and docker folders as explained in this section FOLDERS AND LOCATIONS TO USE DOCKER-COMPOSE WITH THE PLUG-IN.
- In the Docker storage field replace the value with the path of the docker folder created earlier. You can see this path in the GUI under Storage > Shared Folders in the Absolute path column (if it is not displayed open the column by clicking the top right button in the form of a table). Next to the route you have a button that you can use to copy it.
- …
Warning A symlink like /SSD/docker may not work here, it is preferable to use the full path. Example: /srv/dev-disk-by-uuid-861acf8c-761a-4b60-9123-3aa98d445f72/docker - …
- In the bottom menu, click the Save button.
- Now in the Status field the message should appear: Installed and running
- In the fields corresponding to the appdata (Compose Files Section) and data (Data Section) folders, display the menu and choose the previously created shared folder.
- Press the Save button.
4. Create the user "appuser"
- In the OMV GUI go to Users > Users click on the +Create button
- Define appuser name (or whatever you want to call it).
- Assign password.
- In the groups field we add it to the users group (He is probably already in that group, at the time of writing the OMV GUI does this by default).
- Membership in that group should ensure that appuser has write permissions to the appdata and data folders. Check it. If not, make sure the folder permissions are 775, the owner is root, and the owner group is users. See NAS Permissions In OMV
- If you need to reset some permissions on your NAS you can use Reset Permissions Plugin For OMV6. Do not modify the permissions of the docker folder.
- Click on Save.
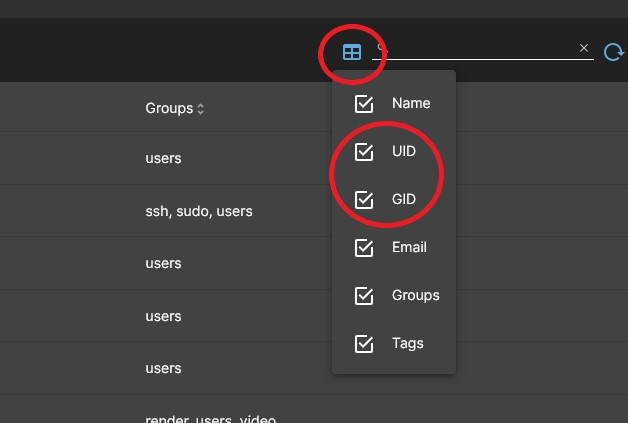
- Open the UID and GID columns and make a note of the values that the appuser user has.
- Example: UID=1002 GID=100
- If you already had one user, appuser UID will be 1001. If you had 2 users, appuser UID will be 1002, etc. This may vary on your system.
- Make sure that the user appuser has the necessary read or read/write permissions depending on the case on the folders that are included in each container. You can use the OMV GUI to do this.
5. Definition of global environment variables
- In the OMV GUI go to Services > Compose > Files and press the Edit global environment file button.
- In Global Environment field copy and paste:
PUID=1000
PGID=100
TZ=Europe/Madrid
- Replace the values with the appropriate ones in your case.
- You can see your local configuration in System > Date & Time in Time zone field.
- You can see the values of user appuser in Users > Users in the UID and GID columns.
- In this case we don't need it since we have defined the DATA folder in the plugin GUI at Services>Compose>Settings. But if you need to define other different routes you can also do it here in the same way as the rest of the variables.

Example of installing an Application (Jellyfin)
6. Choose a stack
- On the dockerhub there are thousands of containers ready to configure.
- Try to choose containers from reputable publishers (linuxserver is very popular) or with many downloads and current ones.
- Check that the container is compatible with your server's architecture x86-64 arm64…
- When choosing one read the publisher's recommendations before installing it.
- The plugin has examples that you can install directly In the Services > Compose > Files button Add from example.
- As an example we are going to install Jellyfin.
- Many results appear in the search engine, we chose the one for linuxserver linuxserver jellyfin.
- We fetch the docker-compose stack and copy it to a text file. In this case:
---
version: "2.1"
services:
  jellyfin:
    image: lscr.io/linuxserver/jellyfin:latest
    container_name: jellyfin
    environment:
      - PUID=1000
      - PGID=1000
      - TZ=Europe/London
      - JELLYFIN_PublishedServerUrl=192.168.0.5 #optional
    volumes:
      - /path/to/library:/config
      - /path/to/tvseries:/data/tvshows
      - /path/to/movies:/data/movies
    ports:
      - 8096:8096
      - 8920:8920 #optional
      - 7359:7359/udp #optional
      - 1900:1900/udp #optional
    restart: unless-stopped
| Note | |
| Verify on the official page that this stack has not changed before installing it | |
7. Customize the stack
- It's always a good idea to read the editor's comments to familiarize yourself with the options and to check that the container is valid for your architecture (x86, arm …).
- We customize our stack to fit our system.
- In this example, we remove all the optional lines and keep the essentials.
- Let's assume as an example that inside
/DATAwe have the media folder that contains other subfolders with movies, photos, etc, such as the image structure:
- We adjust the stack as follows:
---
version: "2.1"
services:
  jellyfin:
    image: lscr.io/linuxserver/jellyfin:latest
    container_name: jellyfin
    environment:
      - PUID=${PUID}  # See Comment 1
      - PGID=${PGID}  # See Comment 1
      - TZ=${TZ}   # See Comment 2
      #- JELLYFIN_PublishedServerUrl=192.168.0.5   # See Comment 3
    volumes:
      - ./config:/config   # See Comment 4
      - CHANGE_TO_COMPOSE_DATA_PATH/media:/media   # See Comment 4
    ports:
      - 8096:8096   # See Comment 5
    restart: unless-stopped
| Note | |
| Verify on the official page that this stack has not changed before installing it | |
- Comment 1:
- PUID and PGID correspond to the UID and GID values of the user who is going to manage the container on the system.
- In our case we want this user to be appuser, so we enter the values of this user.
- See point 4 of this guide to obtain the correct values.
- In addition, in this case we have used environment variables, see point 5 of this document, so the values will be those established in that file.
- Comment 2:
- Adjust it to your location.
- You can see it by typing
cat /etc/timezonein a terminal. - In addition, in this case we have used environment variables, see point 5 of this document, so the values will be those established in that file.
- Comment 3:
- In some you may need this line to make Jellyfin visible on your network. If this is the case remove
#at the beginning and replace the IP with the real IP of your server.- If your IP were for example
192.168.1.100the line would look like this:- JELLYFIN_PublishedServerUrl=192.168.1.100
- Comment 4:
- In the volumes section we map folders from the container to the host.
- …
Note Mapping folders means to "mount" the folder inside the container.
The container does not "see" what is on our host. Similarly our host does not "see" what is in the container. In order for the container to see a folder on our host, we have to mount it inside the container.
This assembly is done in each line of this section. The colon is used as a separator. To the left of the colon we write the actual path of the folder on our host. On the right we tell the container with what name it will "see" that folder when it is running. - …
- In the first line we map the folder that will contain the container configuration files (Container Persistent Data).
- On the left the real path of this folder, that is, in our case
./config- In this case we have used a relative path
./. That means that folder/configwill be mounted on our system in the/jellyfinsubfolder inside the/appdatafolder. The plugin takes care of creating the/jellyfinfolder in this case (within the folder defined in the Settings tab, Compose Files section, that is,/appdataif you called it that) and that the folders defined as relative paths end up as subfolders within it. That is,/appdata/jellyfin/config
- Then the separator
: - To the right of the separator
:, the name we want the container to “see” when it writes to that folder, in this case, following the original stack, it must be/config - …
Note When the container writes to /config what will actually happen on the system is that the user appuser will be writing to /appdata/jellyfin/config
This is why the appuser user must have permissions to write to the appdata folder, otherwise the container would not work.
There is no need to create the /jellyfin folder, docker will do it for us when starting the container. - …
- In the second line we map the folder containing our movies and photos so that the container can read them.
- On the left the real path of this folder. In our case the actual path could be something like
/srv/dev-disk-by-uuid-384444bb-f020-4492-acd2-5997e908f49f/data/media. We can use that route or take advantage of the facilities that the plugin gives us to define routes.- In this case we have used the path defined in the plugin GUI (In Services > Compose > Settings in the Data Section) to make it easier to write paths.
CHANGE_TO_COMPOSE_DATA_PATHis equivalent in our case to/srv/dev-disk-by-uuid-384444bb-f020-4492-acd2-5997e908f49f/data - An alternative way to do this would be to add a global environment variable. We could add this variable to the file that we have created in point 5 of this guide
DATA=/srv/dev-disk-by-uuid-384444bb-f020-4492-acd2-5997e908f49fand in the compose file we would write this line- ${DATA}/media:/media
- Below the separator
: - On the right, the name that we want the container to see, in this case we choose simply
/media - …
Note In the case of jellyfin the libraries are configured from the container, we just need it to be able to see them. That is to say, it is not necessary to map movies on the one hand and photos on the other hand, although we could do it that way too.
To make it easier, we map a single volume that contains everything. Later from jellyfin we will search each folder for each library. /media/movies /media/photos etc. - …
- Comment 5:
- In the ports section we map the ports for the application to communicate with the outside.
- The process and syntax are the same as in the volume mapping section.
- If we want we can change the port that we will use in our system to access jellyfin or keep it the same.
- In this case we keep it the same port, so we write
8096on both sides of:- If we wanted to change the port to 8888, for example, we would write on the left
8888, then the separator:and on the right the one that specifies the original stack8096, which is used internally by the container.
- If you need information about available ports you can check this forum post. [How-To] Define exposed ports in Docker which do not interfere with other services/applications
| Beginners Note | |
|
This file is of type yaml. Indents are important, don't manipulate them while editing. If you do docker won't be able to interpret the file, the container will give an error and won't start. | |
8. Deploy the Docker stack and access the application
- In the OMV GUI, go to Services > Compose > Files and click on the +Create button.
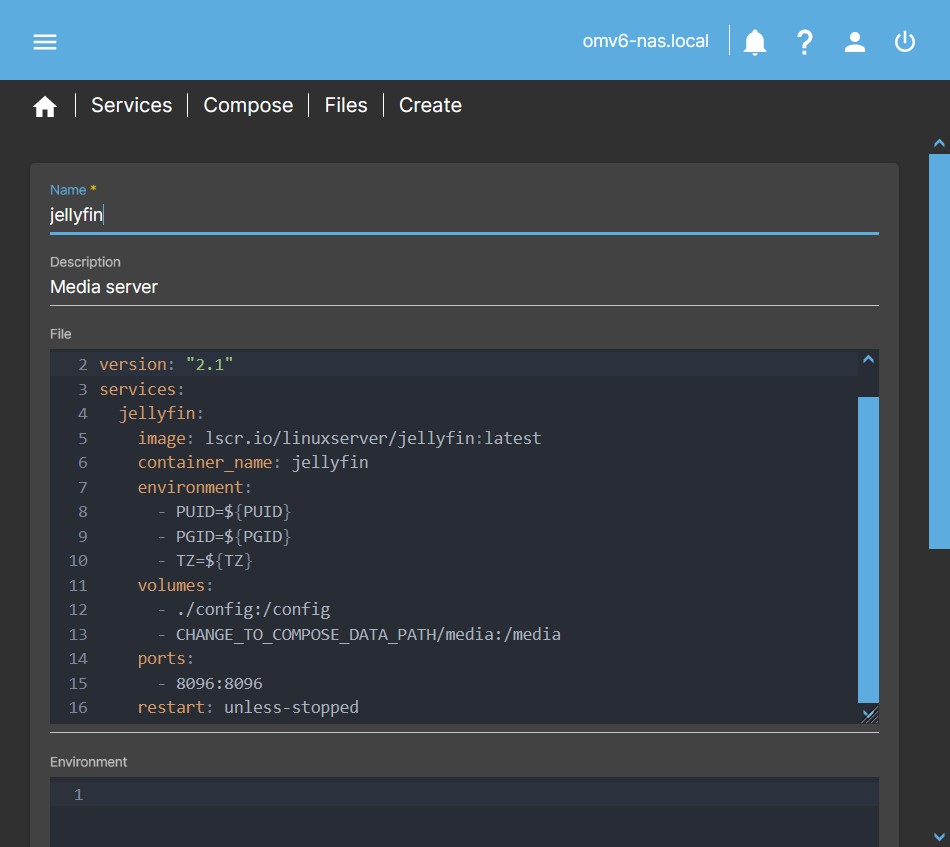
- Copy in the File box the contents of the text file that we have created in point 7.
- In the Name field write the name of the container, in this case
jellyfin. - Click the Save button and apply the changes.
- Note: If you need to set environment variables you can do so in the lower Environment box.
- Select (yellow) the created row corresponding to your container and press the Check button.
- If there are no errors your stack can be executed. Otherwise you should review the values entered.
- Press the Up button.
- This will download the container image and install it.
- At this point you should be able to access your application by typing the IP of our server followed by
:and the access port defined in the previous point.- In this case, if the IP of our server were, for example, 192.168.1.100, we would write
http://192.168.1.100:8096to access Jellyfin.

Some basic procedures for container management
How to modify the configuration of a container
If for any reason you need to modify the container configuration, change the location of a volume or any other circumstance, do the following:
- In the OMV GUI go to Services > Compose > Files, select the container row and press the Down button. This will stop the container.
- Press the Edit button.
- Modify the desired parameters in the File box
- Press Save.
- Select the container row again and press the Up button. The container will now be running with the modified parameters.
How to reset a container's settings
If you want to restore the container to its initial state, do the following (This will remove any configuration we have made to the container):
- In the OMV GUI go to Services > Compose > Files, select the container row and press the Down button. This will stop the container.
- Delete the config folder corresponding to the container. In the example /SSD/appdata/Jellyfin
- This folder contains all the configurations that we have made inside the container.
- When the container starts again it will recreate the files in this folder, so no configuration will exist. We can start configuring it from scratch again.
- In the OMV GUI go to Services > Compose > Files, select the container row and press the Up button. This will start the container.
Other procedures
A Closing Note
We, who support the openmediavault project, hope that you’ll find your openmediavault server to be
enjoyable, efficient, and easy to use.
If you found this guide to be helpful, please consider a modest donation to support the
hosting costs of this server (OMV-Extras) and the project (Openmediavault).
OMV-Extras.org
www.openmediavault.org
