Kernel Plugin For OMV6
Summary
This plugin is for amd64 or i386 systems only. The Proxmox kernel works on amd64 systems only.
The kernel plugin allows the user to:
- Select which grub entry to boot
- Installation of the Proxmox kernel
- Removal of kernels
It also allows for downloading and grub entries to boot into the following utility and rescue Linux distros:
Prerequisites
- OMV-Extras must be pre-installed.
Installation
In OMV6's GUI:
Under System, Plugins, find and highlight openmediavault-kernel 6.X, and click the install button.
Configuration
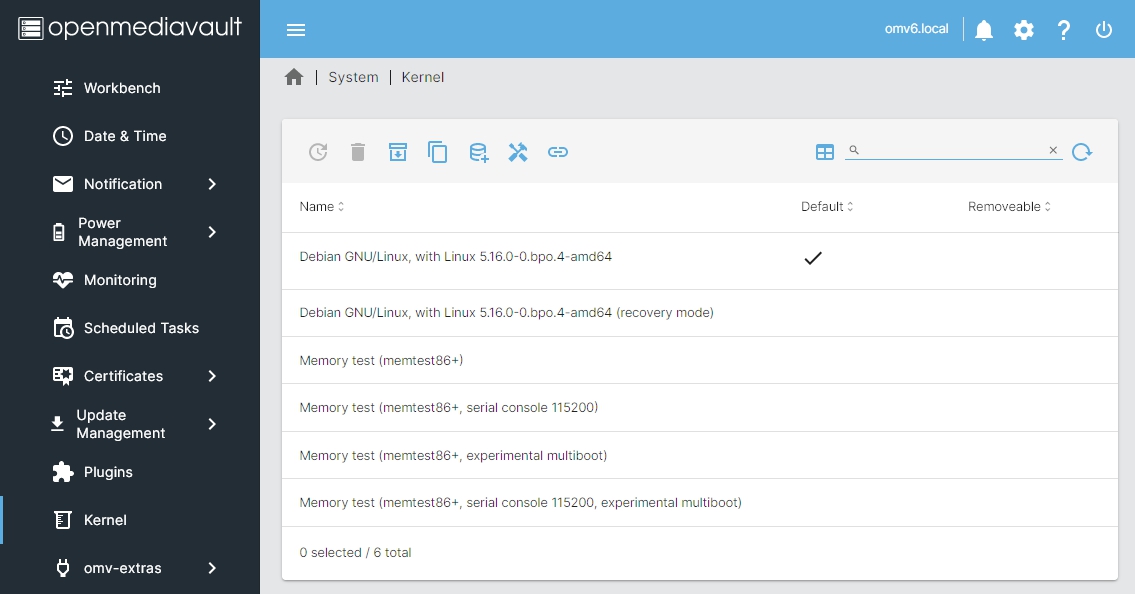
Under System, Kernel:
| Cautionary Note | |
| In many instances users will opt to run Openmediavault headless (no keyboard or monitor). Selecting any of the default memory test options will, after reboot, disable the Web Page console. A monitor and keyboard would be required for changing Grub's boot order, to select the standard Debian kernel. | |
- This will set the highlighted (selected) kernel to be the boot kernel.
- Setting the wrong default boot kernel may cause the system to be inaccessible.
- The boot menu will still be available to select a different kernel. (Accessing the boot menu requires a monitor and keyboard.)
- Uninstall the highlighted (selected) kernel.
- Install Proxmox kernel of selected version and set it to boot.
Remove non-Proxmox kernels
- Reboot with the Proxmox kernel before removing non-Proxmox kernels.
- This will fail to remove a linux-image-* kernel if it is still active.
- This will remove all kernel packages with the prefix linux-image-.
- This will remove all headers packages with the prefix linux-headers-.
- Downloads the Clonezilla ISO and configures grub's bootloader to allow booting from ISO.
- SSH server is enabled by default. Login with username: user and password: live
- When connecting via ssh, the ssh key will be different than the OpenMediaVault ssh key. This is normal. Add / update the SSH key on the client system.
- IP Address will be set by DHCP. Using static DHCP is recommended for headless servers.
- When logging in remotely, start clonezilla with: sudo clonezilla
- The space used by ISO in /boot directory on OS drive: 251M
Reboot to Clonezilla once
- Sets grub's bootloader to boot from Clonezilla ISO ONE time.
Remove Clonezilla
- Removes Clonezilla ISO from /boot directory.
- Removes grub bootloader entry.
- Downloads the GParted Live ISO and configures grub's bootloader to allow booting from ISO.
- Not recommended for headless servers. A monitor and keyboard is required.
- Default username: user and password: live
- IP Address will be set by DHCP.
- Spaced used by the ISO in /boot directory on OS drive: 338M
Reboot to GParted Live once
- Sets grub bootloader to boot from GParted Live ISO ONE time.
Remove GParted Live
- Removes GParted Live iso from /boot directory.
- Removes grub bootloader entry.
- Downloads the SystemRescue ISO and configures grub's bootloader to allow booting from the ISO.
- SSH server is enabled by default. Login with username: root and password: openmediavault
- When connecting via ssh, the ssh key will be different than the OpenMediaVault ssh key. This is normal. Add / update the SSH key on the client system.
- IP Address will be set by DHCP. Using static DHCP is recommended for headless servers.
- The spaced used by ISO in /boot directory on OS drive: 687M
Reboot to SystemRescue once
- Sets grub bootloader to boot from SystemRescue ISO ONE time.
Remove SystemResuce
- Removes SystemResuce iso from /boot directory.
- Removes grub bootloader entry.
Source Code
A Closing Note
We, who support the openmediavault project, hope you’ve found this guide to be useful and that you’ll find your openmediavault server to be efficient, easy to use, and enjoyable.
If you found this plugin guide to be helpful, please consider a modest donation to support the hosting costs of this server.
OMV-Extras.org
Venmo: ryecoaaron

