Remote Mount For Openmediavault 5
This document can be converted to a PDF file, in the user's language of choice (see the following), on Windows, Mac's and popular Linux desktop platforms. Simply select the printer icon on the upper right corner of this web page. When prompted at the client, select “print to PDF”, name and save the file.
Google Translate kann Wiki-Dokumente in Ihre Sprache übersetzen. Fügen Sie die Wiki-URL in das linke Fenster ein und öffnen Sie den übersetzten Link rechts.
Google Translate puede traducir documentos wiki a su idioma. Pegue la URL de la wiki en la ventana izquierda y abra el enlace traducido a la derecha.
Google Translate peut traduire des documents wiki dans votre langue. Collez l'url du wiki dans la fenêtre de gauche et ouvrez le lien traduit sur la droite.
Google翻訳はwikiドキュメントをあなたの言語に翻訳することができます。 左側のウィンドウにwikiのURLを貼り付け、右側の翻訳されたリンクを開きます。
The Remote Mount Plugin
Remote Mount is a plugin that's designed to mount a remote network share, in a manner which makes the resultant file system appear to be local.
This capability makes makes connections to OMV servers, non-OMV servers, and Client network shares possible.
Prerequisites
- OMV-Extras must be installed.
- A username and password is required, with a minimum of read access to the remote share.
Uses for Remote Mount
- Remote Mount is useful for mounting, accessing and replicating network shares, located on another LAN server or a LAN client. This capability works very well with Rsync, for backing up network shares over a LAN connection.
- Along with setting up Remote Mount, this document will provide a practical example where Remote Mount and Rsync are used for replicating a network share.
- Remote Mount makes the creation of a full Backup Server relatively easy, with no command line operations required. Guidance for creating a full Backup Server is provided in this document.
Install the Remote Mount Plugin
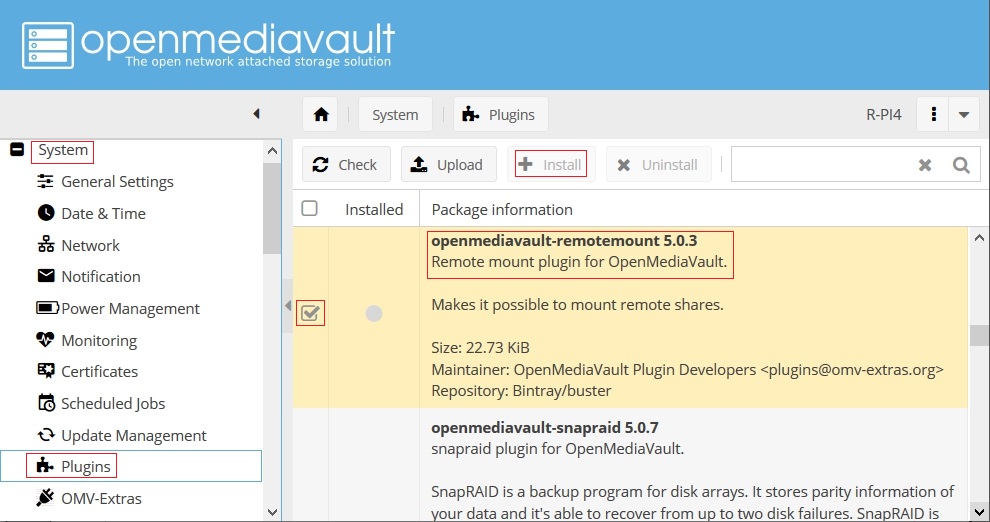
Setting up a Remote Mount
In the example provided, a Single Board Computer (a Raspberry PI 4) is being used to backup a network share on the Primary LAN server. (Where the term “remote” is used, it will be in reference to the Primary server.)
As previously noted, to create a Remote Mount'ed file system, it's necessary to have a username and password to the remote network share that has, at a minimum, “read access”. In a case where a remote share is being replicated, read only access is preferred. With read only access, the Backup device can not manipulate, delete, or otherwise alter data on the Primary server. It can only “read” the data.
In the example following, the Primary (remote) Server is another installation of OMV on the local LAN. The share to be accessed is Music.
In this specific example, a username and password was created on the Primary Server to facilitate replicating shares. The user was installed under Access Rights Management, User. The user was named backup-r . The -r makes the username unique and provides a visual indicator that the user is on the remote server. Finally note that all new users installed under Access Rights Management, User are added to the group “users” by default.
On the Primary server:
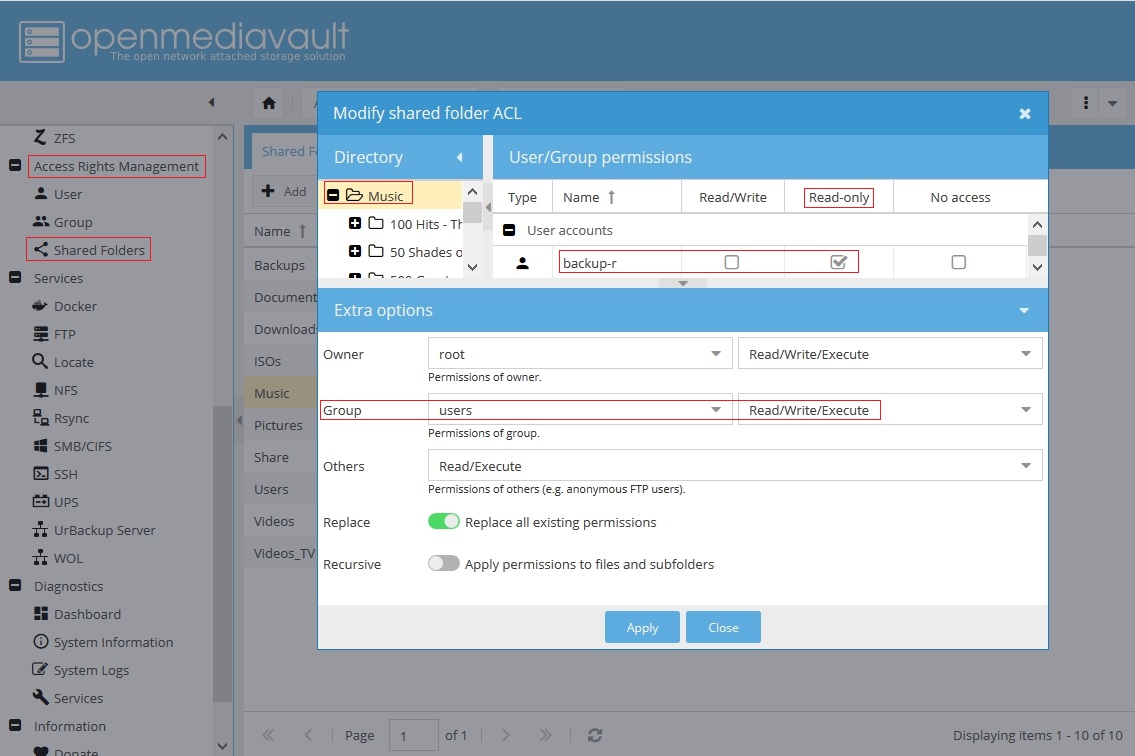
Under Access Rights Management, Shared Folders; click on the Music shared folder and the ACL button.
The following shows permissions on the Primary server, for the Music share:
- The user root, in the vast majority of cases, with be the Owner and will have Read, Write and Execute.
- In this example, the Group users has Read, Write and Execute.
- Others means any user that is not root or any user that is NOT in the Group users. Others have Read and Execute.
In the above, note that the group users have “write” access to the Music share. In this instance, write access is more than is needed, so the ACL line shown was used to further restrict the access of one specific user, backup-r, to “read only”.
Important. This is a very limited use of an ACL.
In the interests of clarity, when mixing ACL's with standard Linux (Posix) permissions; ACL's can be used to further restrict access, but they can't be used to override basic file / folder permissions to give “more” or “increased” access.
In this very limited use case, the username backup-r is being further restricted, by ACL, to “read only”. This allows the remaining members of the group users to retain the write permission.
While off-topic, a few things should be discussed regarding OMV's users and access control:
- What is shown as Extra Options (above) is standard Linux permissions.
- When a user is added to OMV, the username is added to the Group “users” by default.
- For home server use and to keep server permissions simple, use standard Linux permissions only.
- What is labeled as User/Group permissions (above) are ACL's (Access Control List). Without understanding the exact effects, do not mix ACL's with standard Linux permissions.
- When creating users, do not attempt to create a user that “exactly” matches the name of Linux system users. Even a single character change or the addition of one character is enough to make the name unique. (For example, backup-r is not the same as the system user backup.)
A list of existing system usernames is provided at the end of this document, under OMV's Pre-configured and System User Names.
At the Backup Server:
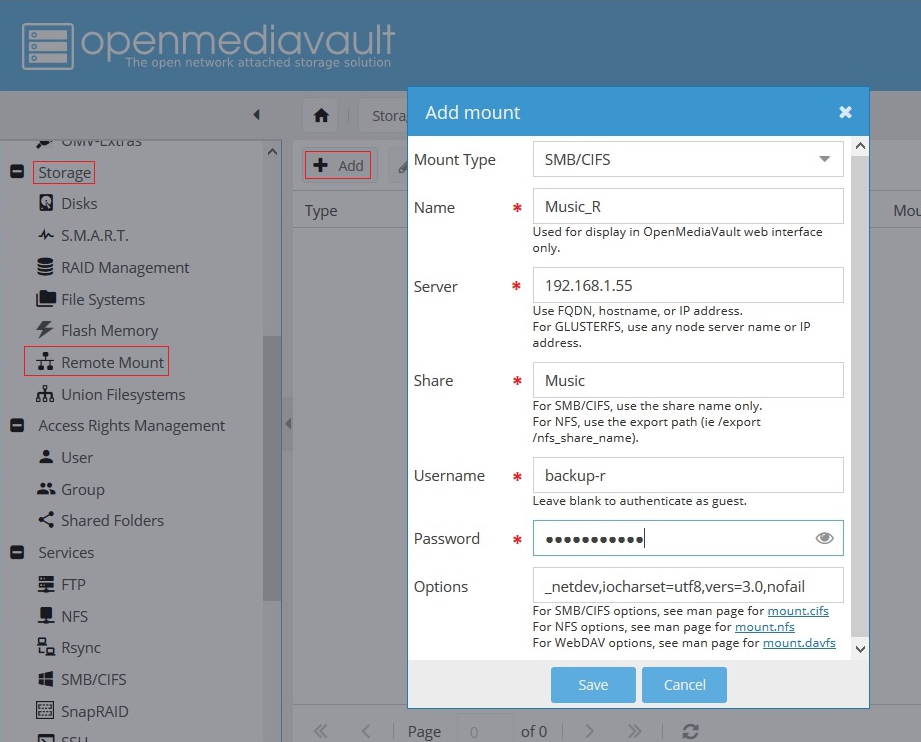
Under Storage, Remote Mount, click the +Add button.
- Mount Type: Leave at the default
- Name: Name the mount in a way that indicates the share name (Music) with an indicator that it's a remote filesystem ( _R ), Music_R
- Server: If the remote server is statically addressed or has a static DHCP lease, use the remote server's IP address.
- Share: The exact name of the remote share.
- Username: As previously mentioned, this user must have at least “read” access to the remote share.
- Password: The username's password on the remote server.
Notes:
- In other use cases, where a non-OMV NAS server is used (a QNAP or other type of NAS appliance, etc:)
- The administrative username and password, used to access the NAS, could be used for Remote Mount.
- If a workstation can access a NAS share, in many cases, the workstation login (username and password) could be used.
- Workstation network shares, generally, can be accessed with the workstation's username and password logon.
Notes:
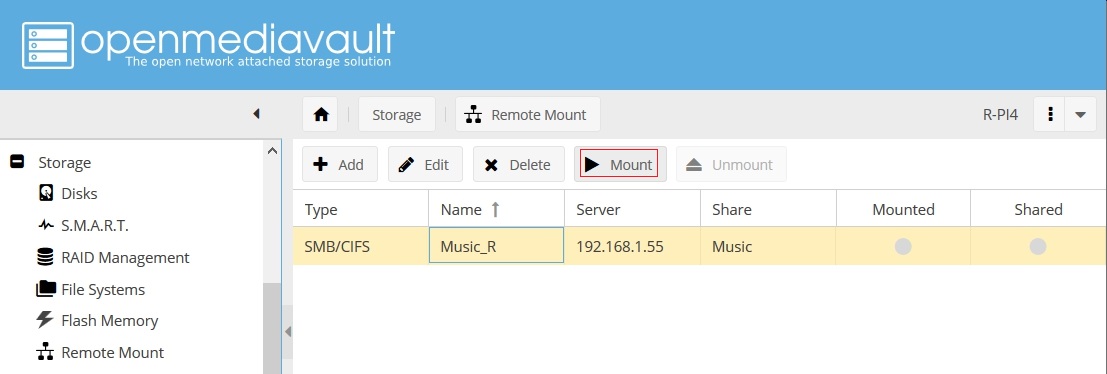
- The green light under Mounted may not, immediately, turn green.
- If the username or password are incorrect or the user does not have at least read access, or if the share does not exist, an error dialog box will pop up. In such a case, edit the Remote Mount with the correct data and try again.
- On a rare occasion, an RPC error dialog box may come up when the mount is saved. The mount was made but it may be necessary to reboot to see it.
Confirm the Mount:
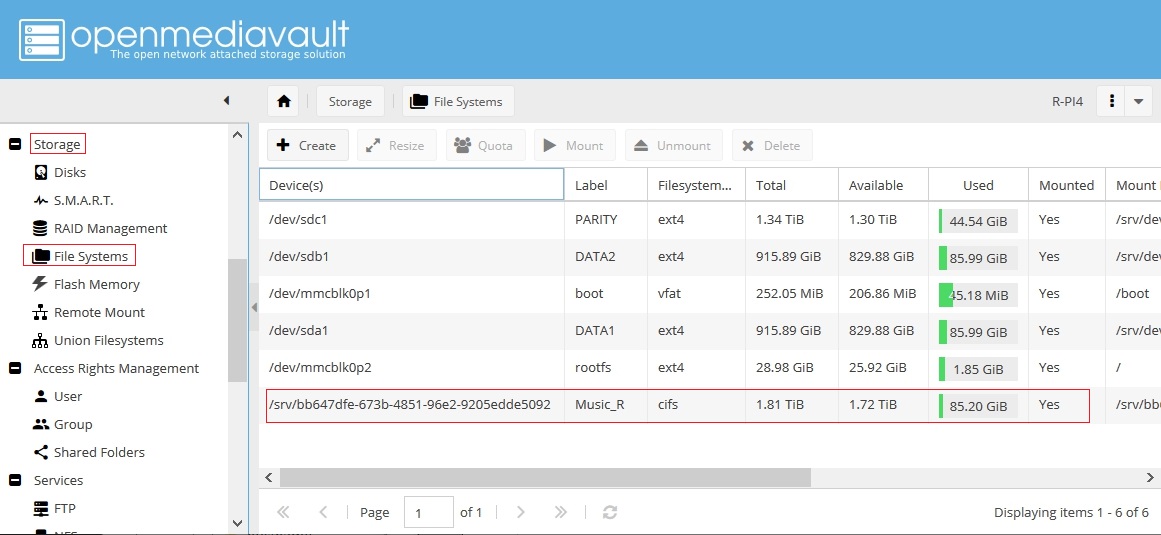
Under Storage, File Systems, note the new device with the Label Music_R and the Filesystem type cifs.
The remote network share Music, on the Primary Server, is now mounted under the local label Music_R, as if it's a local file system. This mount is subject only to the access level and restrictions of the username and password that was used to mount it. The reasoning behind accessing the remote share with a username and password, that has “read only” access may now be apparent. If a remote share is mounted with write access, it would be possible to alter or delete files on the Primary Server's Music share.
For users who are interested only in mounting a remote share, this concludes the installation and configuration of the Remote Mount plugin.

Using Remote Mount and Rsync to Replicate a Network Share
In conjunction with the active Remote Mount'ed file system (above); in the following, the processes for replicating a remote network share, to a Backup Server, will be demonstrated.
Create a Local Shared Folder
First, it's necessary to create a local repository for files to be imported.
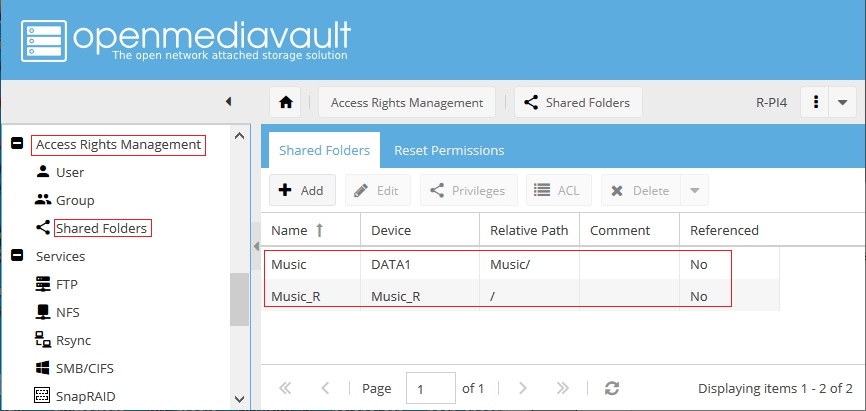
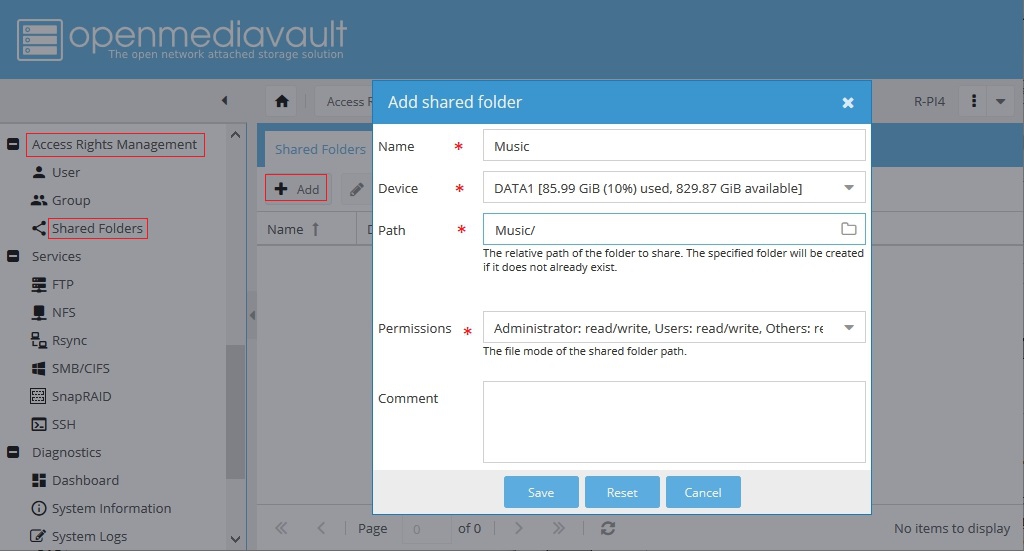
Under Access Rights Management, Shared Folders, Click the +Add button.
Use the pop-down arrow next to the Device field and select a local hard drive, or a mount point, to house the shared folder. If the creation of a Backup Server is the goal, ideally, all fields (name, path, and permissions) should be the same as those on the remote server.
Based on the shared folder Name, the Path field will be populated automatically. For the majority of use cases, the path generated will be correct.
Create a Shared Folder for the Remote Mount
Now we'll create a shared folder, for the Remote Mount(ed) network share.
- Name: For consistency, the shared folder name should follow the function with a remote designation, Music_R
- Device: Using the pop-down arrow, select the remote network share.
- Path: In this case, the default entry will have to be altered. Use “/” only. This selects the root of what “appears” to be a local file system, to the local host.
- Permissions: Set permissions to be the same as the local Music share.
Now we have two shared folders. At this point, it's becoming obvious why using something to annotate “remote” ( _R ), in the shared folder name helps to prevent confusion. With a pair of shared folders, one local and the other remote, the two can be rsync'ed.
Setting up an Rsync Job
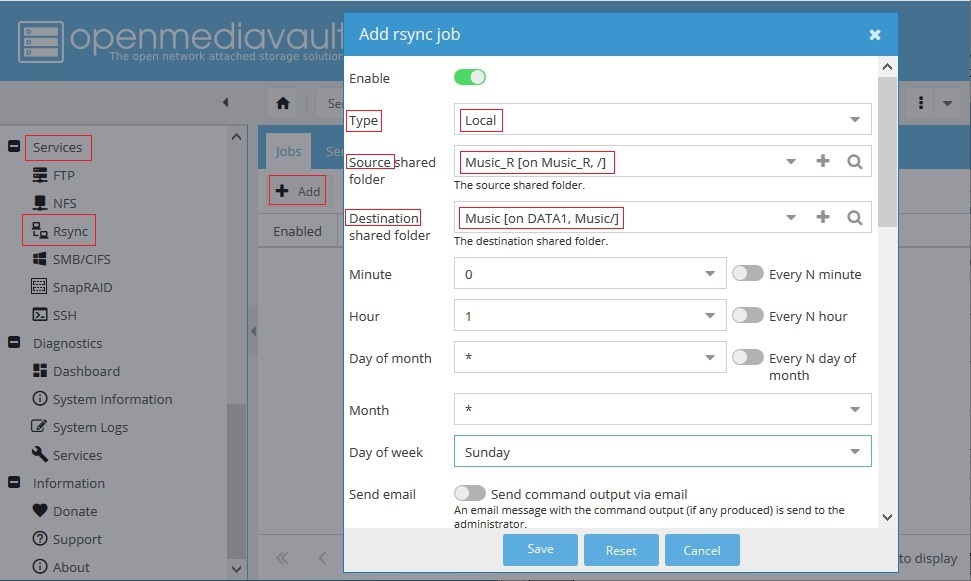
First note that the job type is Local. (When using Remote Mount, an Rsync server is not required.)
Note the Source is the remote network share and the Destination is the local share on hard drive DATA1.
This is known as a “Pull”. In this case the user backup-r has read only access which is enough to do a pull from a remote source.
Note:
While it's possible to “Push” using Remote Mount, when the username and password has write access to the remote share, it's not recommended. Push events may be buffered through the local boot drive. If the “push” destination doesn't exist and with a relatively small boot drive (16 to 32GB), the boot drive may fill up.
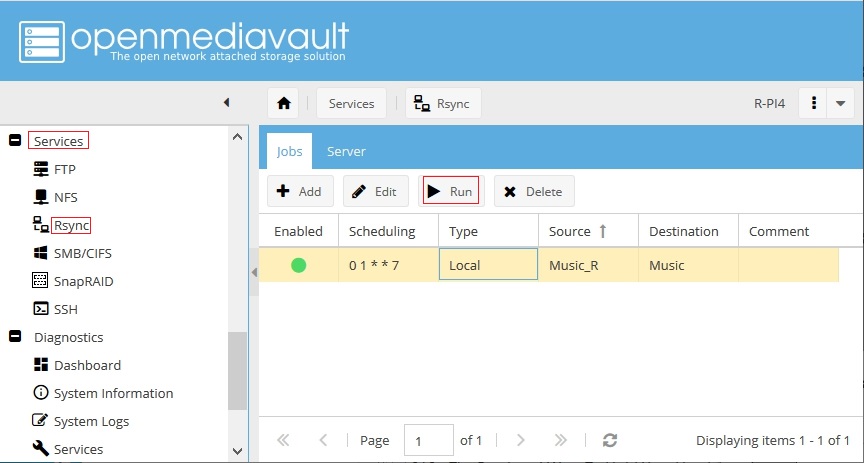
In the schedule, this job is set to run on Sundays, at 01:00(AM).
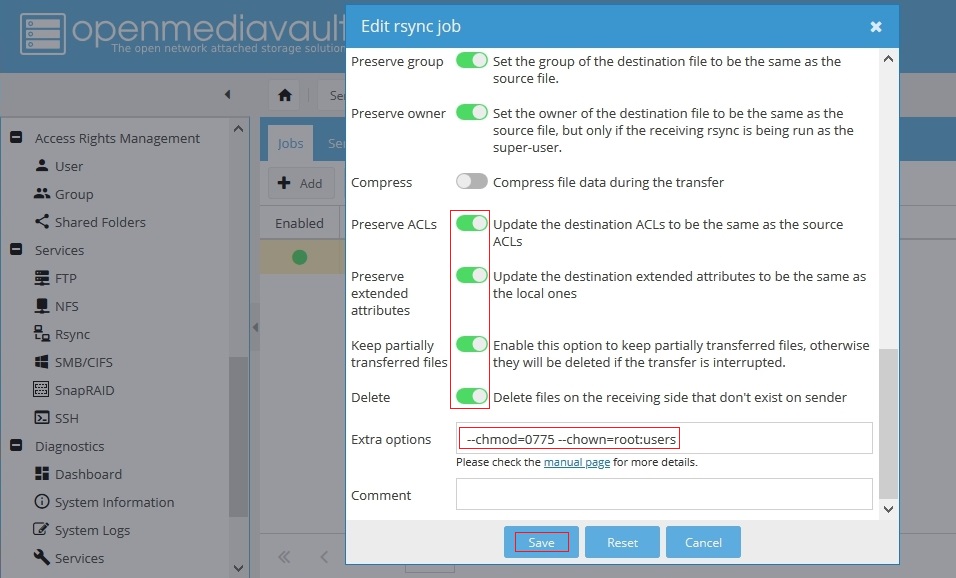
In the same dialog box, use the right slide bar or keyboard arrow keys to scroll down to the following options.
At the bottom of the dialog box, below, turn the annotated features ON.
There is one possible exception. If the local shared folder, on the Backup Server, is on a ZFS pool do not turn on “Preserve Extended Attributes”.
In Extra options, note the additional commands added:
These commands are necessary due to the origin of the files. Files and folders are being pulled from a “foreign volume” where the root account and the users group are different from the same accounts and user group, with the same names, on the local machine. When files and folders are imported from a foreign source, the default “create mask” is applied which is root:root - 0755 for folders and 0644 for files (depending on the create location).
It's necessary to change ownership (chown) to the local root account and the local users group, and to modify access permissions (chmod). In this case −−chmod=0775 and −−chown=root:users was used. This is the equivalent of:
Owner – root Read/Write/Execute
Group – users Read/Write/Execute
Others – Read/Execute
See Further Notes on Permission commands, for setting the appropriate permissions for imported files.
The following is an example of the initial message presented, as the rsync job is compiled:
Please wait, syncing </srv/bb647dfe-673b-4851-96e2-9205edde5092/> to </srv/dev-disk-by-label-DATA1/Music/> …sending incremental file list
Depending on the number of files in the remote share, this may take a couple minutes.
Files will begin to scroll by as the job proceeds.
Note that there won't be a “progress meter” and if the share to be replicated is large, the first run of the job may take several minutes to several hours. Further note, if the web page is closed, the rsync dialog box will close with the page, but the rsync job will continue to run in the background. It won't be possible to reopen the dialog box.
An attempt to manually rerun the job, if a job is running the background, will result in an error. Be patient and allow the job to finish.
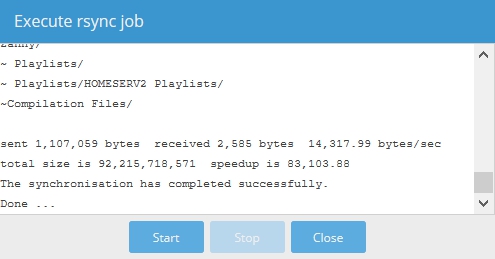
When a dialog box similar to the following is displayed, with “Done …”, share replication is complete.
Notes:
- After the first replication event is complete, in subsequent jobs, rsync will only transfer new and changed files. This makes rsync very efficient and fast.
- In the Rsync Job's options, with the “Keep Partially Transferred Files” switch ON, even if a job is interrupted with a reboot or for some another reason, transferred files are not lost.
- Turning the Delete switch OFF, may provide some degree of protection against accidentally deleted files. However, it will be necessary to manually turn the Delete switch on, from time to time, to purge unwanted files.
Create A Samba Share
Note:
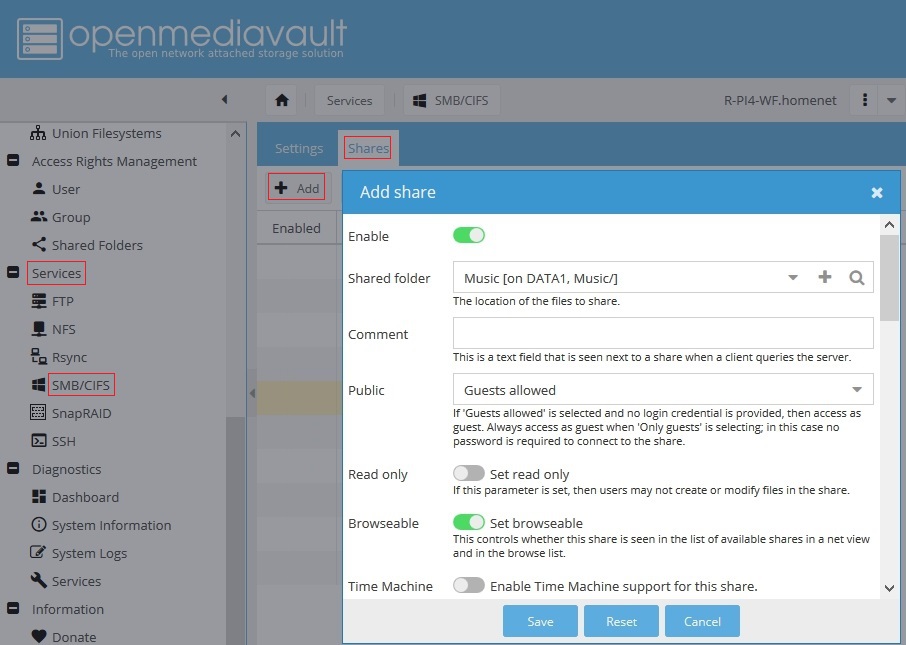
To insure that network behavior is consistent, this share (Music) on the Backup Server, should have the same SMB share settings as those used on the Primary Server. Open the Primary Server GUI, in a second browser tab, and use it for reference.
Creating a Backup Server
*Disclaimer - Use at your own risk.*
There are many ways to create backup and replicate data. The following method is offered as an easy way to create a Home Backup Server, using OMV, that does not require operations on the Command Line or extensive knowledge. It has been thoroughly tested on amd64 and SBC platforms. However, since the priority is on ease of implementation, it may not be considered to be best practice from a hardened security point of view.
Users and Administrators must make their own decision on, whether or not, this method is appropriate for their use case.
The Overview
The previous example laid out the steps to replicate a remote network share onto a Backup Server and then sharing the replicated data to the network VIA a Samba share.
In the Getting Started Guide, a reference was made to using Remote Mount and an SBC to create a Backup server. Along those lines, the previously demonstrated method of replicating a share can be used selectively, to backup sensitive data only, or expanded to include all shares on the Primary Server. If all shares are replicated, it's possible to create a full Backup Server.
In such a case, with a Backup Server on-line that contains all data as of the last backup, if the Primary Server fails, recovery time is minimal.
*After all remote network shares have been replicated and tested, to prevent user confusion, the SMB service on the Backup Server should be turned off *. (In this case, that would apply to the R-PI4.) All preconfigured SMB shares on the Backup Server will still exist but, with SMB service turned off, they won't be visible on the network.
Turning off the SMB service will prevent users from saving files direct to the Backup Server. If users save files to the Backup Server accidentally, given the switches of the rsync job (the delete switch), user files will be purged on the next rsync operation.
Recovering to the Backup Server
In the event of a Primary Server outage:
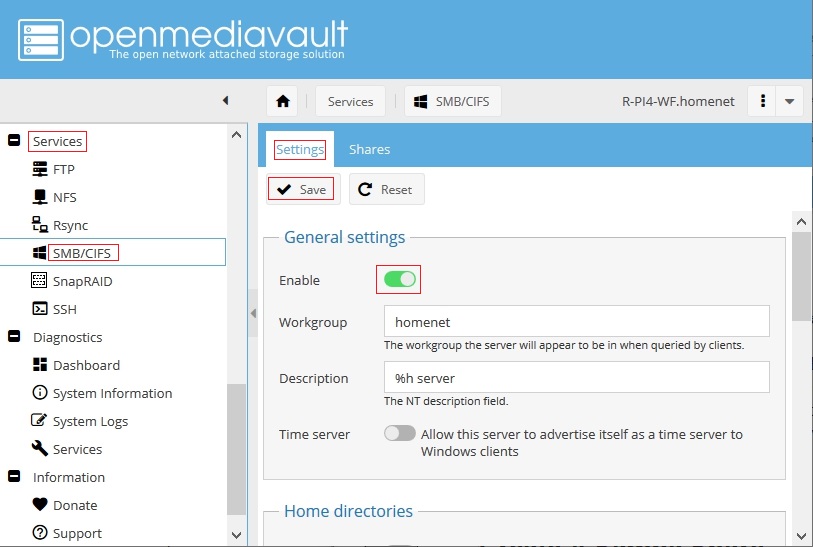
On the Backup Server, Enable SMB in the Settings tab, under General settings, and Save. (The slide switch is turned on / green.)
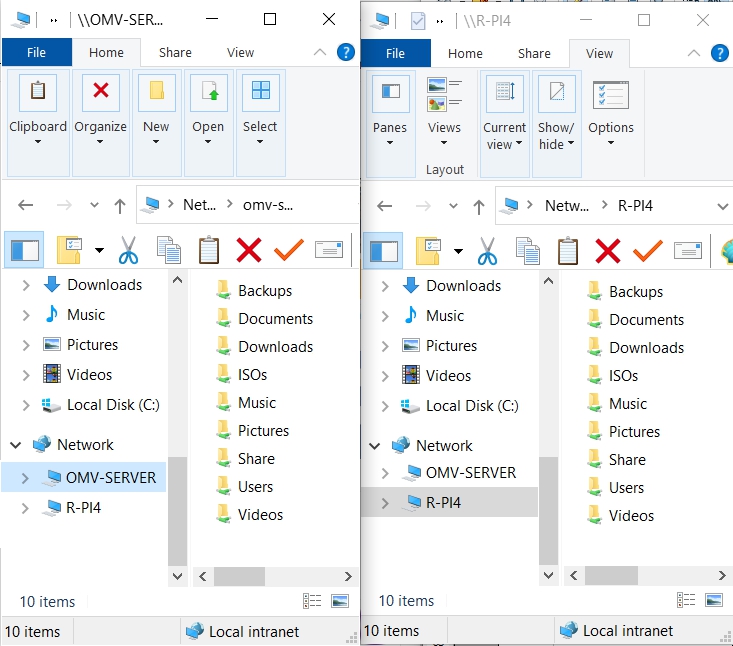
The Backup Server's shares will appear on the network, as they were as of the last replication event.
See Switching to the Backup Server for more details.
Considerations and Suggestions
If the creation of a Full Backup Server is the goal, the following is a list of considerations and suggested actions to consider:
- If permissions are used, duplicate all usernames and passwords that are resident on the Primary Server, on the Backup Server. Usernames and passwords must be an exact match.
- Check the Primary Server's permissions for each share, on both the shared folder and on the SMB share, and duplicate them on the Backup Server. Permissions should match throughout.
- The permissions applied in the rsync job Extra options, to adjust incoming foreign files permissions, should match permissions set on the local shared folder. Understanding the “Octal” required for chmod or using WinSCP to determine the Octal to use (demo'ed in Further Notes on Permission Commands ), is important for transparent user access to backup shares, when the Backup server is brought on-line.
- Before the Backup Server is activated, all rsync jobs on the Backup Server should be disabled. Share replication should not be re-enabled until the Primary Server is repaired and newly created user files are transferred from the Backup Server, to the Primary Server.
- Changes involving shares, permissions, etc., made on the Primary Server should be duplicated on the Backup Server.
- If a user's workstation password is changed, the password for the same username much changed on the Primary Server AND the Backup server to maintain transparent access.
- Turning the Delete switch off, in rsync jobs, may provide some accidental delete protection. However, from time to time, it will be necessary to turn the switch ON and run a job to purge unwanted files.
Use Cases
Home Users:
For home use, where files are largely static, home admin's should consider a replication interval of once a week or every two weeks. The reasoning is, a reasonable time interval is needed to discover a data disaster on the Primary server and turn off share replication, before the problem is replicated to the Backup Server.
In some instances, home admin's may opt for a “cold backup”, with the Backup Server powered off. Shares could be replicated manually or set for automated replication daily with the Backup Server powered up for one day, every two weeks or once per month.
Business Users:
In addition to considering local backup on the Primary Server (daily) and replicating to a Backup Server (weekly) business admin's, that require continuous delete protection and retention of file versions, might consider a file system like ZFS or BTRFS. Automated snapshots can provide file versioning and delete protection for up to a year (or longer if custom configured) in intervals as frequent at every 15 minutes. In addition, snapshots provide immunity to ransomware.
While not for beginners, setting up automated and self purging snapshots is within the capability of a Computer or Linux enthusiast. HOW-TO: Setup automated, Self Rotating and Purging ZFS snapshots details the processes for setting up automated snapshots using zfs-auto-snapshot .
Switching to the Backup Server – A Short Check List
- Log into OMV's GUI, on the Backup Server.
- Under Services, Rsync, in the Jobs tab, select the top Rsync job, and click the Edit button. At the top of the dialog box, change the Enabled switch from ON (green) to OFF (gray). Proceed down the list, turning ALL rsync jobs OFF.
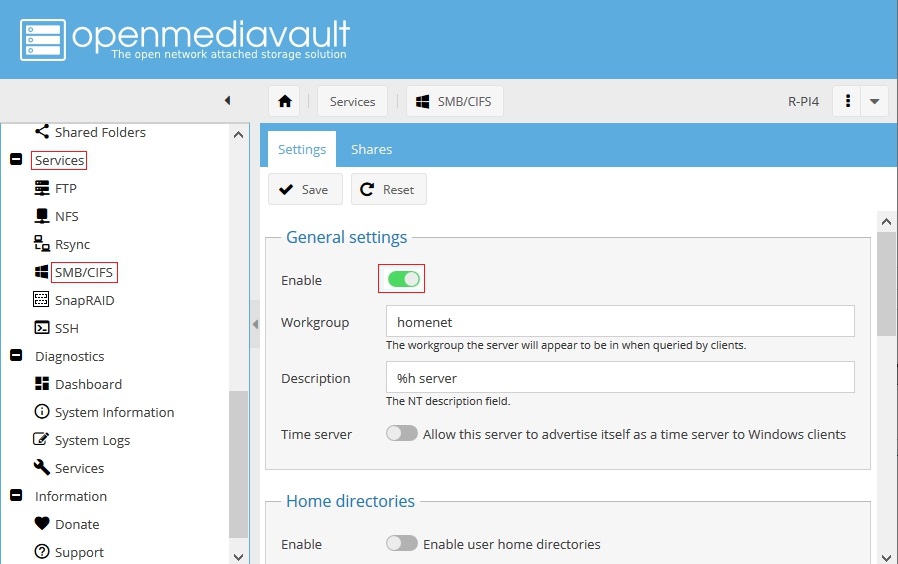
- Under Services, SMB/CIF, in the Settings Tab under General Settings, set Enable to ON (green).
- Notify users to use the Backup Server until further notice.
- On the Primary Server, under Services, SMB/CIF, Settings Tab, General Settings, disable SMB (off - gray) to avoid user confusion.
The Bottom Line
The Remote Mount Plugin and Openmediavault's standard features make it relatively easy and inexpensive to setup 100% backup of a Primary Server's entire data store, with a second hard drive or an array of adequate size. The platform could be a low cost SBC, an I386 or an amd64 PC.

Additional Information
OMV's Pre-configured and System User Names
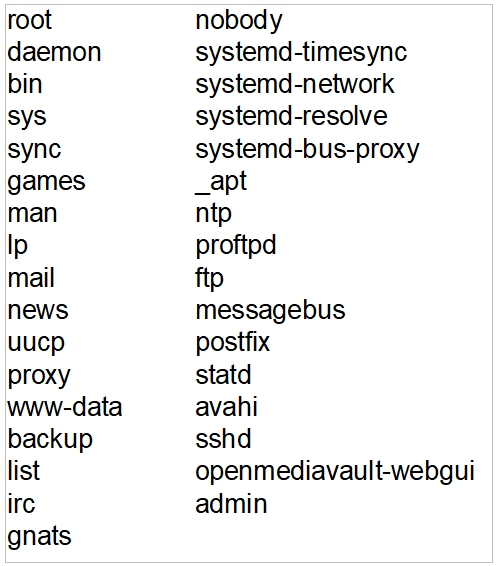
The user pi is a default user on Raspberry PI's only.
This list is not all inclusive. It's worth noting that many software packages will install system users to enable a package to interact with the OS.
Further Notes on Permission commands
chown is used to reset ownership and group access on incoming foreign files.
In the following, the left hand side of the colon is the “Owner” (root). The right hand side of the colon is the “Group” (in this case users).
−−chown=root:users
Others, not part of the command, is any username that is NOT specifically called out as the “owner” or any member of the group “users”.
chmod is used to define the permissions applied to the Owner, the Group, and others.
−−chmod=0775
On the Primary (remote) server, WinSCP can be used to determine the permissions and settings needed for incoming files, as shown below. (Details for setting up WinSCP are available → here.) The “Octal” 0775 are permissions that directly correspond to:
(OMV's standard Linux permissions)
Owner: root - Read/Write/eXecute
Group: users - Read/Write/eXecute
Others: Read/eXecute
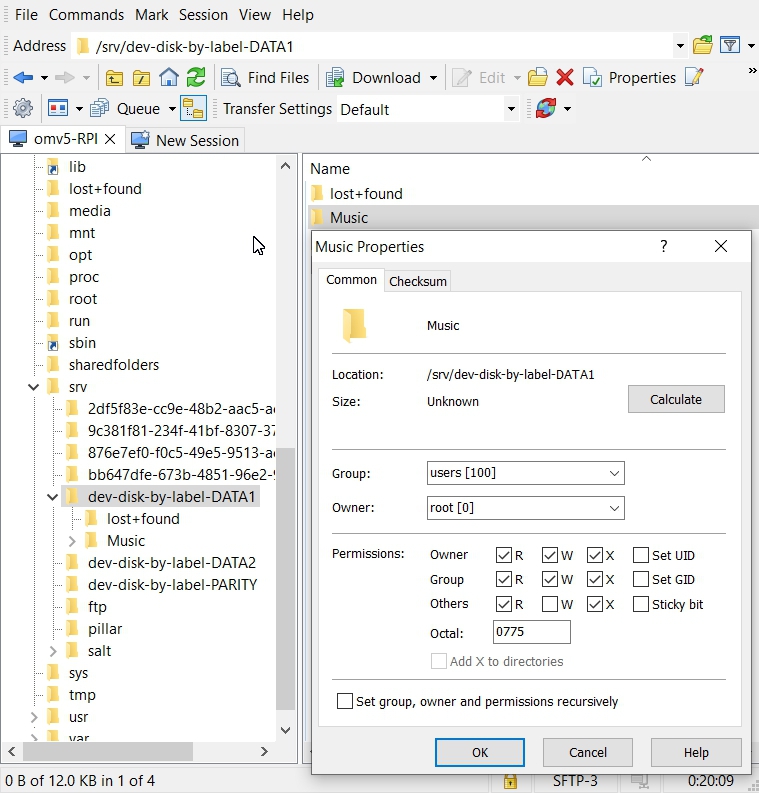
Using WinSCP:
Navigate to the share to be replicated on Primary (remote) server, usually under /srv, and duplicate the permissions found on the Backup (local) server, in rsync's Extra Options.

