Table of Contents
Docker in OMV 7
Summary
 This document establishes a method to successfully install any application on OMV using Docker.
The OMV forum is a bi-directional tool. Provides users with solutions to their problems. It provides developers with information about user problems and allows them to implement appropriate solutions in software and methods.
In the case of Docker, the forum has received numerous queries about very diverse problems. Based on that forum experience, this document offers a simple method for configuring Docker that fixes the vast majority of these problems before they arise.
Index:
What is Docker
 “ A container is a standard unit of software that packages up code and all its dependencies so the application runs quickly and reliably from one computing environment to another. A Docker container image is a lightweight, standalone, executable package of software that includes everything needed to run an application: code, runtime, system tools, system libraries and settings.
Container images become containers at runtime and in the case of Docker containers – images become containers when they run on Docker Engine. Available for both Linux and Windows-based applications, containerized software will always run the same, regardless of the infrastructure. Containers isolate software from its environment and ensure that it works uniformly despite differences for instance between development and staging. ”
That's all very well, but… 

 That definition is very good and very professional, but it is of little use to people on the street, so we will try to explain in an easier way what docker is and how it works. If you are an experienced docker user you will probably want to skip this part. If this is your first time using docker, keep reading.
Docker is a system that allows you to run an application within your server as if it were an independent and isolated system. It has its own processes and its own file system and network, which are independent of the main (host) server. The container cannot access the file systems or network systems of the host, and vice versa, that is why we say that it is isolated, therefore it cannot harm the system in any way. It is safe.
In reality docker is very similar to a virtual machine. The difference is that docker uses some of the most general resources in the system while a virtual machine is a complete system. This makes containers designed for different architectures. A container designed for Raspberry PI (arm architecture) will not work on an Intel processor system (amd64 architecture) and vice versa. You should keep this in mind when choosing a container to install on your system.
At this point it is good to remember that the 32-bit architecture is obsolete, little by little 32-bit containers are disappearing. If your system supports 64 bits, never install 32 bits, install 64 bits.
The operation of docker is very simple. Someone on the Internet packages a system into a file we call an image. This image contains the necessary packages for the application we want to use to work. Docker downloads that image, installs it on our server and runs it. We already have a container working.
Now the creator of that image does the corresponding maintenance and publishes a new updated image. Docker is responsible for downloading it automatically and replacing the one we had with the new one. Docker runs it and we have our container updated and working.
So far so good. But now we want to configure certain information in our application, for example a password to access that application. We could “enter” the container and make that configuration by writing to the /folderpass/password file inside the container. That would work, but on the next image update that /folderpass/password file will be overwritten and the settings will be lost. To solve this Docker allows folder mapping.
Mapping a folder means that Docker will make a configuration such that when the container writes to the /folderpass/password file it will actually be writing to an external folder, a folder located on our server file system. This way, when we update the container image, all its files will be overwritten except /folder/password, since this folder is not in the container but in the file system of the host server, and when the container is running it will be able to continue reading the password that we have stored in our server file system. As an added bonus, mapping a folder makes it easier to manipulate the files in that folder from the server without needing to enter the container.
In the same way that Docker maps folders it can also map network ports, we can map port 3800 that the container uses internally to any port on our server, for example 4100, the container will send data packets to port 3800 internally but Docker will that these packets be sent through port 4100 of our server.
 We can also map users. And this is important to understand. The container will work internally as root, but we can make that user be another user on the server, for example the user superman. From that moment on, everything the container does to the mapped files or ports will not be done by root, it will be done by superman. That allows us to restrict the permissions of that container, we only have to restrict the permissions of the superman user of our system. We will give the user superman write permissions to the
 /folderpass/password file on our system so that he can write or modify that file but we will not give him permissions to write to any other folders. In this way we ensure that the container remains isolated.
To define all these container configurations the openmediavault-compose plugin uses docker-compose for its simplicity. Using a configuration file of a few lines we define the mappings and other configurations of a container and then we execute it.
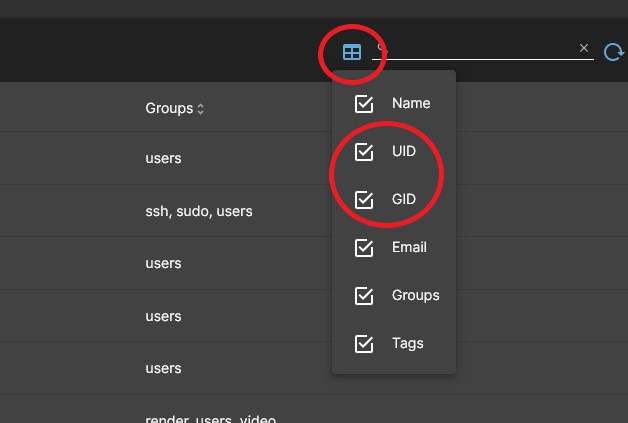
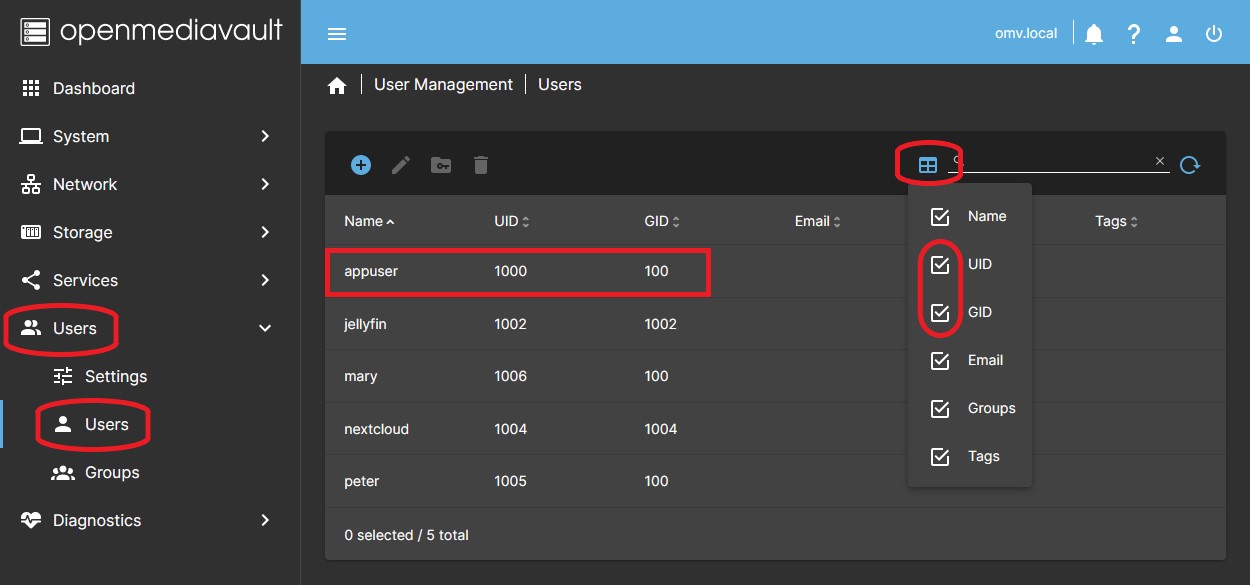
To map a user we define the PUID value, the user's identifier, and to map the group it will be the PGID value, the group's identifier. In the OMV GUI we can see the PUID value for each user in the USERS > USERS tab by opening the UID and GID columns using the icon at the top right. So if the user superman has the values 1004 and 100, in the compose file we would do something like this:
- PUID=1004
- PGID=100
The way to map a folder (volume) in docker-compose is something like this:
- /srv/dev-disk-by-uuid-9d43cda9-20e5-474f-b38b-6b2b6c03211a/appdata/folderpass:/folderpass
That could be one of the lines in the compose file that defines a container. This line is divided into two parts. To the left of the : we have /srv/dev-disk-by-uuid-9d43cda9-20e5-474f-b38b-6b2b6c03211a/appdata/folderpass which is the path of a real folder on our server, in our file system. On the right of the : we have /folderpass which is the path of a folder within the container, in its own file system.
| Beginners Info | |
|
All that long string of numbers is the path of one of our disks on the server and inside that disk we have an appdata folder and inside we create the folderpass folder Filesystem mount paths are usually in the /srv folder and the following folder contains a uuid to uniquely identify that drive. That folder is the mount folder for that hard drive. You should never modify the permissions of that folder or use it to create a shared folder. Create a folder inside to use as a shared folder. | |
From now on, every time the root user of the container writes to its /folderpass folder, what will really be happening is that the superman user will be writing to our /srv/dev-disk-by-uuid-9d43cda9-20e5-474f-b38b-6b2b6c03211a/appdata/folderpass folder from our server. The content of that folder is what we call persistent data. Naturally we must give permission to the superman user on our server to write to that folder or the container will throw an error.
The advantage of all this is that the container is limited to writing to that folder. We could be unlucky enough to download an image that has harmful code inside. Or if that container was exposed to the internet and had a security hole, perhaps it could be hacked. In this case the hacker could take control of the root user of the container. The advantage is that that root user on our system is actually the superman user, and in this case, no matter how superman he is, he can only write to the /folderpass folder, so he cannot access our server in any way. The user superman does not have permissions to write or read any other files on our server. Contained threat.
Conclusion. Never map the container user to the root user of the server, unless it is absolutely necessary and the container developer is fully trusted. If there were a security hole in that container, your server would be at the mercy of the hacker, since they would have permissions for everything. Related to this, never include the user running a container in the docker group, this is another story but doing that allows that user to escalate permissions to root.
If you're reading this, it's probably your first time using Docker. Docker may seem complicated at first glance, but once you get over the initial learning curve, setting up and installing a container literally takes less than 30 seconds. Keep going.
User and permission management in docker and OMV. More security.
| Note | |
| You are interested in reading this even if you are an experienced docker user but have no experience with OMV. | |
 The security mechanism of docker is that the permissions that the container has on our system are equivalent to the permissions that the user mapped to that container has. The easiest way to manage this is to create a user in the OMV GUI to run all the containers, let's call it appuser, this way we will give appuser permission to write/read the folders that all the containers need, and also appuser will never have access to system files. We achieve some security and control.
This may work for most users but can be improved. Let's analyze this in detail.
OMV has a special feature regarding creating users in the GUI. The primary user group for all users created in the GUI is the users group, GID=100. We can add a user to other groups but their primary group will always remain 100 and we cannot modify this.
Another feature of OMV is that shared folder creation defaults to owner root and owner group users. In addition, the permissions are read/write for the owner, read/write for the owner group and read for others, unless you modify it at the time of creating that shared folder.
The result of all of the above is that, at the time of creating a shared folder, any user created in the OMV GUI by default has read and write permissions on any shared folder. This is then restricted by individually managing the permissions of each shared folder or each user. To do this OMV uses a samba-based permissions system, an upper layer of permissions applied on top of filesystem-level permissions that allows it to enforce these restrictions.
| Beginners Info | |
|
Don't confuse file system level permissions with samba system permissions. Samba permissions are a top layer that can restrict permissions to the file system level, never expand them. The file system level permissions will always be the same even if you modify the permissions in the OMV GUI. Another very different issue is ACL permissions, never use them if you do not know exactly what you are doing, in 99% of cases they are not necessary and only cause problems. | |
All of this may be convenient for managing permissions on the NAS but it has security implications that need to be considered from a docker point of view.
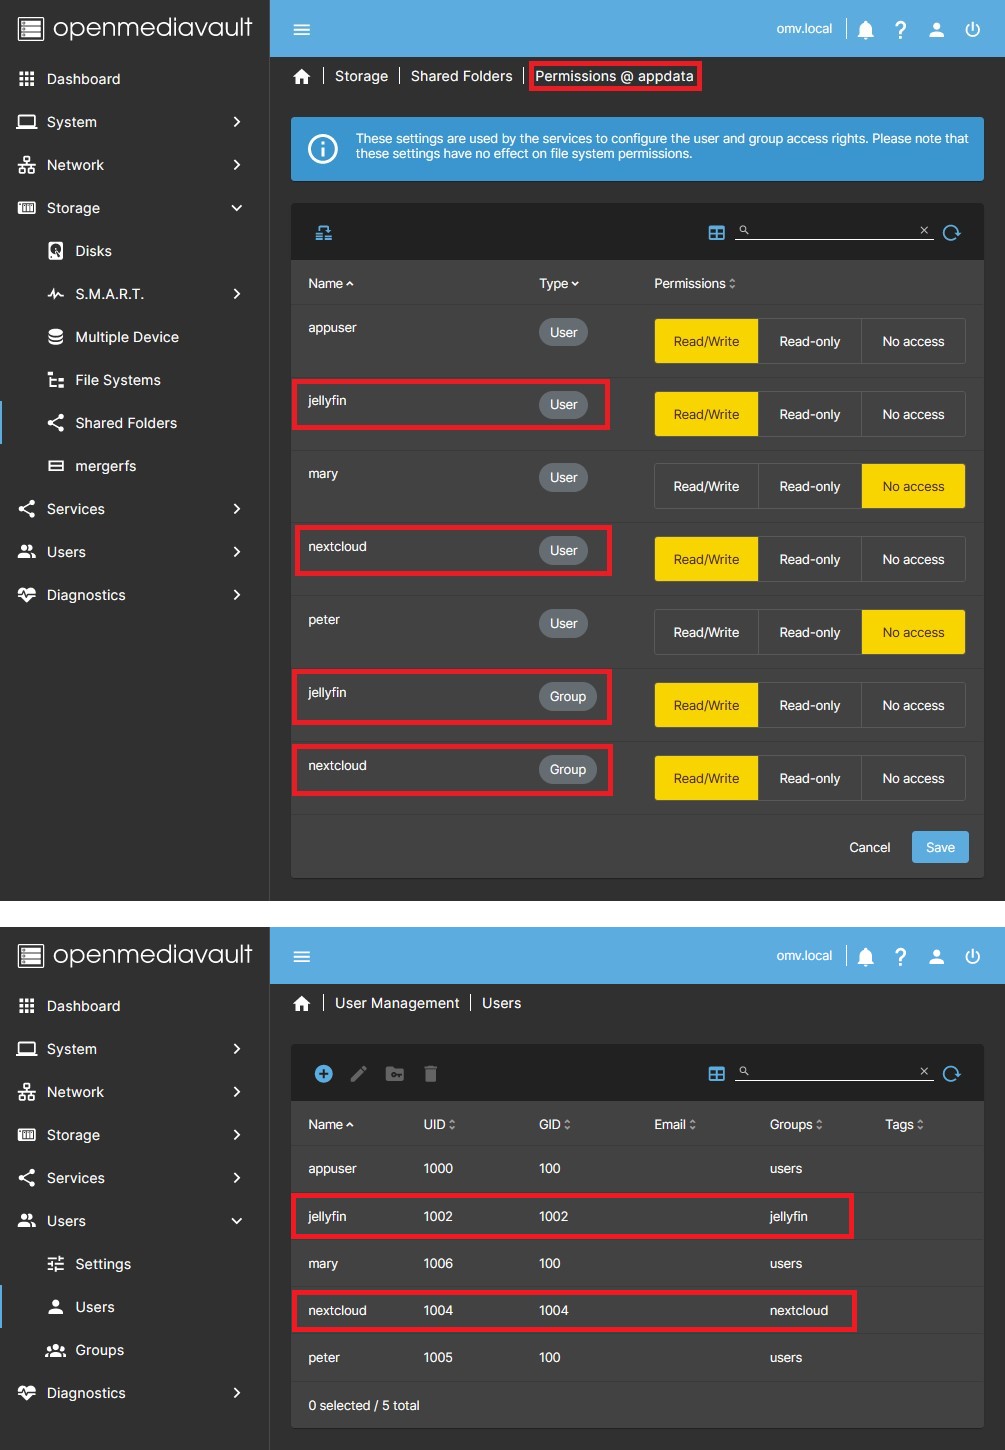
Therefore, we have created in the GUI a user called appuser that belongs to group 100 and has read/write access to all folders by default. The way to restrict appuser permissions is to customize this user's permissions in the GUI and ensure that they only have access to the folders that the containers need. If we do nothing, appuser will have access to all folders, even those not needed by the container. Important point. We don't want, for example, jellyfin to be able to access the documents folder if it's not necessary, just access the media folder, and maybe only with read permissions.
Up to this point we have some security, but there is still room for further improvement. At this point we have a user called appuser with access permissions to all the folders that the containers need. But it turns out that we implement a container that needs access to the documents folder, like Nextcloud or Duplicati. If we configure it with the user appuser we will have to give it access to the documents folder. At this point jellyfin will also have access to the documents folder. This may not be convenient if we are exposing jellyfin to the internet and the container is compromised at some point.
In this case, the only way to guarantee the separation of permissions in the containers is to create different users for each container. Then we could create a user in the OMV GUI named jellyfin for the jellyfin container and a user named nextcloud for the nextcloud container. In this way we can guarantee that each of them accesses only the folders they need. We have improved security a little more.
Regarding the group 100 of those users we still have a small problem. Belonging to that group grants default permissions to those users on all those folders and files that allow it, most if not all those created by the users. And here we must consider that all the files created by the containers are actually being created by a user who is in group 100. That is, the persistent data files generated by the containers will continue to belong to the users group GID=100. That means the jellyfin container could access the configuration files of the nextcloud container and vice versa.
If we want to improve this we have no choice but to go to CLI to create users who are not in group 100, since the OMV GUI does not allow doing so. Then in CLI we will execute the following command:
sudo useradd -U jellyfin
We have created a user jellyfin and its primary group is jellyfin. If we go to the GUI we can check that this user actually appears in the USERS > USERS tab and if we look at the PID and GID columns we will see their identifiers and we will see that they belong to the jellyfin group, not to the users group whose GID would be 100. In the USERS > GROUPS tab we can see that the jellyfin group has also been created, although it apparently has no users. This is because of the way OMV manages permissions using Samba permissions, we have created that user in CLI, therefore OMV has not included it in its primary group. You can simply edit that group and add the jellyfin user to the jellyfin group.
Done. We now have a user jellyfin with a primary group jellyfin that we can assign to the jellyfin container and we can guarantee that it will only have access to the folders we give it permission to. The jellyfin user will not be able to access any other folder on the system since it does not belong to the users group. Additionally, the persistent data in the jellyfin container will belong to the jellyfin user and the jellyfin group, so no other container will be able to access those files either. If we want another user to have access to that persistent data we just have to include it in the jellyfin group. Now we have that container perfectly isolated.
In this document we will use a single user called appuser and created in the GUI, this is more than enough for 99% of users. Consider your use case and whether or not you need to go further. If you do, act accordingly throughout the entire process.

Install and configure Docker
1. Installation
 In OMV7's GUI:
Under SYSTEM > OMV-EXTRAS Click on the DOCKER REPO button and click on the SAVE button. Now the docker repository is activated and you can install the compose plugin and docker.
Under SYSTEM > PLUGINS find and highlight openmediavault-compose 7.X, and click the INSTALL button.
- Installing the openmediavault-compose plugin will also install the openmediavault-sharerootfs plugin as a dependency.
| Warning | |
| Do not uninstall the openmediavault-sharerootfs plugin. It is a dependency of the openmediavault-compose plugin. Uninstalling openmediavault-sharerootfs when the openmediavault-compose plugin is installed will cause the openmediavault-compose plugin to be uninstalled. | |
2. Plugin Settings
The first step is to define some folders where the different data is stored. To do this, we go to the SERVICES > COMPOSE > SETTINGS tab. There are many possible configurations on a NAS. First we will see a simple configuration and then we will see a somewhat more advanced configuration.
2.1 SIMPLE OMV NAS SYSTEM
In the simple configuration we have the OMV operating system on a pendrive. We also have a drive that stores all the NAS data. In this unit we will configure docker and everything necessary.
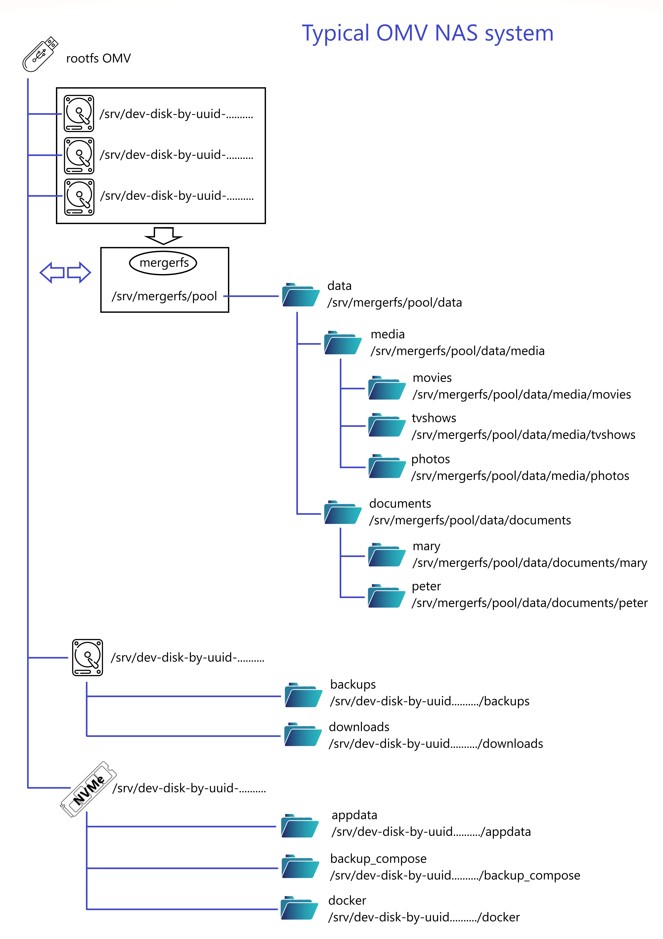
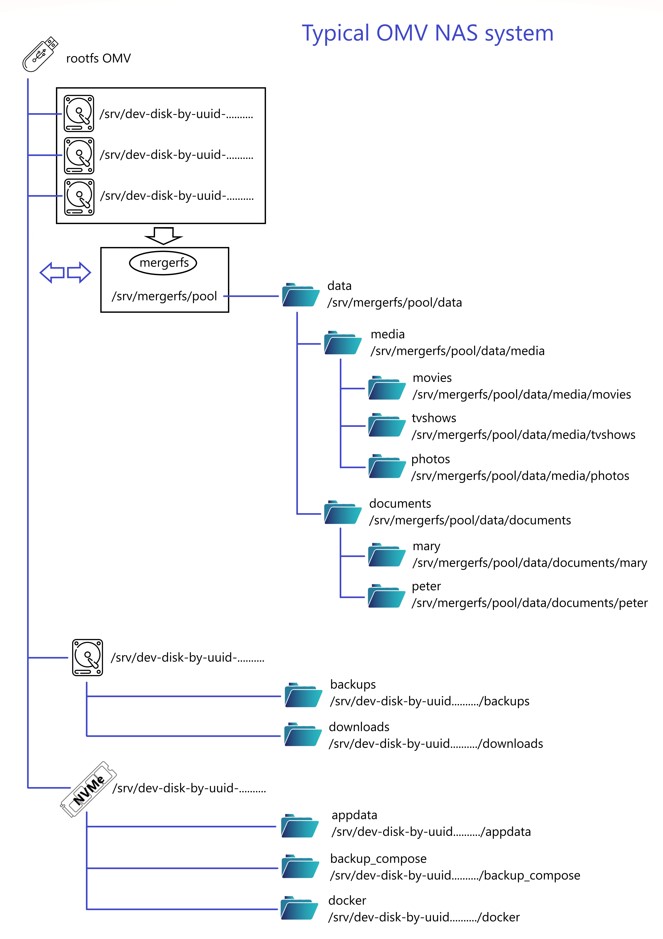
The following image shows a schematic of this type of configuration.
In this case all the necessary folders are on the same drive so everything will be very simple. All of them will be inside the mount folder of that drive, something like /srv/dev-disk-by-uuid…/appdata for example.
Create those shared folders in the OMV GUI and follow the explanations in point 2.3. Just keep in mind that all paths in this case will be in the same mount folder of type /srv/disk-by-uuid-…/docker or /srv/disk-by-uuid-…/backup_compose since there is only one unit.
2.2 ADVANCED OMV NAS SYSTEM
In a more advanced configuration than the previous one we can find something like the following.
The image below shows an example schematic that may be typical of any OMV NAS. The explanations in this document from now on will be based on this example system. Your system will probably be different, adapt the explanations to your real system.
- The OMV operating system is installed on a pendrive.
- A mergerfs pool has been configured with three drives where massive data of NAS users is stored.
- There is another hard drive where backups are made.
- A high access speed NVMe drive stores Docker data.
| Beginners Info | |
|
Installing OMV on a pendrive may seem strange to a beginner, but you will also be surprised to know that a large part of professional-level servers boot from a pendrive. Doing this has many advantages and no disadvantages. The speed of the system does not suffer at all since practically everything is done in RAM. The longevity of the pendrive is guaranteed by the openmediavault-flashmemory plugin, which is responsible for avoiding excessive writing that could degrade it. In addition to all this, it will be very easy to make backup copies, you will only have to make an image of that pendrive with usbimager on your PC. And even more important, restoring the system is extremely easy, cloning a pendrive from an image is very simple and fast. And finally, from a docker point of view, installing OMV on a pendrive will make it easier for us to separate the operating system and docker, using that fast SSD or NVMe drive where it is really necessary, in the docker storage. The OMV pendrive will not occupy a SATA port or the NVMe port on the motherboard. If your system is already installed and configured you can easily move the OMV configuration to a pendrive with omv-regen. | |
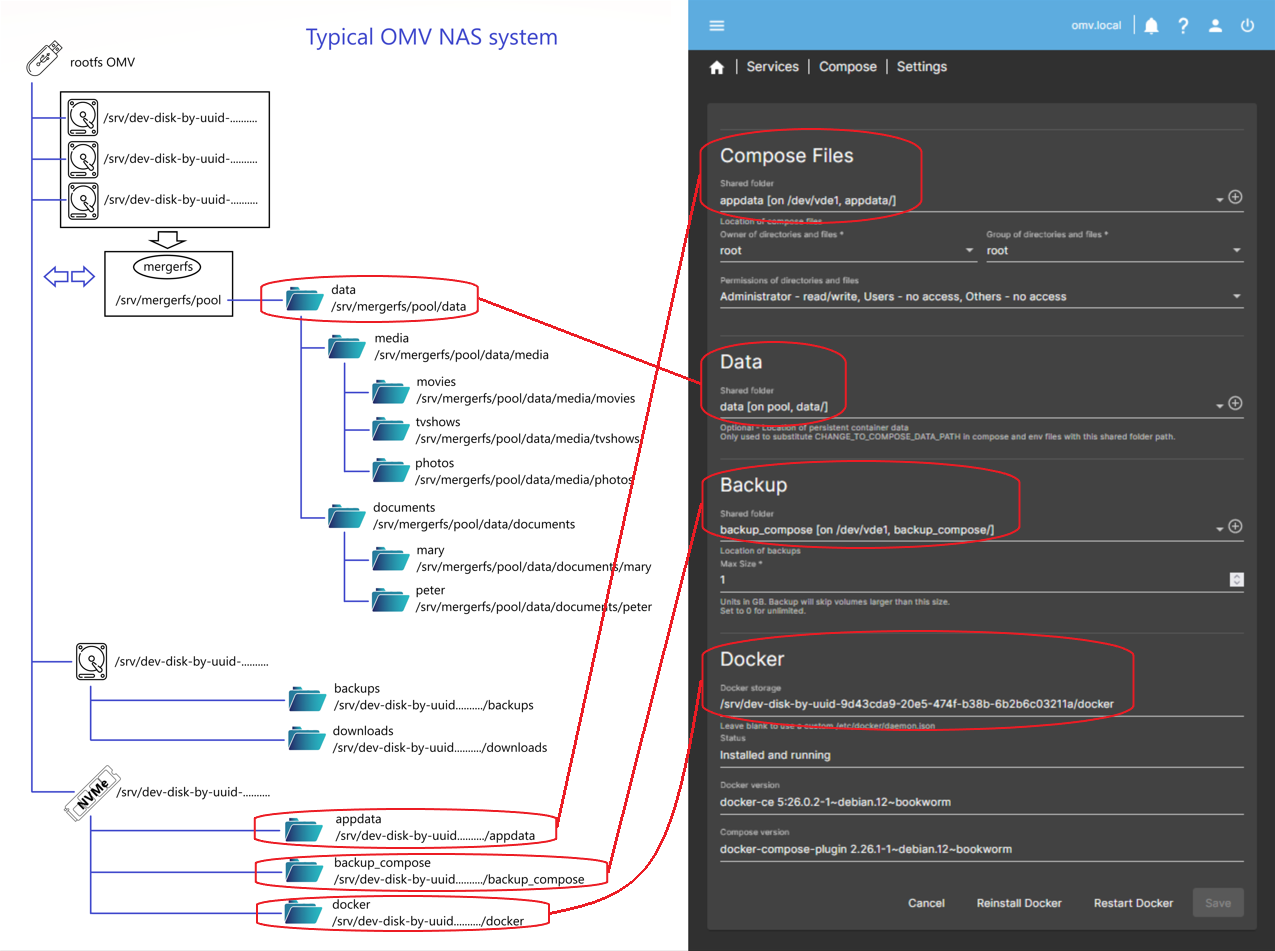
On the right you can see how the plugin's SETTINGS tab could be configured following this diagram. If your system is simpler or more complicated, adapt it accordingly. A simpler system could be one drive for OMV and another drive for data, in which case just create all the necessary folders on the data drive.
2.3 CONFIGURATION
In any case, the main recommendation here is to keep docker data and the OMV operating system separate.
| Beginners Info | |
|
Separating Docker from the operating system unit offers several advantages (this may surprise a user new to Linux, but things work differently on Linux than on Windows): - If Docker is installed along with the operating system, Docker data will be lost if you need to reinstall OMV for any reason. For a possible reinstall of OMV, having the docker data on a separate drive only requires mounting that drive and everything is back up and running in a matter of minutes. - Avoid rootfs filling problems. Depending on the number and type of containers, it is very possible to exhaust rootfs storage if docker is located next to the operating system, this causes a lot of problems. - Allows you to place docker on a higher speed drive. The OMV operating system does not need to be on fast storage, it can live perfectly on a pendrive (just remember to install openmediavault-flashmemory to ensure the longevity of the pendrive). However, Docker containers will benefit from increased execution speed if docker is installed on a high-access speed drive, such as an SSD or NVMe. - Installing OMV on a USB flash drive is a good idea. But installing docker also on that pendrive is detrimental to the pendrive because docker will perform continuous writes, penalizing the longevity of the pendrive despite openmediavault-flashmemory. - If you don't have a fast drive you can install docker on one of the data drives. The applications won't go as fast but at least they will be separated from rootfs. | |
| Beginners Info | |
|
Capacity of the disk drive dedicated to docker This capacity depends on the number and type of containers you are going to configure. A minimum of 60GB or 100GB would be recommended. If you are going to use database containers like Jellyfin or Plex with very large libraries you may need more, perhaps 250GB or 500GB. Nextcloud can also take up a lot of space depending on how you use it. | |
You can call these folders whatever you prefer. In this document, the names that reflect the previous images have been adopted for illustrative purposes, but you can decide what you want to call them and how to locate them. Following this scheme, the folders are the following:
appdatadatabackup_composedocker
We will see them below one by one:
| Note | |
| If you already have data on the NAS you will probably already have the data folder created, not necessarily with the same name. | |
appdata
- WHAT IS APPDATA FOLDER:
- This folder contains the configuration files and persistent data for the containers by default.
- The plugin will create subfolders inside the appdata folder for each compose file we generate. The name of each subfolder will be the same as the compose file. This subfolder will contain a copy of the yml file and the env file generated in the GUI. These are just backups, they should not be modified except in the plugin GUI.
- …
Beginners Info Each container is created using two configuration files. The yml file contains the container operation definitions, such as the image that is downloaded, the volumes and/or ports transferred to the host, etc. The env file contains environment variables for that particular container. Don't worry about this last file, you won't need it for now. - In the root of this folder the global environmental variables file generated by the plugin with the name
global.envwill be stored. We just need to know that this file is stored there, do not modify it manually or it will be overwritten.
- CONFIGURE THE APPDATA FOLDER:
- Create the appdata shared folder in the OMV GUI.
- …
Beginners Info To create shared folders, for example the appdata folder in the OMV GUI go to STORAGE > SHARED FOLDERS and Click +CREATE button.
- In the NAME field type -> appdata
- In the FILE SYSTEM field, select the SSD or NVMe disk or the one that interests you.
- Press SAVE button. - Return to the plugin's SETTINGS tab, click on the SHARED FOLDER field in the COMPOSE FILES section and from the drop-down menu select the appdata folder you created.
- Press the SAVE button.
- …
Beginners Info We can store persistent container data in this folder. For example, for the Jellyfin config folder we would do the following:
- /srv/dev-disk-by-uuid-9d43cda9-20e5-474f-b38b-6b2b6c03211a/appdata/jellyfin/config:/config
Where /srv/dev-disk-by-uuid-9d43cda9-20e5-474f-b38b-6b2b6c03211a/appdata is the absolute path to the appdata folder. You can copy it from the OMV GUI in the STORAGE > SHARED FOLDERS tab in the ABSOLUTE PATH column. When you start the container, Docker will create the jellyfin and config subfolders if they do not exist.
Later you can see this with examples. - …
Warning Make sure to create subfolders within each appdata folder for each container folder.
Don't do this: - /srv/dev-disk-by-uuid-9d43cda9-20e5-474f-b38b-6b2b6c03211a/appdata/jellyfin:/config
If you do this, the persistent data in the config folder will be mixed with the plugin's Docker files, and permissions could change without warning.
Do this: - /srv/dev-disk-by-uuid-9d43cda9-20e5-474f-b38b-6b2b6c03211a/appdata/jellyfin/config:/config
This way, the permissions will remain as created by the container. - …
Advanced configuration. Relative paths are supported by the compose plugin. If we use relative paths for volumes in containers, those volumes will be generated in these subfolders. For example, if we create a Jellyfin container and define this volume:
- ./config:/config
the configuration folder will be created in the subfolder of that container in this case:
/appdata/jellyfin/config
In addition to relative paths the compose plugin also supports symlinks to define volume paths. You can use the openmediavault-symlinks plugin to create them in the OMV GUI and combine both systems or use just one of them.
data
- WHAT IS DATA FOLDER:
- Use of this field is optional. This field in the plugin configuration allows you to define a path to a shared folder using the
CHANGE_TO_COMPOSE_DATA_PATHvariable. Later we will see how to use this variable in a compose file. The plugin allows you to use example compose files that are already preconfigured with this variable. In the GUI you can see a note that says: “Optional - Location of container persistent data”, this was the goal when the plugin was created since at that time environment variables were not supported for paths in the bakup utility of the complement. At this point that is no longer a problem and all paths can be defined in the environment variables file. - In order to put this field to useful use, despite the legend in the GUI about persistent data, we will use this variable to define the path to the system data folder. This is more useful considering the system configuration we have designed as an example, but you can use this field to define the route you want. By user data we understand the main storage file system where you will have most of the data, such as movies or other types of files.
- If you have more than one folder of these characteristics in different file systems, you will only be able to choose one of them to use the
CHANGE_TO_COMPOSE_DATA_PATHvariable. In that case, you will have to define the rest of the folder paths by other means, such as the global environmental variables file, for example. - …
Note If you don't have a fast drive for Docker, you can configure the data and appdata folders in the same shared folder. This will make the CHANGE_TO_COMPOSE_DATA_PATH variable serve to define the path of both. This is how the plugin example files are preconfigured. - …
Beginners Info The internal structure described in the "data" folder is unimportant. In this document, a "standard" structure has simply been described for illustrative purposes, so that the reader has a general idea about what the content of that folder may be. You can distribute within that folder any directory tree that you feel comfortable with.
- CONFIGURE THE DATA FOLDER:
- If your server is already running, you will already have this folder created. In this case, simply open the SHARED FOLDER field in the DATA section and select the shared folder (it doesn't matter if the name is different than data).
- If it is a new installation and you still do not have data on the server nor have you created that folder, you can create it in the OMV GUI and select it in the mentioned field of the plugin configuration.
- Press SAVE button.
backup_compose
- WHAT IS BACKUP_COMPOSE FOLDER:
- The compose plugin allows you to schedule automatic backups of persistent container data. Those backups will be stored in this folder.
- CONFIGURE THE BACKUP_COMPOSE FOLDER:
- Create the backup_compose shared folder in the OMV GUI and select it in the compose plugin settings in the BACKUP section.
- …
Note In the system diagram of this document the backup_compose folder has been configured on the NVMe drive instead of the dedicated backup drive for the following reason.
The primary purpose of the compose plugin's scheduled backup utility is to obtain a copy of persistent data when containers are stopped. The plugin is responsible for stopping the containers, backing them up and starting them again. This allows you to obtain a consistent copy. The next copy will overwrite the previous one (via rsync), so you will always only have the latest one.
This makes it easier to later use a specialized bakcups application that is capable of generating versioned and/or compressed backups of that copy generated by the plugin.
If you prefer, you can configure that folder on the backup disk as well.
docker
- WHAT IS DOCKER FOLDER:
- This folder contains the files that docker uses internally, such as downloaded images and other information necessary for docker to function.
- Unless you have special configurations, there is no need to preserve the data in this folder against a possible reinstallation of OMV, since everything in it is automatically downloaded if necessary each time a container is started. But it is convenient to locate this folder separate from rootfs to avoid problems.
- The plugin allows you to locate this folder somewhere else easily, simply go to the plugin's settings tab and in the DOCKER STORAGE field of the DOCKER section define the new path. By default this path is
/var/lib/dockerand it is located in the OMV file system, that is what we must change. - To define this route it is necessary to define the complete route. Symlinks can sometimes cause problems.
- CONFIGURE THE DOCKER FOLDER:
- Create the docker shared folder in the OMV GUI.
- In the STORAGE > SHARED FOLDERS tab, look for the absolute path of the docker folder in the ABSOLUTE PATH column (if the column is closed, open it using the icon at the top right). Next to the path there is an icon that allows you to copy the path to the clipboard. Paste it in the corresponding field according to the previous image.
- …
Warning The file system where the docker folder is should preferably be EXT4.
If you need to locate this folder on a ZFS or BTRFS file system, consult the corresponding documentation on the docker website to learn how to do it.
Never use an NTFS file system to host docker folders, it won't work (or generally for anything on linux other than a staging mount for copying data).
Do not place the docker folder in a merges pool, as this causes the docker files to be spread across several drives and ends up causing operating problems. If you do not have available units other than those contained in the mergerfs pool you can do the following:
- Create the docker folder on one of the drives that make up the mergerfs pool instead of creating it in the pool, and use the absolute path of that drive in the compose plugin GUI to locate the docker folder.
- Don't use the mergerfs rebalance feature on that pool, the docker data could end up on a different drive and be lost. - …
Advanced configuration. You can customize the /etc/docker/daemon.json file manually to customize the options. Doing this is useful for setting the driver for an nvidia card or for the driver for a different file system.
If you need to customize this file just leave the Docker storage field blank, the plugin will not modify the file.
3. Create appuser
If you have read the introduction of this document you already know if the appuser user is enough for you or you need something else. If you are happy with this user for some or all of the containers go ahead, otherwise customize it as above.
- In the OMV GUI create a user called appuser.
- Add appuser to the groups you need.
- For example, if you are going to use hardware transcoding with an Intel GPU you will want to add this user to the render and video groups.
- …
Warning Don't add appuser to the docker group. This is a security hole.
- Edit appuser's permissions and grant the appropriate permissions to each shared folder that the containers should be able to access. Persistent configuration data will generally be stored in appdata, so we'll give appuser write permissions to the appdata folder. It must also have access to the shared folders defined as volumes in the containers. For example, for Jellyfin, this could be the /media folder where movies are stored. Make sure this user only has access to the necessary folders.
- …
Beginners Info
To create the appuser user in the OMV GUI:
- Go to the USERS > USERS tab and press the +CREATE button.
- In the NAME field type appuser
- In the PASSWORD field define a strong password and confirm it in the next field.
- If you need to add appuser to a group, click the GROUPS field and choose the ones you need.
- Click on SAVE button.
To assign permissions to appuser, select appuser and press the SHARED FOLDER PERMISSIONS button.
- On each line of each shared folder, choose the appropriate permissions and click the corresponding box so that it is yellow.
- Click on SAVE button.
- Open the UID and GID columns and take note of the values that appuser has.
- Example: UID=1002 GID=100
- If you already had one user, appuser UID will be 1001. If you had 2 users, appuser UID will be 1002, etc. This may vary on your system.
| Warning | |
|
Except for very controlled special cases, never designate the admin user (UID=998) or the root user (UID=0) to manage a container. This is a serious security flaw. If we do this we are giving the container complete freedom to do whatever it wants in our system. Have you created this container? Do you know what he is capable of doing? | |
4. Global environmental variables
Global environment variables will be used in the procedure that follows this document.
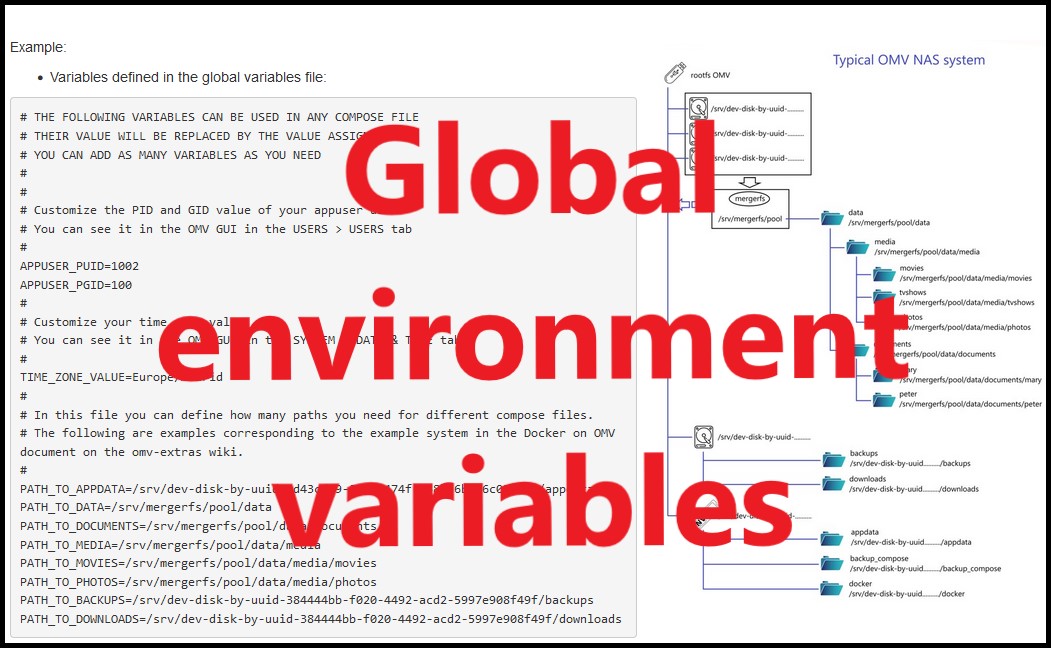
The plugin allows you to define global environment variables in a file that will be available to all running containers. This means that the variables defined in this file can be used in the different compose files. When you start a container, docker will replace those variables with their real values.
This is very useful for defining paths to folders or the user running the container. We define these values once and have them updated automatically in all containers.
- Variables defined in the global variables file:
# THE FOLLOWING VARIABLES CAN BE USED IN ANY COMPOSE FILE # THEIR VALUE WILL BE REPLACED BY THE VALUE ASSIGNED HERE # YOU CAN ADD AS MANY VARIABLES AS YOU NEED # # # Customize the PID and GID value of your appuser user. # You can see it in the OMV GUI in the USERS > USERS tab # APPUSER_PUID=1002 APPUSER_PGID=100 # # Customize your time zone value. # You can see it in the OMV GUI in the SYSTEM > DATE & TIME tab # TIME_ZONE_VALUE=Europe/Madrid # # In this file you can define how many paths you need for different compose files. # The following are examples corresponding to the example system in the Docker on OMV document on the omv-extras wiki. # Customize the values according to your system configuration. # PATH_TO_APPDATA=/srv/dev-disk-by-uuid-9d43cda9-20e5-474f-b38b-6b2b6c03211a/appdata PATH_TO_DATA=/srv/mergerfs/pool/data PATH_TO_DOCUMENTS=/srv/mergerfs/pool/data/documents PATH_TO_MEDIA=/srv/mergerfs/pool/data/media PATH_TO_MOVIES=/srv/mergerfs/pool/data/media/movies PATH_TO_PHOTOS=/srv/mergerfs/pool/data/media/photos PATH_TO_BACKUPS=/srv/dev-disk-by-uuid-384444bb-f020-4492-acd2-5997e908f49f/backups PATH_TO_DOWNLOADS=/srv/dev-disk-by-uuid-384444bb-f020-4492-acd2-5997e908f49f/downloads
- Now we could define the following compose file:
---
services:
  jellyfin:
    image: lscr.io/linuxserver/jellyfin:latest
    container_name: jellyfin
    environment:
      - PUID=${APPUSER_PUID}
      - PGID=${APPUSER_PGID}
      - TZ=${TIME_ZONE_VALUE}
    volumes:
      - ${PATH_TO_APPDATA}/jellyfin/config:/config
      - ${PATH_TO_APPDATA}/jellyfin/cache:/cache
      - ${PATH_TO_MEDIA}:/media
    ports:
      - 8096:8096
    restart: unless-stopped
- And the file that would actually be executed would be this:
---
services:
  jellyfin:
    image: lscr.io/linuxserver/jellyfin:latest
    container_name: jellyfin
    environment:
      - PUID=1002
      - PGID=100
      - TZ=Europe/Madrid
    volumes:
      - /srv/dev-disk-by-uuid-9d43cda9-20e5-474f-b38b-6b2b6c03211a/appdata/jellyfin/config:/config
      - /srv/dev-disk-by-uuid-9d43cda9-20e5-474f-b38b-6b2b6c03211a/appdata/jellyfin/cache:/cache
      - /srv/mergerfs/pool/data/media:/media
    ports:
      - 8096:8096
    restart: unless-stopped
What this variable system does is convert the variables that we have defined in the compose file into the actual values that we need to define in the compose file. If we are only creating one compose file it may not make much sense, but it is very useful when there are several compose files.
The advantage of using this system is that we define the compose file once and never need to modify it. Even if we reinstall the OMV system we just need to update those global variables and all our containers will be up to date and continue to work as before.
| Note | |
|
At this time, the plugin fully supports global environment variables, even while using the plugin's backup utility, so there is no reason to use symlinks. But if you want to use them for some reason, you can still do so. If you don't want to use environment variables, simply write the full values to the compose files without using variables. | |
- In the OMV GUI go to SERVICES > COMPOSE > FILES and press the EDIT GLOBAL ENVIRONEMENT FILE button.
- In the GLOBAL ENVIRONMENT field copy and paste the example file at the beginning of this section.
- Customize it with your own values.
- PUID and PGID → You can see the values of user appuser in USERS > USERS in the UID and GID columns. See point 3 of this document.
- TZ → You can see your local configuration in SYSTEM > DATE & TIME and in TIME ZONE field.
- APPDATA → Find the absolute path of your appdata shared folder in STORAGE > SHARED FOLDERS in the ABSOLUTE PATH column. Copy by clicking the link and paste it here.
- Customize the values of all paths according to your system configuration. If you need to define other different paths you can also do it here in the same way as the rest of the variables.
- You can define other variables according to your needs, such as database passwords or any value your compose file needs.

Configuring a container step by step (Jellyfin)
Choose a container
- On the dockerhub there are thousands of containers ready to configure.
- Try to choose containers from reputable publishers (linuxserver is very popular) or with many downloads and current ones.
- Check that the container is compatible with your server's architecture amd64, arm64…
- When choosing one read the publisher's recommendations before installing it.
- The plugin has examples that you can install directly. As an example we are going to install Jellyfin.
- …
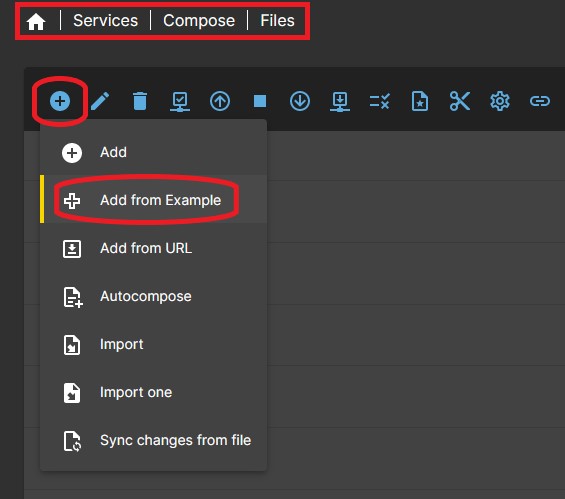
Note If you have configured folders in the plugin's SETTINGS tab, the example files will usually work as is, but you may want to modify them to optimize your settings. If you finish reading this document and look at any of the example files, you will understand why. - Go to SERVICES > COMPOSE > FILES and click ADD button, then click ADD FROM EXAMPLE button.
- Click on the EXAMPLE field and in the list look for the jellyfin file and select it.
- In the NAMEame field you can simply write jellyfin
- In the DESCRIPTION field you can write something to identify it as Media server.
- Press SAVE button.
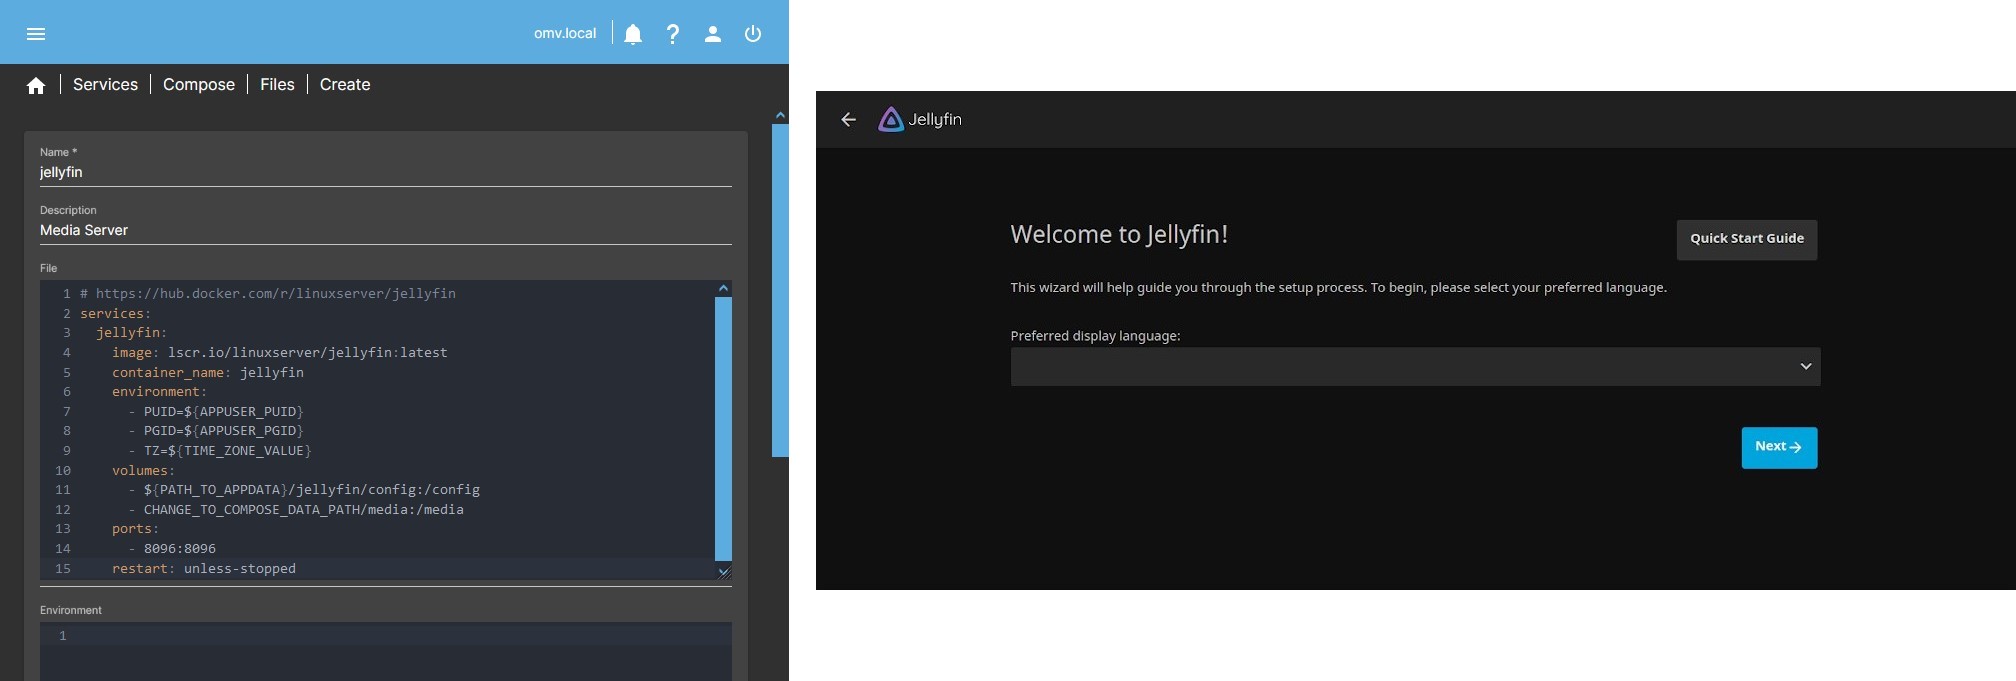
- In the form you will see a line with the compose file you just added called jellyfin. Select that file and press the EDIT button. At the time of writing this document, the example compose file looks like this:
| Beginners Info | |
| You will find containers where the creator has not published a compose file. Containers can be run from the CLI with a command line. The plugin uses docker-compose for easy setup but you need that compose file. If you can't find it, you can build it yourself using Composerize and starting from that container's docker command. There is a prepared Composerize container in the plugin's examples list. | |

# https://hub.docker.com/r/linuxserver/jellyfin
services:
  jellyfin:
    image: lscr.io/linuxserver/jellyfin:latest
    container_name: jellyfin
    environment:
      - PUID=1000
      - PGID=1000
      - TZ=Etc/UTC
      - JELLYFIN_PublishedServerUrl=192.168.0.5 #optional
    volumes:
      - CHANGE_TO_COMPOSE_DATA_PATH/jellyfin/library:/config
      - CHANGE_TO_COMPOSE_DATA_PATH/jellyfin/tvseries:/data/tvshows
      - CHANGE_TO_COMPOSE_DATA_PATH/jellyfin/movies:/data/movies
    ports:
      - 8096:8096
      - 8920:8920 #optional
      - 7359:7359/udp #optional
      - 1900:1900/udp #optional
    restart: unless-stopped
| Note | |
| Verify on the official page that this compose file has not changed before installing it | |
| Beginners Info | |
|
WHAT A COMPOSE FILE IS LIKE A compose file is a yaml format file that is used to define the configurations that docker will adjust to the downloaded image to form the container. The parts of this composition file for jellyfin are as follows: services: It is always the first line and gives way to the definition of the different services. jellyfin: Is the name of a service in this compose file. In this case there is only one but there could be more. image: Defines where the container is downloaded from, in this case linuxserver. This value may have options to download different versions of images. In this case the word latest indicates that the latest available version will always be downloaded. container_name: Simply the name of the container for this service, in this case jellyfin. environment In this section some environment values are defined, such as in this case the user who will run the container, the time zone, or others. volumes Here we define the folder mounts in the container. ports To define port mounts. restart Tells docker how we want the container to behave when the server starts, etc. In this case, the container will always be running unless we stop it manually. | |
Customize the compose file
 The next thing we need to do is adapt the container configurations so that it works on our system. We will see it below step by step.
The first line contains a link to the website of the container developer, useful to reach quickly and take a look. It is always a good idea to read the editor's comments to familiarize yourself with the options and check that the container is valid for your architecture (x86, arm…) or see special configurations that we may need.
To customize this compose file we will follow the system example used in the previous point of this document and the generated environmental global variables file, which is as follows:
# THE FOLLOWING VARIABLES CAN BE USED IN ANY COMPOSE FILE
# THEIR VALUE WILL BE REPLACED BY THE VALUE ASSIGNED HERE
# YOU CAN ADD AS MANY VARIABLES AS YOU NEED
#
#
# Customize the PID and GID value of your appuser user.
# You can see it in the OMV GUI in the USERS > USERS tab
#
APPUSER_PUID=1002
APPUSER_PGID=100
#
# Customize your time zone value.
# You can see it in the OMV GUI in the SYSTEM > DATE & TIME tab
#
TIME_ZONE_VALUE=Europe/Madrid
#
# In this file you can define how many paths you need for different compose files.
# The following are examples corresponding to the example system in the Docker on OMV document on the omv-extras wiki.
#
PATH_TO_APPDATA=/srv/dev-disk-by-uuid-9d43cda9-20e5-474f-b38b-6b2b6c03211a/appdata
PATH_TO_DATA=/srv/mergerfs/pool/data
PATH_TO_DOCUMENTS=/srv/mergerfs/pool/data/documents
PATH_TO_MEDIA=/srv/mergerfs/pool/data/media
PATH_TO_MOVIES=/srv/mergerfs/pool/data/media/movies
PATH_TO_PHOTOS=/srv/mergerfs/pool/data/media/photos
PATH_TO_BACKUPS=/srv/dev-disk-by-uuid-384444bb-f020-4492-acd2-5997e908f49f/backups
PATH_TO_DOWNLOADS=/srv/dev-disk-by-uuid-384444bb-f020-4492-acd2-5997e908f49f/downloads
- We adjust the compose file as follows:
# https://hub.docker.com/r/linuxserver/jellyfin
services:
  jellyfin:
    image: lscr.io/linuxserver/jellyfin:latest
    container_name: jellyfin
    environment:
      - PUID=${APPUSER_PUID}  # See Comment 1
      - PGID=${APPUSER_PGID}  # See Comment 1
      - TZ=${TIME_ZONE_VALUE}   # See Comment 2
      #- JELLYFIN_PublishedServerUrl=192.168.0.5   # See Comment 3
    volumes:
      - ${PATH_TO_APPDATA}/jellyfin/config:/config   # See Comment 4
      - CHANGE_TO_COMPOSE_DATA_PATH/media:/media   # See Comment 4
    devices:   # See Comment 5
      - /dev/dri:/dev/dri   # See Comment 5
    ports:
      - 8096:8096   # See Comment 6
    restart: unless-stopped
| Beginners Warning | |
|
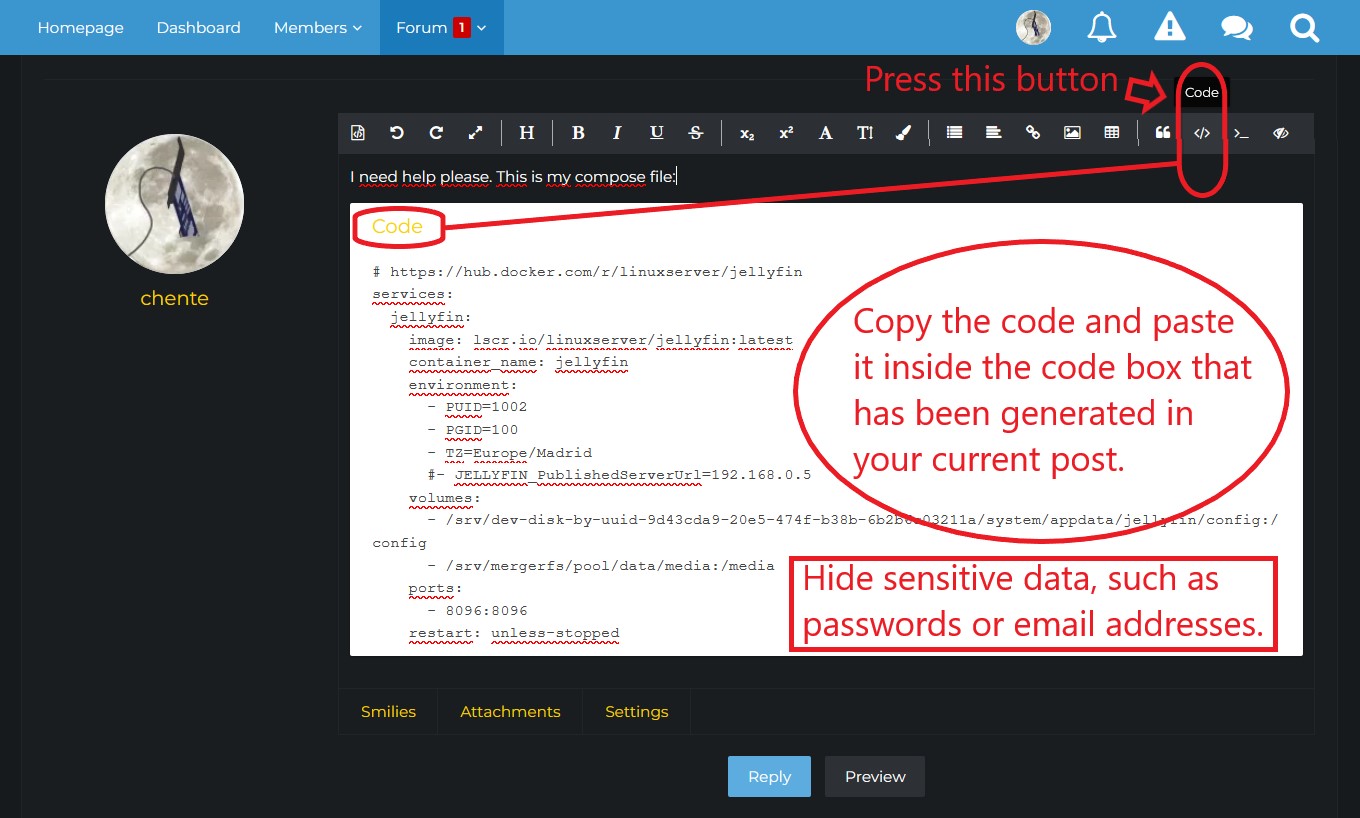
This file is in Yaml format, indentations are important. If you do not respect the indentations, Docker will not be able to interpret the configuration file and the container will give an error and will not start. Whenever you ask for help on the forum, post the compose file in a code box to show the indentations so you can get help. To create a code box in the forum press the corresponding button in the toolbar. Hides sensitive data, such as passwords, email addresses, etc. | |
Environment
- Comment 1:
- PUID and PGID correspond to the UID and GID values of the user who is going to manage the container on the system.
- In our case we want this user to be appuser, so we enter the values of this user.
- In the OMV GUI, go to the USERS > USERS tab and open the UID and GID columns using the icon at the top right. In these columns the values for the appuser user will be displayed. Let's assume that in this case they are UID=1002 and GID=100. See point 3 of this document.
- In addition, in this case we have used environment variables, see point 4 of this document, so the values will be those established in that file.
- Comment 2:
- This line is used to set the time zone within the container. Adjust it to your location. If you leave the previous value
Etc/UTCthe container will use the Coordinated Universal Time.- It should appear in the OMV GUI in the SYSTEM > DATE & TIME tab and in the TIME ZONE field. If not, you can see it by typing
cat /etc/timezonein a terminal.
- In addition, in this case we have used environment variables, see point 4 of this document, so the values will be those established in that file.
- Comment 3:
- This is a special configuration of this container. To know what it means, it is necessary to consult the container documentation on the linuxserver website mentioned above. In some you may need this line to make Jellyfin visible on your network. We assume that our system does not need this so we add a hash at the beginning of that line so that docker ignores this instruction. If you need this you just have to remove
#at the beginning and replace the IP with the real IP of your server.- If your IP were for example
192.168.1.100the line would look like this:- JELLYFIN_PublishedServerUrl=192.168.1.100
Volumes
- Comment 4:
- In the VOLUMES section we map folders from the container to the host and vice versa. The user appuser must have read and write permissions on the /appdata folder and at least read permissions on the media folders. Otherwise, the container will throw an error when we start it.
- …
Beginners Info On the left the folder on the host. On the right the folder in the container.
Read the introduction of this document to understand folder mapping. - …
Advanced configuration You can use relative paths. Set the volume mapping in the compose file:
- ./config:/config
will create the folder
${PATH_TO_APPDATA}/jellyfin/config
on the host. - In the first line we are mapping the /config folder of the jellyfin container to a folder on our system. The /config folder is the one that contains the jellyfin configuration files, the database, users and passwords, plugins, etc. We want this folder to be located on a drive with access speed. So we map it to our /appdata folder that we have configured on a fast disk, ideal for managing a large database. A fast disk will allow Jellyfin to quickly read movie covers, etc. from the television and everything will be better.
- …
Beginners Info This will be the persistent data for this container. If we need to reset the container, it is enough to stop it, delete this folder and start the container. We will find it in its initial state and ready to configure from scratch.
- In the second line we map the folder containing our movies and photos so that the container can read them.
- On the left the real path of this folder. In our case the actual path could be something like
/srv/mergerfs/pool/data/media. We can use that route or take advantage of the facilities that the plugin gives us to define routes.- In this case we have used the path defined in the plugin GUI (In SERVICES > COMPOSE > SETTINGS in the DATA Section) to make it easier to write paths.
CHANGE_TO_COMPOSE_DATA_PATHis equivalent in our case to/srv/mergerfs/pool/data - An alternative way to do this would be to use the global environment variable that we added to the global environment variables file.
PATH_TO_DATA=/srv/mergerfs/pool/data. In the compose file we would write this line- ${PATH_TO_DATA}/media:/media
- Next the separator
: - On the right, the name that we want the container to see, in this case we choose simply
/media - …
Note In the case of jellyfin the libraries are configured from the container, we just need it to be able to see them. That is to say, it is not necessary to map movies on the one hand and photos on the other hand, although we could do it that way too.
To make it easier, we map a single volume that contains everything. Later from jellyfin we will search each folder for each library. /media/movies /media/photos etc.
- If you have shared folders on other hard drives that you need the container to see, you can add as many volumes as you need in this section.
Devices
- Comment 5:
- In the DEVICES section we can mount existing devices on the host inside the container.
- This step is optional, set it only if you need Hardware Acceleration for Jellyfin. If you don't need it, simply remove these two lines from your compose file.
- As an example in this case we will assume that we want to use Hardware Acceleration in Jellyfin and that the server processor is Intel and has an integrated GPU with Intel Quick Sync. If we consult the linuxserver documentation it tells us that to use an Intel GPU we must mount the video device inside the container and we must also grant permission to the container user to access that device (see the linuxserver documentation to customize if your GPU is different).
- To mount the video device we simply add the
Devices:section to the compose file and mount the/dev/drivolume so that Jellyfin can read it using the line- /dev/dri:/dev/dri- When the container looks for the
/dev/drifolder on his file system docker will cause the container to actually read the server filesystem folder/dev/dri
- To grant appuser permissions to use this device we include it in the render and video groups. That will be enough to access the device and use it.
Ports
- Comment 6:
- In the PORTS section we map the ports for the application to communicate with the outside.
- The process and syntax are the same as in the other sections of the compose file.
- If we want we can change the port that we will use in our system to access jellyfin or keep it the same.
- In this case we keep it the same port, so we write
8096on both sides of:- If we wanted to change the port to 8888, for example, we would write on the left
8888, then the separator:and on the right the one that specifies the original stack8096, which is used internally by the container. The result would be- 8888:8096
- If you need information about available ports you can check this forum post. [How-To] Define exposed ports in Docker which do not interfere with other services/applications
- …
Beginners Info You should always make sure that the port mapped on the host is free.
There are special cases where the container needs port 80 and/or port 443, with Nginx Proxy Manager. OMV uses those ports to access the GUI. You can change them in System Workbench.
Another special case is pihole, which needs port 53. OMV uses port 53 and we cannot occupy it, so in this case it can be solved with a VLAN. There is a procedure in the openmediavault-compose plugin document on this wiki.
When you run that container, what will actually be executed is the following. If you don't want to use global environment variables you can do it just like this. It will work the same way:
services:
  jellyfin:
    image: lscr.io/linuxserver/jellyfin:latest
    container_name: jellyfin
    environment:
      - PUID=1002
      - PGID=100
      - TZ=Europe/Madrid
    volumes:
      - /srv/dev-disk-by-uuid-9d43cda9-20e5-474f-b38b-6b2b6c03211a/system/appdata/jellyfin/config:/config
      - /srv/mergerfs/pool/data/media:/media
    devices:
      - /dev/dri:/dev/dri
    ports:
      - 8096:8096
    restart: unless-stopped
Deploy the Container and access the application
- In the OMV GUI, go to SERVICES > COMPOSE > FILES. At this point the line corresponding to the compose file should appear with a red indicator on the right side saying that the container is stopped. Select the compose file and click on the UP button.
- A code box will appear showing the output of this command in which you can see that the jellyfin image is being downloaded, the container is configured and its execution starts. Press CLOSE to close the code box. If everything went well you should see the line of that compose file with the indicator on the right in green.
- If the container configuration is not correct, a red box will appear in the GUI indicating that there is an error. In that case you can debug it by doing the following:
- Select the compose file and press the CHECK button.
- A dialog box will open analyzing the composition of the container. You can probably figure out what the error is by reading that text.
- Modify the compose file to correct the error and try again.
- If the container configuration is correct, you should be able to access your application by typing the IP of our server followed by
:and the access port defined in the previous point. In this case, if the IP of our server were, for example, 192.168.1.100, we would writehttp://192.168.1.100:8096to access Jellyfin.
Help request on the OMV forum
- If you have come this far and cannot lift your container, you can request help in the OMV forum.
- Whenever you ask for help on the forum related to running a container, post the compose file (and the global environment variables file if you are using it) inside a code box.
- To open a code box press the
</>button in the toolbar of the box in which you write the post. - Copy and paste the code inside.
- Hide sensitive data, such as passwords or email addresses or web domains.
- Be grateful for help when you receive it, keep in mind that all forum members are volunteers, including OMV and omv-extras developers.

Examples of configuration of some containers
Once the global environment variables file is configured, implementing containers is very simple. Some examples may be those listed below.
In each of them the container has been configured following the system and folder scheme outlined in this document. Adapt it to your server configuration if it is different.
Duplicati
Useful application to make encrypted, versioned, compressed and deduplicated backups locally or remotely.

# https://hub.docker.com/r/linuxserver/duplicati
services:
  duplicati:
    image: lscr.io/linuxserver/duplicati:latest
    container_name: duplicati
    environment:
      - PUID=${APPUSER_PUID}
      - PGID=${APPUSER_PGID}
      - TZ=${TIME_ZONE_VALUE}
      #- CLI_ARGS= #optional
    volumes:
      - ${PATH_TO_APPDATA}/duplicati/config:/config
      - ${PATH_TO_BACKUPS}/duplicati/backups:/backups
      - ${PATH_TO_DOCUMENTS}:/source/documents:ro   # :ro makes the container only have read access to this volume
      - ${PATH_TO_PHOTOS}:/source/photos:ro
    ports:
      - 8200:8200
    restart: unless-stopped
###########################
# This compose file is customized following the document: "Docker in OMV" from the OMV-Extras wiki.
# Adapt it to your server if the configuration is different.
# https://wiki.omv-extras.org/doku.php?id=omv7:docker_in_omv
###########################
Syncthing
Application to synchronize folders between different devices and the server, such as smartphones or PCs.

# https://hub.docker.com/r/linuxserver/syncthing
services:
  syncthing:
    image: lscr.io/linuxserver/syncthing:latest
    container_name: syncthing
    hostname: syncthing #optional
    environment:
      - PUID=${APPUSER_PUID}
      - PGID=${APPUSER_PGID}
      - TZ=${TIME_ZONE_VALUE}
    volumes:
      - ${PATH_TO_APPDATA}/syncthing/config:/config
      - ${PATH_TO_DOCUMENTS}/mary/syncthing:/mary    # If your name is not Mary, modify this
      - ${PATH_TO_DOCUMENTS}/peter/syncthing:/peter  # If your name is not Peter, modify this
    ports:
      - 8384:8384
      - 22000:22000/tcp
      - 22000:22000/udp
      - 21027:21027/udp
    restart: unless-stopped
###########################
# This compose file is customized following the document: "Docker in OMV" from the OMV-Extras wiki.
# Adapt it to your server if the configuration is different.
# https://wiki.omv-extras.org/doku.php?id=omv7:docker_in_omv
###########################
Nginx Proxy Manager
This container will allow you to publish services (for example jellyfin) on the internet securely with Let's encrypt certificates. It has a very intuitive administration GUI.
- As a special feature, notice that NPM needs to use ports 80 and 443 on the server. Since the OMV GUI is using them by default, you will have to release those ports so that the container can use them.
- In the OMV GUI go to SYSTEM > WORKBENCH and change those two ports to others. For example, change 80 to 8888 and 443 to 8443. Or whatever you want that is not in use.
- When you change them you will have to add the port to your browser's IP to access the OMV GUI. Example: http://192.168.1.50:8888
| Advanced configuration. | |
|
NPM requires ports 80 and 443 on the router to validate Let's Encrypt certificates. You can free those ports by changing the ones used by the OMV GUI as suggested or you can do a forwarding from the router to the container. To do this, forward 80 and 443 on the router to, for example, 30080 and 30443 with the server's IP. In the NPM container it collects these ports using: - 30080:80 - 30443:443 The result will be the same, the container will receive the traffic from those router ports and you will still have the OMV GUI on port 80 and 443 of your local network. | |
# https://nginxproxymanager.com
services:
  app:
    image: 'jc21/nginx-proxy-manager:latest'
    restart: unless-stopped
    ports:
      - '80:80' # Public HTTP Port
      - '443:443' # Public HTTPS Port
      - '81:81' # Admin Web Port
      # Add any other Stream port you want to expose
      # - '21:21' # FTP
    environment:
      # Mysql/Maria connection parameters:
      DB_MYSQL_HOST: "db"
      DB_MYSQL_PORT: 3306
      DB_MYSQL_USER: "npm"
      DB_MYSQL_PASSWORD: "npm"
      DB_MYSQL_NAME: "npm"
      # Uncomment this if IPv6 is not enabled on your host
      # DISABLE_IPV6: 'true'
    volumes:
      - ${PATH_TO_APPDATA}/nginxproxymanager/data:/data
      - ${PATH_TO_APPDATA}/nginxproxymanager/letsencrypt:/etc/letsencrypt
    depends_on:
      - db
  db:
    image: 'jc21/mariadb-aria:latest'
    restart: unless-stopped
    environment:
      MYSQL_ROOT_PASSWORD: 'npm'
      MYSQL_DATABASE: 'npm'
      MYSQL_USER: 'npm'
      MYSQL_PASSWORD: 'npm'
      MARIADB_AUTO_UPGRADE: '1'
    volumes:
      - ${PATH_TO_APPDATA}/nginxproxymanager/mysql:/var/lib/mysql
###########################
# This compose file is customized following the document: "Docker in OMV" from the OMV-Extras wiki.
# Adapt it to your server if the configuration is different.
# https://wiki.omv-extras.org/doku.php?id=omv7:docker_in_omv
###########################
To access the NPM GUI use port 81. The initial username and password to access NPM is:
- User:
admin@example.com - Password:
changeme
Nextcloud AIO (All In One)
Nextcloud is a private cloud hosting system. You will be able to access the files on your server from the internet.
This container is the official version of Nextcloud AIO (All In One). It has a configuration GUI that installs and manages several containers at the same time.
- The official Nextcloud AIO docker container documentation is here → Nextcloud AIO
- The official Nextcloud administration documentation is here → Nextcloud
Before installing Nextcloud you need to previously install a proxy, such as the one described above Nginx Proxy Manager (you can use any other proxy supported by Nextcloud AIO, check their documentation for other options). Install NPM first and configure it following these instructions: NPM configuration for Nextcloud AIO (Click on “click to expand” in the option for Nginx-Proxy-Manager)
For this container to work you will have to do the following:
- You will need a domain, you can buy it or get a free one, for example at Duckdns.org
- Point the domain to your router's public IP (make sure your ISP hasn't put you behind CGNAT. If this is the case, request a public IP without CGNAT). Use this site to check if it's working: www.whatsmydns.net The IP must be the same as the one configured on your router. You can press several times to force the expansion.
- On your router, direct ports 80 and 443 to the IP of your server. The proxy (Nginx Proxy Manager) will receive the traffic from these ports and will direct it to the Nextcloud container through port 11000 (or to another container, if the request reaches the proxy from a domain other than Nextcloud).
# https://github.com/nextcloud/all-in-one
# For custom configuration consult -> https://github.com/nextcloud/all-in-one/blob/main/compose.yaml
services:
  nextcloud-aio-mastercontainer:
    image: nextcloud/all-in-one:latest
    init: true
    restart: always
    container_name: nextcloud-aio-mastercontainer
    volumes:
      - nextcloud_aio_mastercontainer:/mnt/docker-aio-config
      - /var/run/docker.sock:/var/run/docker.sock:ro
    ports:
      - 8080:8080
    environment:
      - APACHE_PORT=11000
      - NEXTCLOUD_DATADIR=${PATH_TO_APPDATA}/nextcloud_data
volumes:
  nextcloud_aio_mastercontainer:
    name: nextcloud_aio_mastercontainer
###########################
# This compose file is customized following the document: "Docker in OMV" from the OMV-Extras wiki.
# Adapt it to your server if the configuration is different.
# https://wiki.omv-extras.org/doku.php?id=omv7:docker_in_omv
###########################
Start the container and make the first configuration. Follow these steps from point 4 → How to install the Nextcloud All In One on linux
Notice that we have configured the Nextcloud data volume in the appdata folder. This is due to two reasons.
- All files that Nextcloud manages directly are synchronized in a database and Nextcloud can modify their permissions. This may prevent you from using those files from outside of Nextcloud due to permissions and would in any case affect the Nextcloud database.
- Nextcloud AIO provides a backup system in its GUI that specifically includes all user data. This may not be convenient if those folders are too large and you use other means to back up that data.
All of this can be easily overcome by using the Nextcloud External Storage Plugin to mount those shared folders from the Nextcloud GUI, for example with samba. This will allow you to continue using those files within Nextcloud but outside of its database. Then in the data volume set up for Nextcloud there will only be information such as phone books or calendars of the different users, which do not take up much space and can be stored on a small and fast disk.
| Note | |
|
Nextcloud AIO is a container that spawns other containers and stores them in the docker folder. The openmediavault-compose plugin backup utility does not back up data in this folder. If you want to have a backup of this container you must use the internal backup function of Nextcloud AIO. In the Nextcloud AIO GUI you must establish where this backup is saved and how often it should be done, Nextcloud AIO takes care of everything else, stopping containers, making the backup and starting containers again. | |
Other containers
- Look at the examples provided by the compose plugin, there are many prepared compose files.
- In the OMV GUI go to SERVICES > COMPOSE > FILES and press the ADD button, then press the ADD FROM EXAMPLE button.
| Beginners Info | |
| Most of the example compose files will work out of the box if you run them without making any modifications. But it will probably be better to adapt them to your system configuration according to everything explained in this document. This will avoid unexpected situations. | |
Create your own custom container
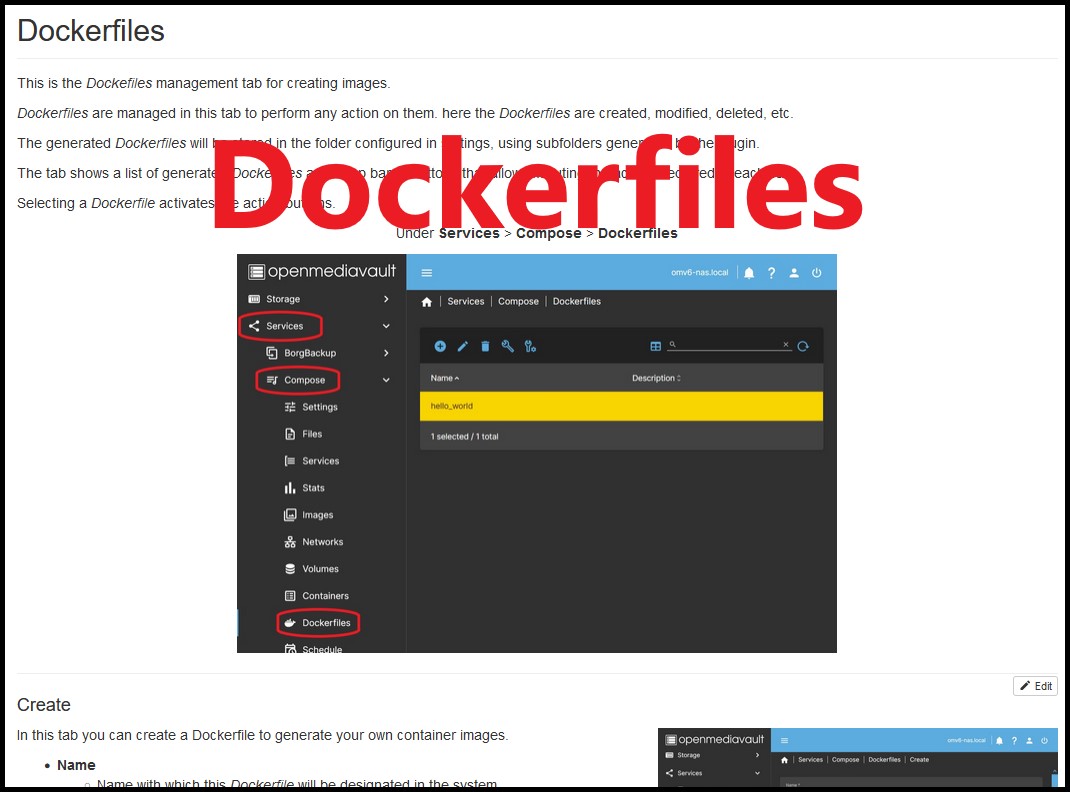 If you can't find a container that fits what you need in the plugin's list of examples or on the internet, you can create an image yourself and run the container from that image. To do this you can use Dockerfile.
The openmediavault-compose plugin makes it easy to create images using the Dockerfile. You can see its use here → Dockerfiles

Some basic procedures for container management
How to schedule container updates and/or backups
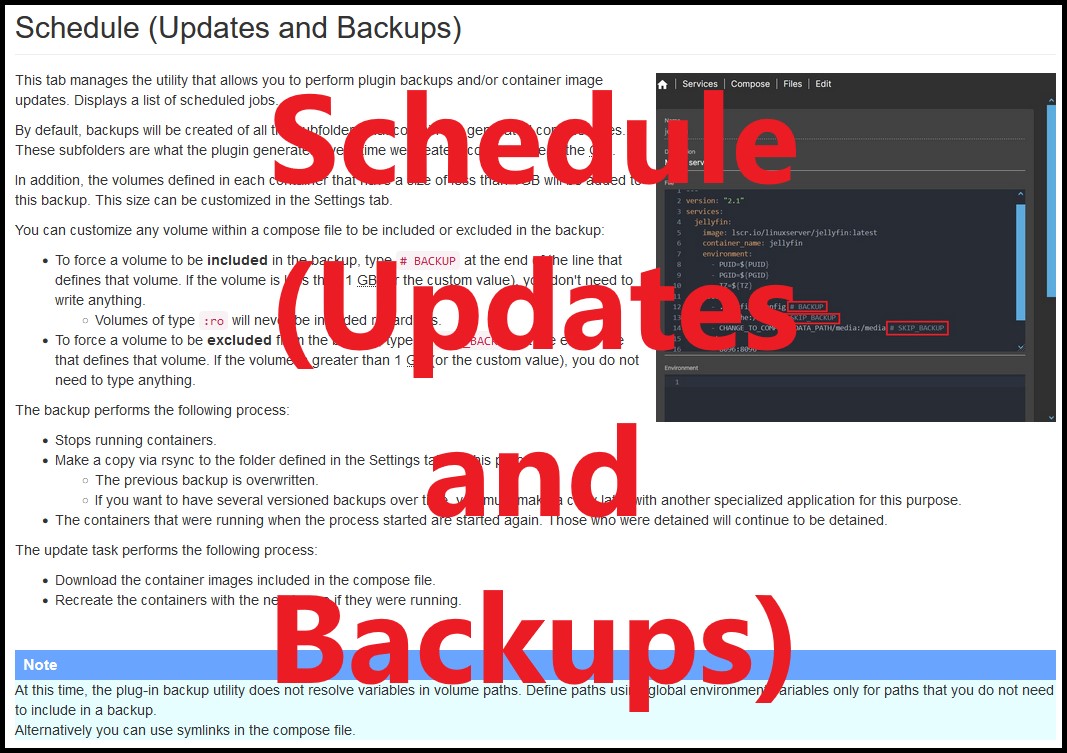 Especially useful is this feature of the plugin. You will be able to selectively schedule container updates. And you can also make backups of the containers and volumes you want on a scheduled basis.
See how to do it in the corresponding section of the plugin document in this wiki → Schedule (Updates and Backups)
How to modify the configuration of a container
If for any reason you need to modify the container configuration, change the location of a volume or any other circumstance, do the following:
- In the OMV GUI go to SERVICES > COMPOSE > FILES, select the container row and press the DOWN button. This will stop the container.
- Press the EDIT button.
- Modify the desired parameters in the FILE box.
- Press SAVE button.
- Select the container row again and press the UP button. The container will now be running with the modified parameters.
How to reset a container's settings
If you want to restore the container to its initial state, do the following (This will remove any configuration we have made to the container):
- In the OMV GUI go to SERVICES > COMPOSE > FILES, select the container row and press the DOWN button. This will stop the container.
- Delete the config folder corresponding to the container. In the example
/srv/dev-disk-by-uuid-9d43cda9-20e5-474f-b38b-6b2b6c03211a/appdata/jellyfin/config- This folder contains all the configurations that we have made inside the container.
- When the container starts again it will recreate the files in this folder, so no configuration will exist. We can start configuring it from scratch again.
- In the OMV GUI go to SERVICES > COMPOSE > FILES, select the container row and press the UP button. This will start the container.
Other procedures
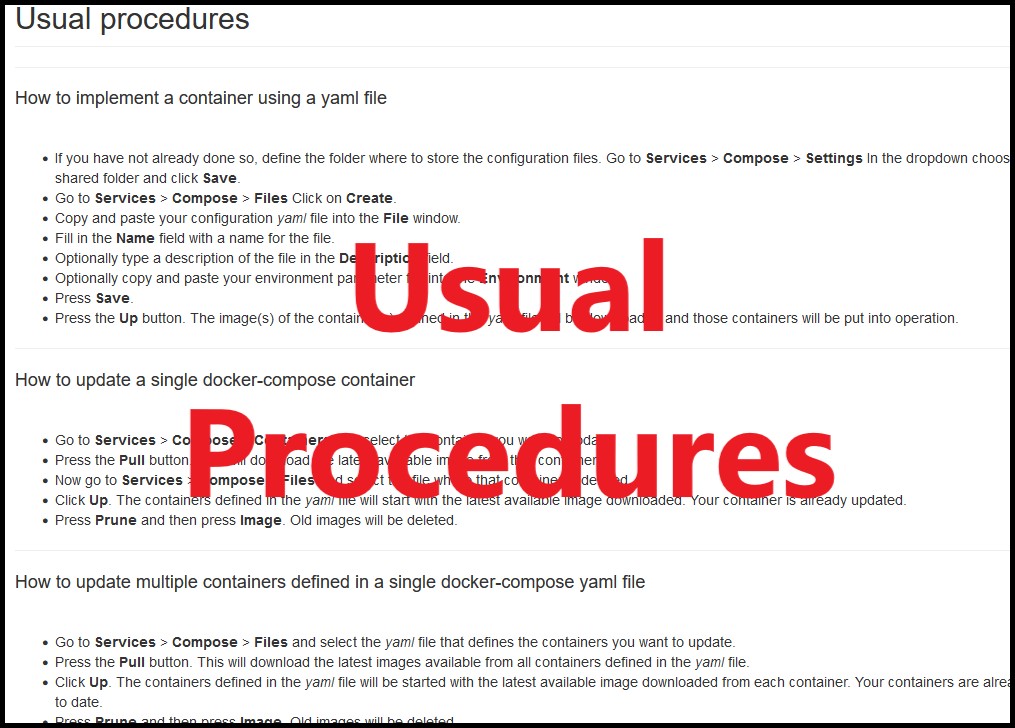
You can find several useful procedures in the corresponding section of the openmediavault-compose plugin document. Among them you will find a procedure to configure a vlan that will allow you to install pihole or adguard. → Usual procedures

The whys
Why use global environment variables
- If you change a path or any other variable that affects multiple containers, it is enough to vary this value in the global environment variables file. The value will change automatically in all containers. Useful if you change a data drive, or if you reinstall OMV and change routes, for example.
- It is integrated into the plugin, it is enough to press a button to access the file to directly introduce the variables without doing anything else.
- They allow us to define a value once and all the containers that we create will use this value automatically.
- Useful to define routes with UUID, it is only necessary to enter it once and we will have it available to use in each container.
- Useful to reuse containers if we perform a reinstallation of OMV. We just need to update the values of these variables and the containers will continue to work just like before.
- Avoid using symbolic links if you don't need them for another reason. Despite that you could still combine the two systems if you need to.
Why use symlinks
- It is integrated into OMV thanks to the openmediavault-symlinks plugin
- When working with container configuration yaml files, we will likely need to copy the mount paths from our file system and they will likely be paths with UUIDs. These routes are very long and difficult to manage.
- A symlink is a shortcut to the folder we need. This is useful to avoid copying and pasting long flowing paths.
- Makes it easy to quickly change a folder path across all containers without modifying them one by one. Simply modify a symbolic link and all containers will be up to date.
- The use of symbolic links is not mandatory, the goal is ease of use. If you prefer to use full paths, you can skip this point. You can alternatively use the global environment variables file provided by the plugin or combine both.
Why use docker-compose
- It is integrated into OMV thanks to the openmediavault-compose plugin
- It is easy to implement, manage, edit, configure…
- Most docker container publishers offer a ready stack for docker-compose in their documentation.
- Sometimes a container publisher does not provide a stack for docker-compose. In that case you can generate it yourself with a little experience. There are also tools to do it automatically online like this one. www.composerize.com
- If you already have a working container you can generate the stack automatically from the openmediavault-compose plugin with autocompose
Why use openmediavault-compose
- openmediavault-compose
- It covers all the needs of the vast majority of OMV users to use docker.
- It is integrated into the OMV GUI and into the system.
- It is automatically updated along with all other system updates.
- Makes it easy to manage and store container composition files.
- Facilitates the automatic updating and backup of containers on a scheduled and selective basis.
- openmediavault plugins are under constant development and new features and fixes are added as the need arises.
- It has the support of the OMV forum to solve any problem.
- Portainer
- It is not integrated into the GUI, you have to access it through another tab and port of your browser.
- It is one more container, it needs manual updates periodically.
- It does not store the composition files, you have to do it yourself.
- It doesn't update containers, you have to do it manually.
- If you have a functional problem you will have to request assistance from the Portainer developers.
- Disables container management from openmediavault-compose.
Why use 64 bits?
- You should use a 64-bit system if your hardware allows it, 32-bit systems have been out of use for many years now. The compatibility of many software packages is still maintained, but as time goes by they are disappearing.
- Docker starts to be inaccessible for 32-bit systems. Many reputable container builders are stopping releasing 32-bit versions.
- OMV can also cause problems on 32-bit systems with docker.

A Closing Note
We, who support the openmediavault project, hope that you’ll find your openmediavault server to be
enjoyable, efficient, and easy to use.
If you found this guide to be helpful, please consider a modest donation to support the
hosting costs of this server (OMV-Extras) and the project (Openmediavault).
OMV-Extras.org
www.openmediavault.org
