Table of Contents
(Docker) Compose Plugin For OMV6
Summary
- Docker is a technology that enables the creation and use of Linux containers. A container is a closed environment where one or more applications and their dependencies are installed, grouped and isolated from each other, running on the same operating system kernel.
- Docker allows you to install, uninstall, modify, update applications as many times as you want without causing damage to the system.
- The openmediavault-compose plugin provides a tool in the openmediavault GUI to create and manage containers using docker compose.
- Through compose files you can manage containers from images.
- Through Dockerfiles you can create your own images. Containers will be created from these images.
- All generated files (compose files, Dockerfiles, …) are stored in a user-defined folder.
- The plugin will only manage containers created from the OMV interface. Any containers created in CLI will not exist for the plugin. Only some generic functions will be usable in this case.
Docker in OMV - Initial Setup
- Docker in OMV is a document that provides a simple and secure docker management method. This document establishes a method to successfully install a docker application on OMV. It is recommended to read it before installing docker or openmediavault-compose.
Prerequisites
- OMV-Extras must be pre-installed.
- A 64-bit system is desirable to run docker. If your system only supports 32-bit you will be able to run some containers, many others will be inaccessible to you. In addition, there are many other incompatibilities for 32-bit systems.
Installation
In OMV6's GUI:
Under System > Plugins find and highlight openmediavault-compose 6.X, and click the Install button.
- Before installing docker it is necessary to activate the docker repository. Go to System > omv-extras Click on the Docker repo button and click on the Save button.
- Installing the openmediavault-compose plugin will also install the openmediavault-sharerootfs plugin as a dependency.
| Warning | |
| Do not uninstall the openmediavault-sharerootfs plugin. It is a dependency of the openmediavault-compose plugin. Uninstalling openmediavault-sharerootfs when the openmediavault-compose plugin is installed will cause the openmediavault-compose plugin to be uninstalled. | |
Settings
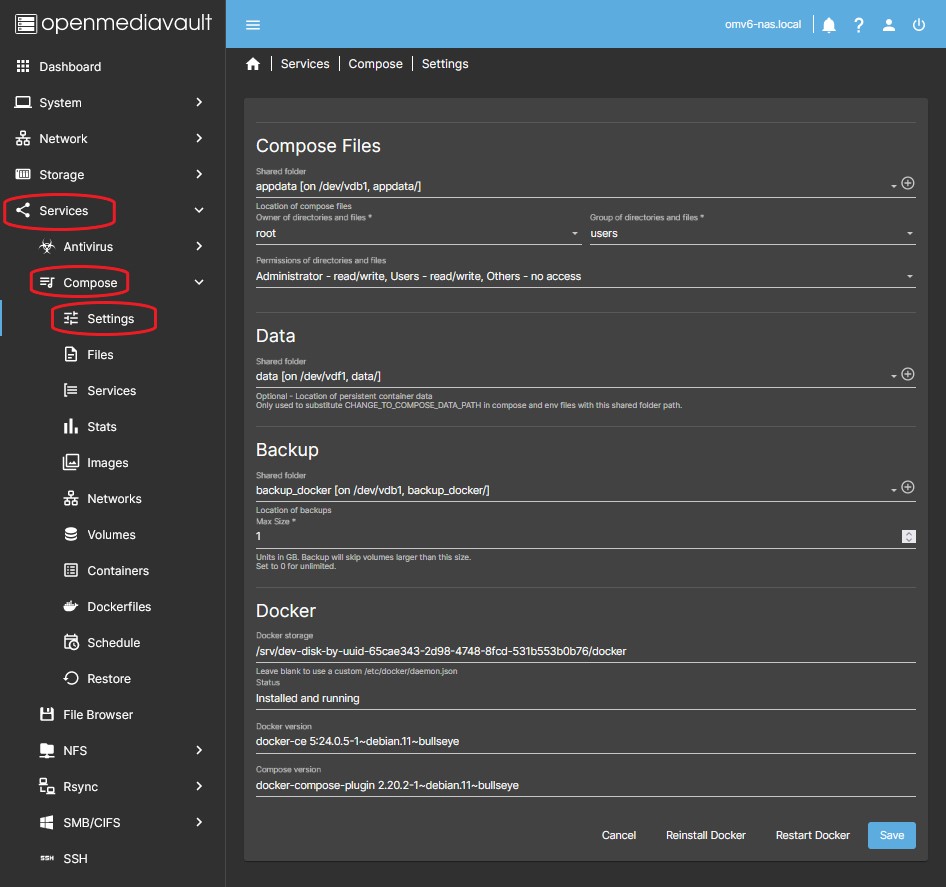
This is the plugin's general settings tab. We can define the necessary parameters for the operation of the plugin, as well as install, uninstall or restart docker.
- If you are configuring the plugin for the first time you can configure all the parameters and then press the Save button and accept the changes. If you are simply modifying a parameter do so and press the Save button below.
- Since the openmediavault-sharerootfs plugin is a dependency of the openmediavault-compose plugin, you can create the different shared folders in the root of the OMV system disk if necessary.
Compose Files
- The container configuration files are stored in this folder. The plugin will create subfolders for each container where it will store yaml files and env files respectively.
- If you set volumes with relative paths (through the expression
./for example./config) in your compose files those folders will be created inside the subfolder corresponding to that compose file. - To define this folder do the following:
- In the Shared Folder field select a shared folder.
- You can choose a shared folder if you have already created it or create it directly by pressing the “+” button on the right.
- By default these folders and files will be created with permissions restricted to root only. If you need to customize these permissions you can do so through the rest of the available fields. These permissions will not affect subfolders belonging to volumes with relative paths.
- Click the Save button if you have already finished configuring the parameters in this tab.
Data
- In this field we can define a folder already created where we have the user data.
- The plugin will use this path if we use the CHANGE_TO_COMPOSE_DATA_PATH string in any compose file. This behavior is similar to that of a global environment variable.
- To define this folder do the following:
- In the Shared Folder field select a shared folder.
- You can choose a shared folder if you have already created it or create it directly by pressing the “+” button on the right.
- Click the Save button if you have already finished configuring the parameters in this tab.
Backup
- The plugin has a schedulable Backup feature. By default, all subfolders that exist in the folder defined in the Compose Files section are included, this includes compose files (file and env) and container volumes defined by relative paths. Also included are all volumes in each composition file that are not set to
:ro(read only) in the composition file. By default, any volume larger than 1GB is excluded.
- The Shared Folder field in this section will define the destination folder of the backup.
- The Max Size field in this section will define the maximum size allowed for a volume to be included in the backups. By default it is 1GB.
- You can customize any volume within a compose file to be included or excluded in the backup:
- Typing
# BACKUPat the end of the line that defines a volume will include that volume in the backup.- Volumes of type
:rowill never be included regardless.
- Typing
# SKIP_BACKUPat the end of the line that defines a volume will exclude that volume in the backup.
- Click the Save button if you have already finished configuring the parameters in this tab.
Docker
- In this section you can define the docker installation folder. This is useful for getting docker off the OMV system disk. The default path is
/var/lib/docker. - If you are using nvidia drivers in your docker containers (e.g. for Plex or Jellyfin hardware transcoding) you have to leave the path blank. If not, the nvidia driver settings are getting corrupted each time you reconfigure the OMV settings. You can see more details in the chris_kmn's guide.
- In the Docker Storage field define the path of the folder you want to use to install Docker and accept the changes.
- Avoid using symlinks in this field.
- Click Reinstall Docker button. If you are on OMV6 and the configuration throws an error, simply press the Reinstall Docker button, if there is no error you are done.
| Notes | |
|
This folder will store docker's internal working files, images, containers, etc. You do not need to back up this folder, it does not store any information that should be persistent. The default path is ''/var/lib/docker'' on the OMV system disk. If OMV is installed on a USB flash drive it is recommended to choose a different location to avoid excessive writing to this drive. Choosing a different disk will help prevent the system disk from filling up, which would cause OMV to malfunction. | |
Files
Files is the yaml and env file management window, for configuring containers with docker-compose.
In this tab you can perform any action necessary to manage these files, including creating, modifying, deleting, starting or stopping containers, updating images, etc.
The files generated here will be stored in subfolders within the folder configured in Compose Files in the previous point.
The tab displays a list of existing files and a top bar with buttons to perform various actions.
Selecting a file activates the buttons on the top bar.
Allows you to act on the container or containers defined in a yaml file simultaneously. Actions executed in this tab will be applied to all containers defined in the yaml file.
Create
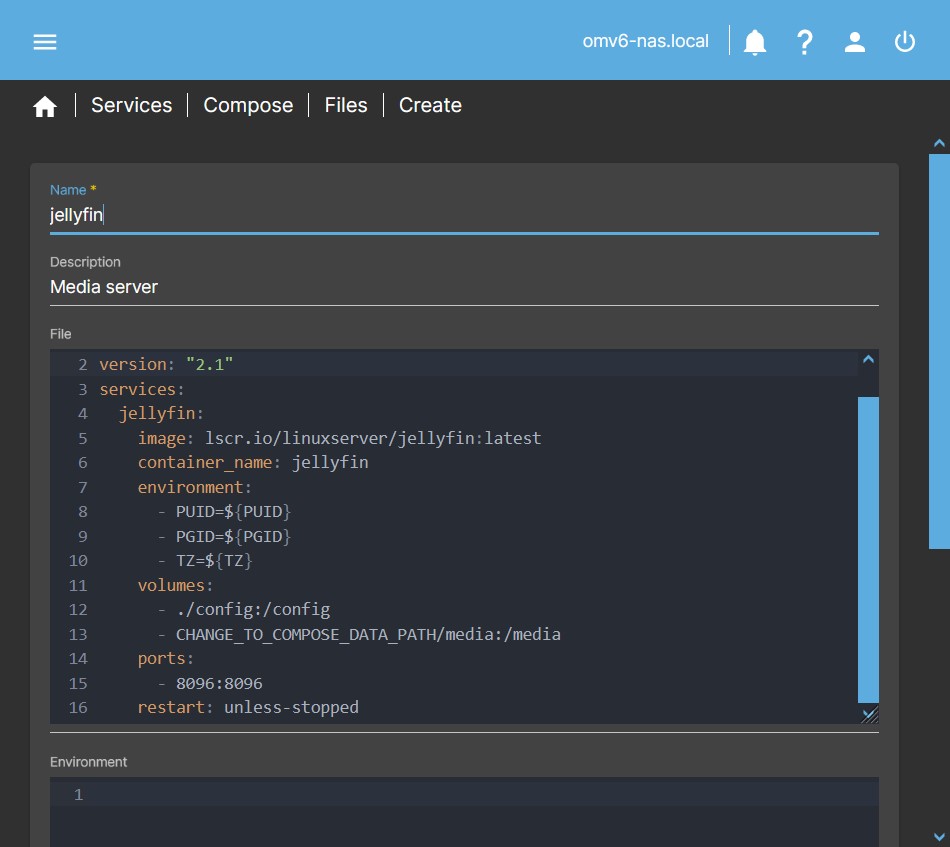 Allows you to create the yaml and env configuration files of a container. Pressing the button will open a dialog box with the following fields:
- Name
- Name with which this file will be designated in the system.
- Description
- Description of the file to help identify it.
- File
- Here you can create (or copy and paste) the configuration yaml file for the container(s).
- Environment
- Here you can create (or copy and paste) the environment variable env file of the container(s).
- Save
- It will store the created yaml and env files in a subfolder of the compose folder, this subfolder will be given the name written in the name field.
- You will exit the dialog box.
- The created file will now appear on a line with the name on the left and the description on the right. Selecting this line will activate all the buttons to apply actions to this file.
- Cancel
- Exit without saving changes.
Add from example
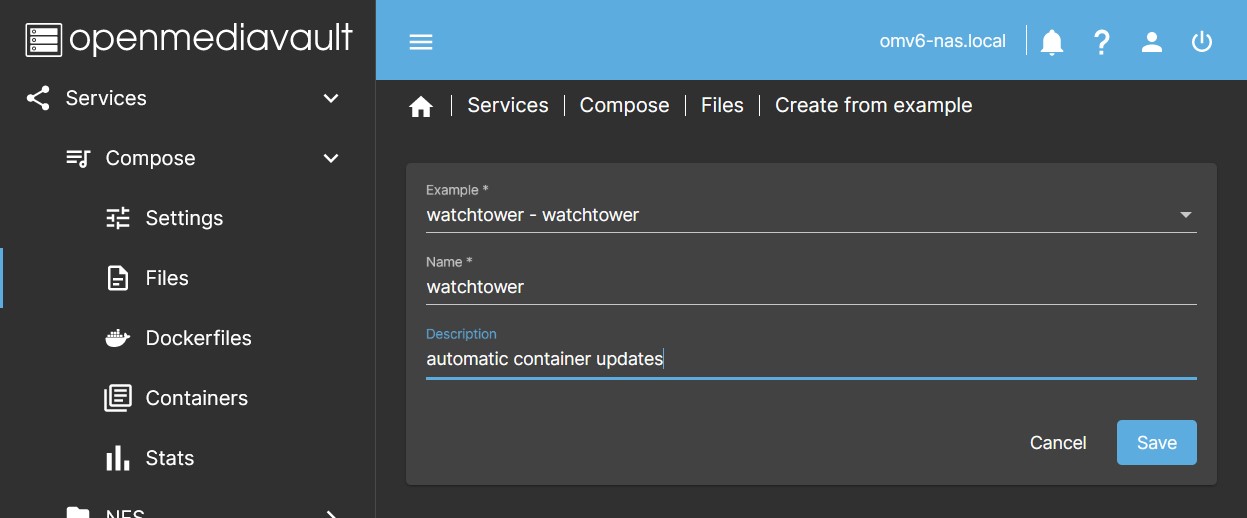 Allows you to create example containers from preconfigured yaml files in the plugin. In this list you will find numerous examples of yaml files ready to be adapted to your system configuration and implemented next.
- Example
- You can select a yaml file from the list.
- Name
- Name with which this file will be designated in the system.
- Description
- Description of the file to help identify it.
- Save
- Will set up the sample yaml and env files so that they can be edited and adapted to the server environment.
- Cancel
- Exit without saving changes.
Add from URL
It allows you to download a file from a URL and create a configuration file from it.
- URL
- Enter the URL from which to download the file.
- Name
- Name with which this file will be designated in the system.
- Description
- Description of the file to help identify it.
- Save
- It will create the file according to the defined parameters.
- Cancel
- Exit without saving changes.
Autocompose
Allows you to create yaml configuration files from containers running on the system that have not been created with compose. Use only when necessary, the generated file will be much larger than necessary to deploy a container. Useful if you have lost the configuration data of a container created in the CLI.
- Container
- A list of working containers that can be imported into the compose plugin will appear.
- Name
- Name with which this container will be designated in the system.
- Description
- Description of the container functions to help identify it.
- Version
- The version of the docker yaml composition files that will be used to create the configuration file.
- Create
- It will generate the yaml and env files and store them in the compose folder inside the corresponding subfolder.
- Cancel
- Exit without saving changes.
| Note | |
| In the Add from example button there is a file prepared to generate a Composerize container, which will generate yaml files from docker CLI container generation commands. | |
Import
Allows you to import existing compose files into the plugin.
- In the dialog box enter the path to the folder containing the yaml files.
- The import will succeed if you have your yaml files in a subfolder with the yaml file and subfolder having the same name:
- compose_files
- compose1
- compose1.yml
- compose1.env
- compose2
- compose2.yml
- compose2.env
- …
- Click on Create button.
Edit
Allows you to edit the yaml and env files of the selected file.
The window is the same as the Create button already seen.
Activates when selecting a file.
Delete
Allows you to delete a file.
The corresponding subfolder in compose folder along with the yaml and env configuration files will also be removed.
Activates when selecting a file.
Edit global environment file
Allows you to define global environment variables.
These variables will be available to be used in the compose file that we are interested in doing.
Example of variable in this file:
MYPUID=1000
Usage in a compose file:
- PUID=${MYPUID}
When that container is run docker will run this:
- PUID=1000
Check
It will check the configuration of a file and report possible errors if they are detected.
Util before launching the defined container or containers.
Any error that appears in a red box can be copied to the clipboard from the notifications button in the top bar of OMV to read it in its entirety.
Activates when selecting a file.
Up
Allows you to start the containers belonging to the selected yaml file.
If this is the first start, the container images will be downloaded, then the containers defined in the file will be put into operation.
Activates when selecting a file.
Stop
Allows you to stop the containers defined in the selected file. Useful if some monitoring needs to find the container and see the output message.
Activates when selecting a file.
Down
Allows you to stop and remove the containers defined in the selected file.
Activates when selecting a file.
Pull
Allows you to download the latest images available on the internet from the containers defined in the selected file.
Previous images are still on the system. To remove old images you can use the prune button.
Activates when selecting a file.
ps
Allows you to see in a pop-up window the status of the containers defined in the selected file.
Activated when selecting a file.
Prune
Allows you to clean the system of images, containers, volumes or networks that are no longer needed and recover space.
- System
- Removes from the system any images, containers, volumes, or networks generated for containers that no longer exist in the openmediavault-compose GUI or are not used. It does the same as all the following buttons simultaneously.
- Image
- Removes downloaded container images from the system that no longer exist in the openmediavault-compose GUI or are not used.
- Container
- Removes from the system containers that no longer exist in the openmediavault-compose GUI or are not used.
- Volume
- Removes from the system volumes that no longer exist in the openmediavault-compose GUI or are not used.
- Network
- Removes container network interfaces from the system that no longer exist in the openmediavault-compose GUI or are not used.
Docs
Link to this document.
Services
This tab shows you the running services generated by docker containers.
Allows you to perform some actions on them.
The Ports column shows links that you can click to access the webui generated by each service.
Pull
It will download the latest image corresponding to the selected service.
Up
It will restart the selected service using the last downloaded image.
Restart
It will restart the selected service.
Logs
It will display the logs of the selected service up to this point and stop.
Follow Logs
It will display logs for the selected service and will continue to display new logs if any occur.
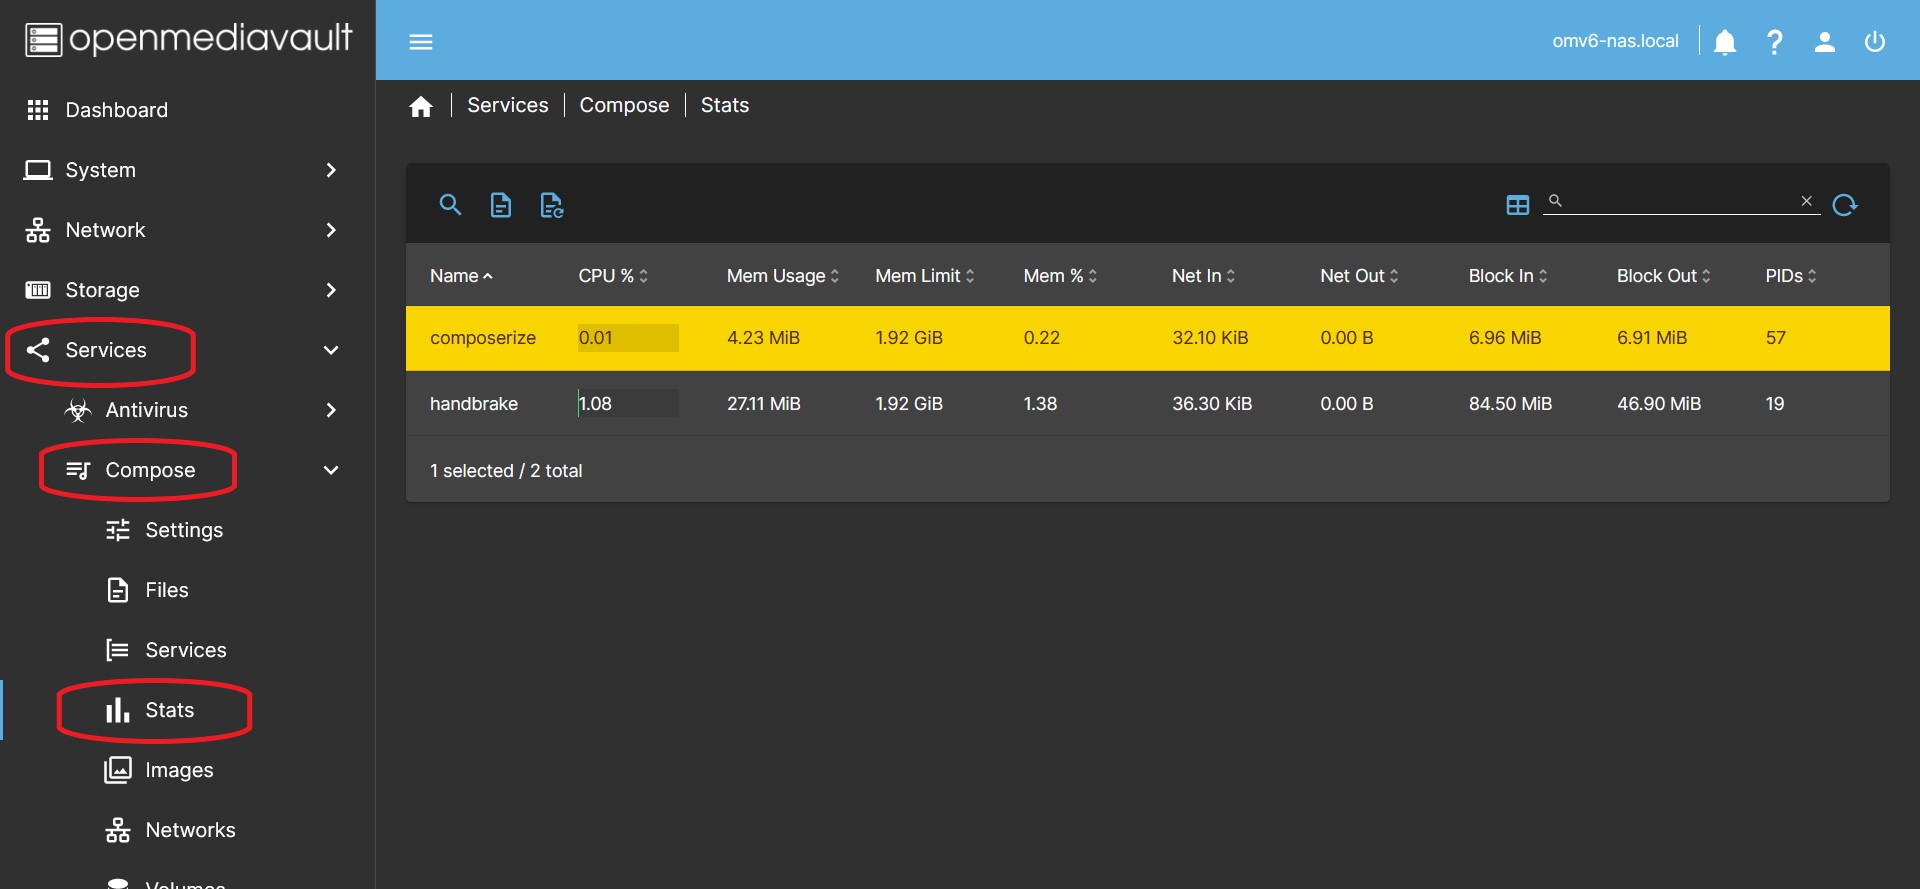
Stats
Shows a list of running containers displaying the usage status of the resources used.
Selecting a container activates the buttons on the top bar.
Inspect
Docker inspect provides detailed information about builds controlled by Docker.
Activated when selecting a container.
Logs
Allows you to view the log of the selected container.
Activated when selecting a container.
Follow Logs
It will display logs for the selected container and will continue to display new logs if any occur.
Activated when selecting a container.
Images
Shows existing images on the system. Allows you to manage these images.
Delete
Deletes the selected image if it is not currently in use. If it is in use it will return an error and will not be removed.
Inspect
Displays the result of inspecting the selected image.
Networks
Shows existing networks on the system. Allows you to manage these networks.
Create
Opens a dialog that allows you to create a custom network interface.
- Name: Type the name of the network interface you want to create.
- Driver: Choose from the available types of drivers the one that interests you for the new network interface.
- Rest of fields: Defines the characteristics of the network interface according to the previously chosen driver.
Delete
Deletes the selected network interface.
Inspect
Inspects the selected network interface and lists its properties.
Volumes
Shows existing volumes on the system. Allows you to manage these volumes.
Delete
Deletes the selected volume.
Inspect
Inspects the selected volume and lists its properties.
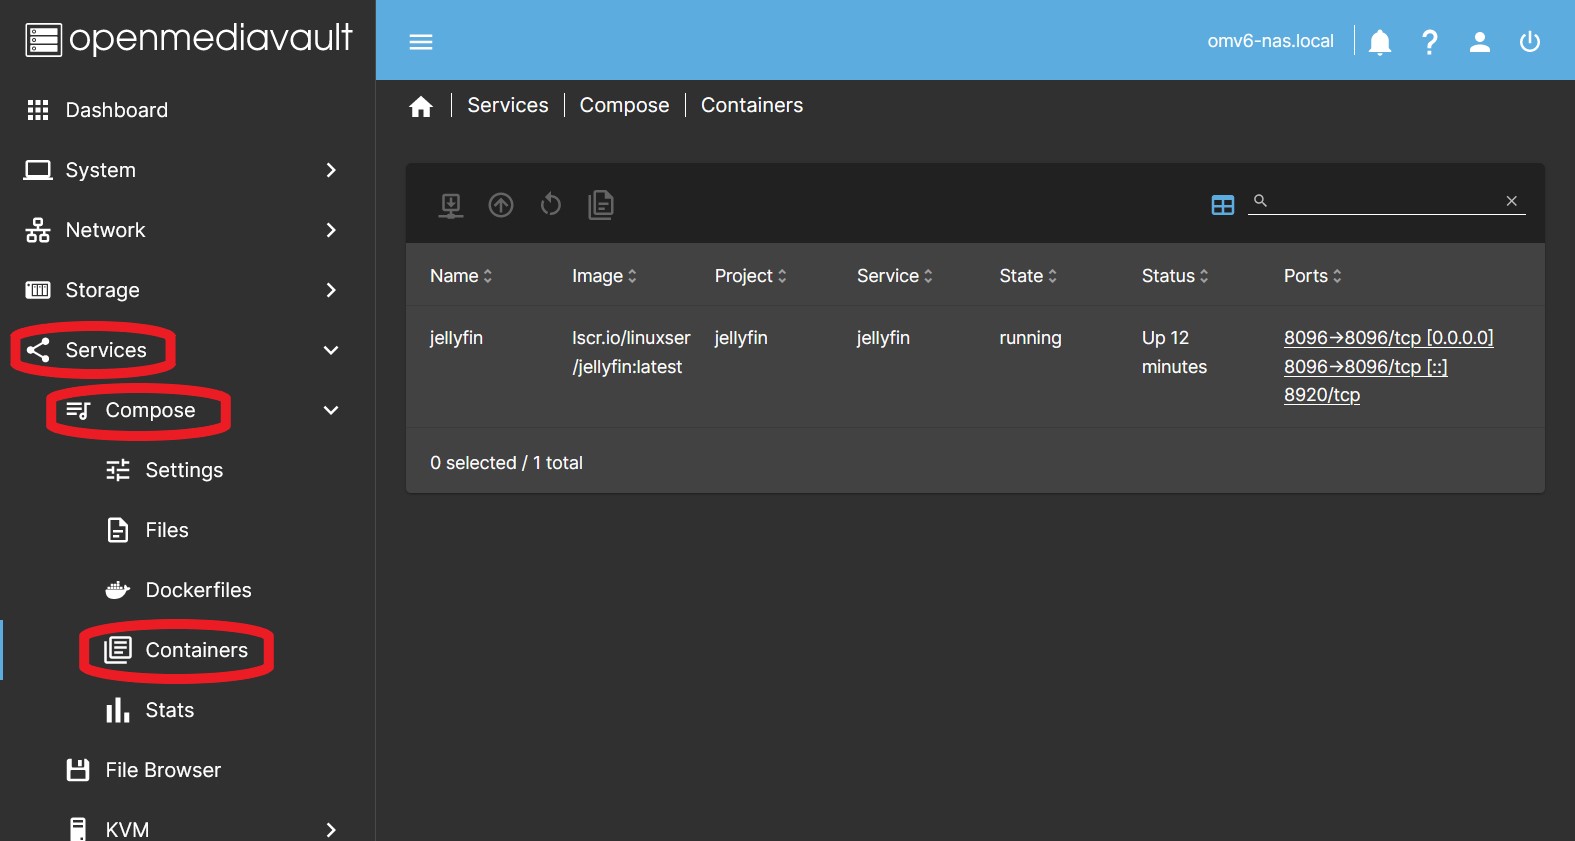
Containers
Shows a list of running containers displaying the basic execution data.
Selecting a container activates the buttons on the top bar.
It allows acting on the containers individually. Actions executed in this tab will be applied only to the selected container, regardless of whether the yaml file defines one or more containers.
The Ports column will display a link that provides access to the GUI of each container via its port and the domain the server uses, opening a new tab in the web browser. Your router has to allow DNS registration of the other domain names and the client with the browser has to be able to look up that fqdn in dns. How that is done depends on the router/DHCP/DNS system you are using.
Restart
Allows you to restart the selected container.
Activated when selecting a container.
Logs
Allows you to view the log of the selected container.
Activated when selecting a container.
Follow logs
Shows the continuous output of the container logs.
Activated when selecting a container.
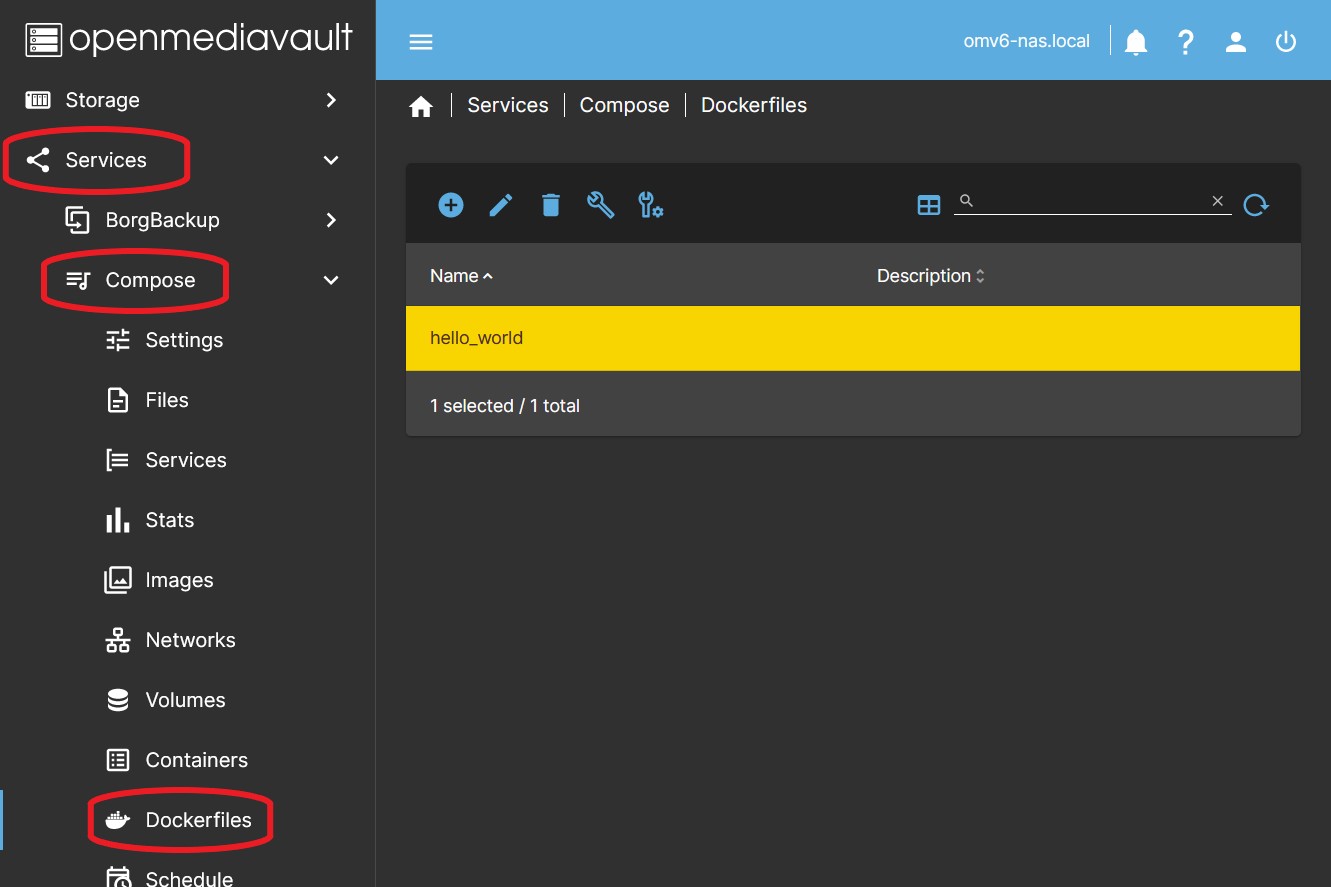
Dockerfiles
This is the Dockefiles management tab for creating images.
Dockerfiles are managed in this tab to perform any action on them. here the Dockerfiles are created, modified, deleted, etc.
The generated Dockerfiles will be stored in the folder configured in settings, using subfolders generated by the plugin.
The tab shows a list of generated Dockerfiles and a top bar of buttons that allow executing the actions required in each case.
Selecting a Dockerfile activates the action buttons.
Create
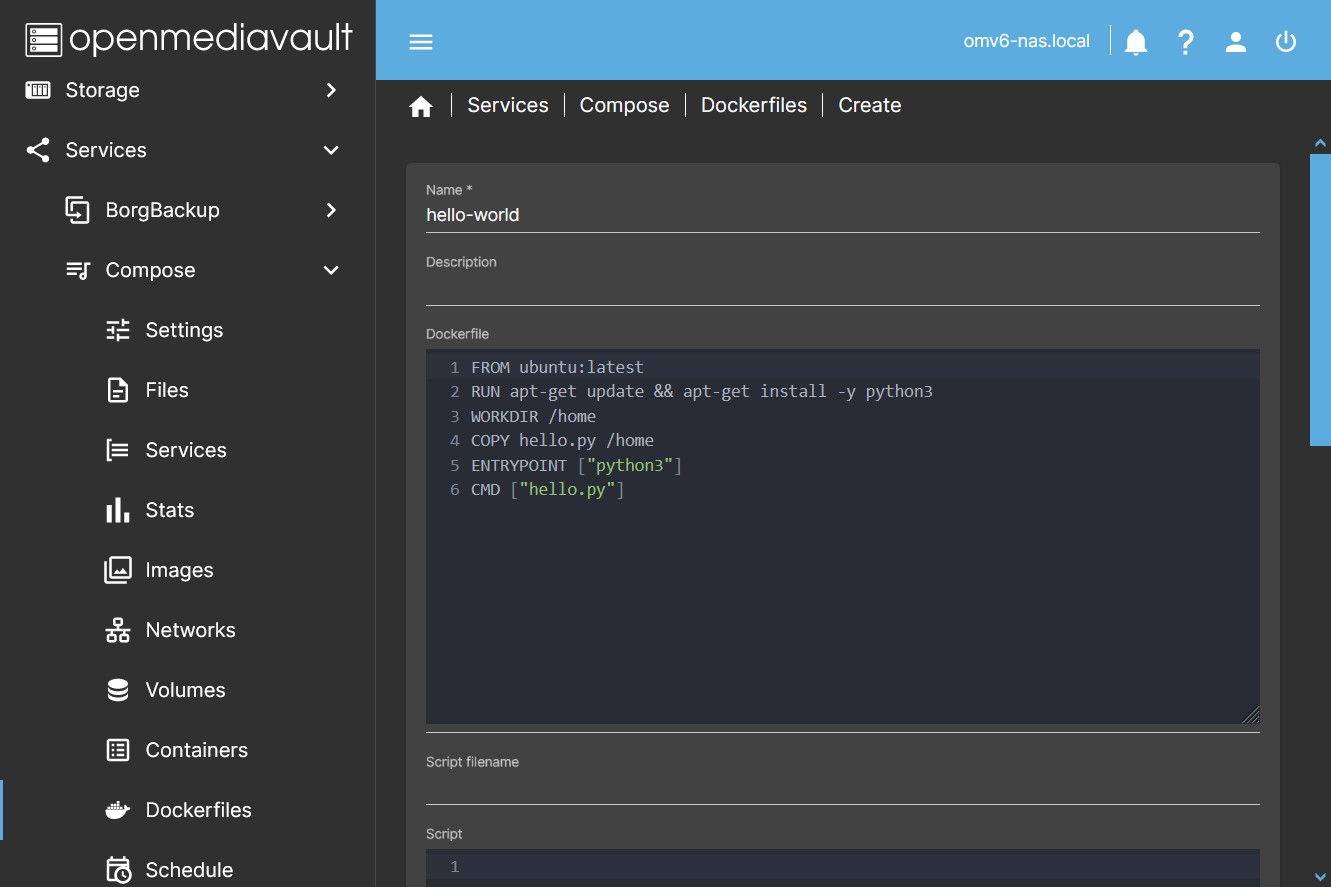 In this tab you can create a Dockerfile to generate your own container images.
- Name
- Name with which this Dockerfile will be designated in the system.
- Description
- Description of the Dockerfile functions to help identify it.
- Dockerfile
- Here you can create (or copy and paste) the Dockerfile for image creation.
- Script filename
- Name of the file with the script.
- Script
- Optionally here you can create (or copy and paste) a file with a script that will call Dockerfile when run.
- Conf filename
- Name of the file with the environment parameters.
- Conf file
- Optionally here you can create (or copy and paste) a configuration file to be included within the image.
Edit
Allows you to edit the Dockerfile, script and conf files of the selected Dockerfile.
The operation of this tab is similar to the Create button already seen.
Triggered by selecting a Dockerfile.
Delete
Allows you to delete a Dockerfile.
It will also remove the corresponding subfolder along with the Dockerfile configuration, script and conf files.
Triggered by selecting a Dockerfile.
Build
Allows you to deploy Dockerfile with the defined configuration. The first image will be pulled from the internet if it is not available on the host. A modified image will be created from the instructions defined in the Dockerfile.
Triggered by selecting a Dockerfile.
Pull and build
It will do the same as the Build button but the initial image will always be downloaded from the internet in its most updated version even if it exists on the host.
Triggered by selecting a Dockerfile.
Schedule (Updates and Backups)
 This tab manages the utility that allows you to perform plugin backups and/or container image updates. Displays a list of scheduled jobs.
By default, backups will be created of all the subfolders that contain the generated compose files. These subfolders are what the plugin generates every time we create a compose file in the GUI.
In addition, the volumes defined in each container that have a size of less than 1GB will be added to this backup. This size can be customized in the Settings tab.
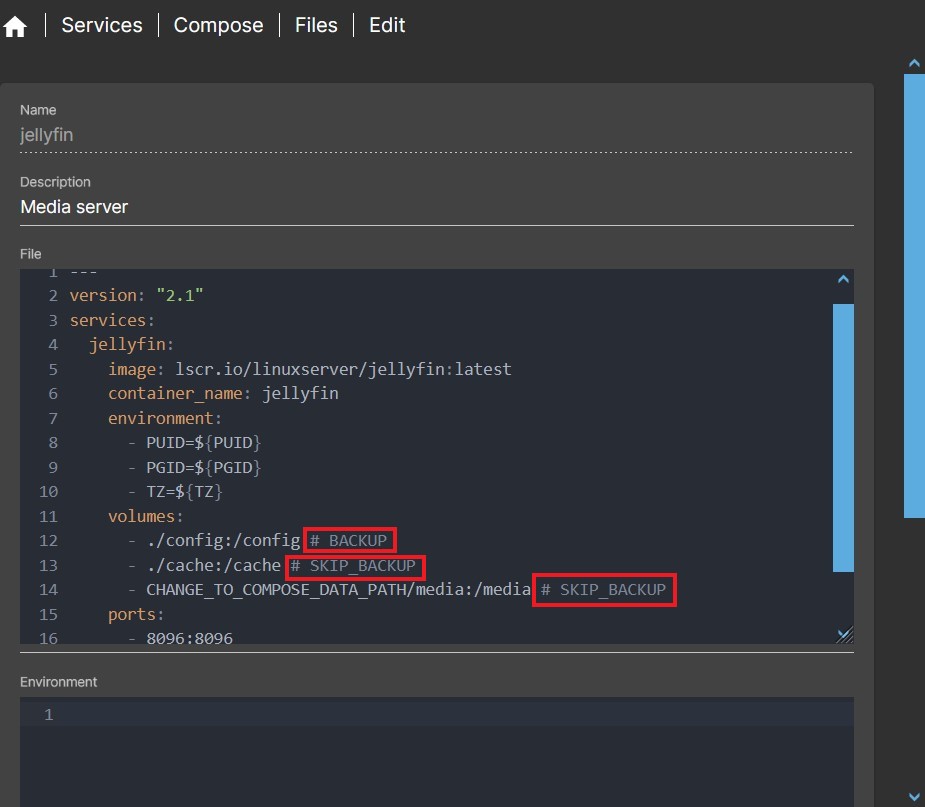
You can customize any volume within a compose file to be included or excluded in the backup:
- To force a volume to be included in the backup, type
# BACKUPat the end of the line that defines that volume. If the volume is less than 1 GB (or the custom value), you don't need to write anything.- Volumes of type
:rowill never be included regardless.
- To force a volume to be excluded from the backup, type
# SKIP_BACKUPat the end of the that defines that volume. If the volume is greater than 1 GB (or the custom value), you do not need to type anything.
The backup performs the following process:
- Stops running containers.
- Make a copy via rsync to the folder defined in the Settings tab for this purpose.
- The previous backup is overwritten.
- If you want to have several versioned backups over time, you must make a copy later with another specialized application for this purpose.
- The containers that were running when the process started are started again. Those who were detained will continue to be detained.
The update task performs the following process:
- Download the container images included in the compose file.
- Recreate the containers with the new image if they were running.
| Note | |
|
At this time, the plug-in backup utility does not resolve variables in volume paths. Define paths using global environment variables only for paths that you do not need to include in a backup. Alternatively you can use symlinks in the compose file. | |
Create
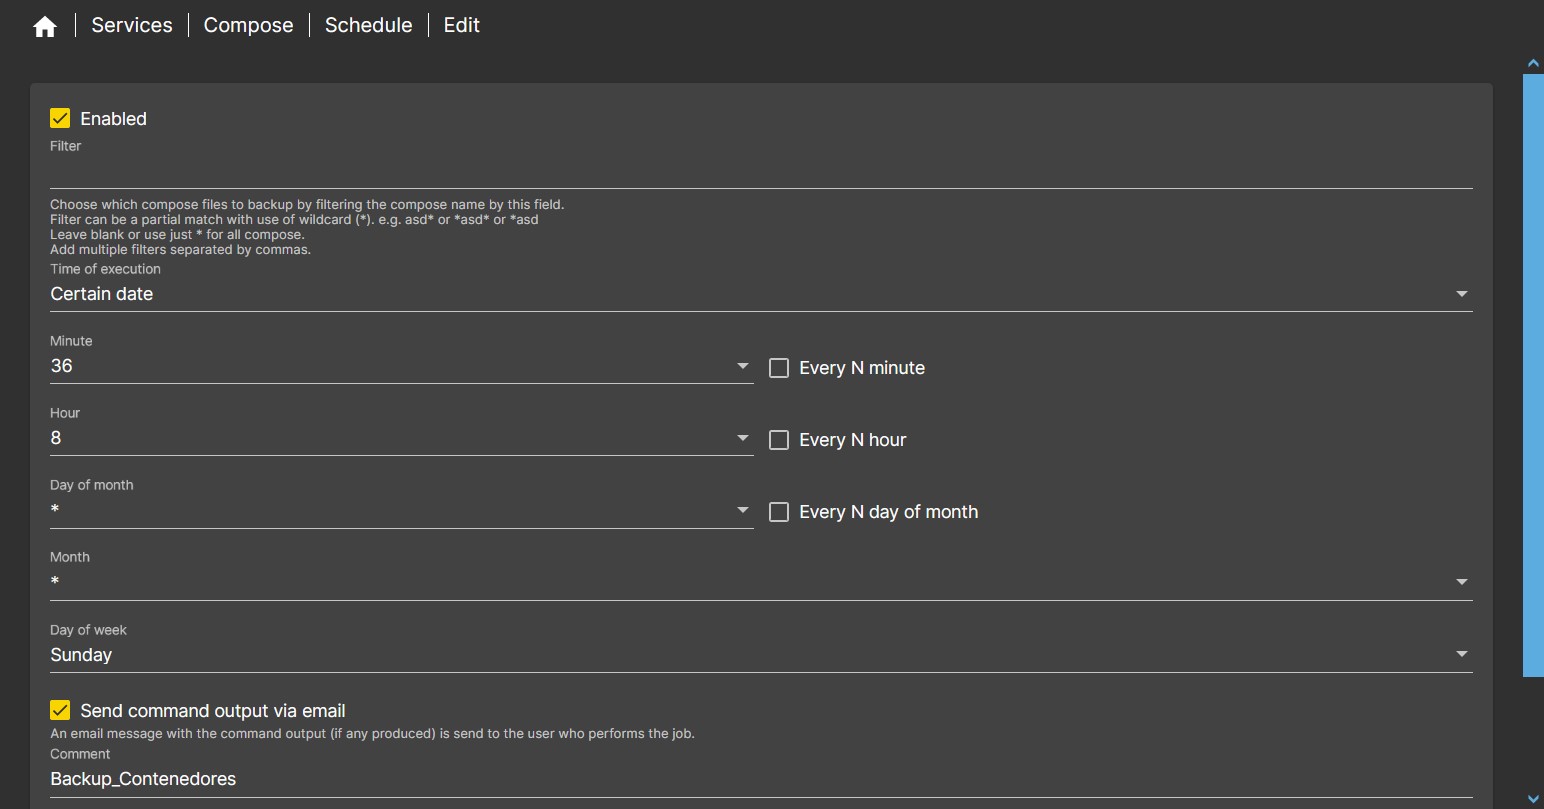 Opens a dialog for scheduling backup jobs.
- Settings
- Enabled: Enable automatic execution of the task. If it is unchecked, the task can be executed manually.
- Filter: Allows you to select the compose files to be included in this backup job.
- Leaving this field blank will cause all compose files to be included.
- Filter can be a partial match with use of wildcard (*). e.g. asd* or *asd* or *asd.
- You can add multiple filters separated by commas.
- Action Type
- Backup: If enabled, a backup task will be executed.
- Update: If enabled, an update task will be executed for the selected containers. If the backup task is also checked, the backup will be performed first and then the update. Will recreate containers after update if running.
- Prune: If enabled, prune all dangling images. It does not use a filter, so all existing dangling images will be removed. Will run the
docker image prune -fcommand.
- Schedule
- Schedule the time of execution using the date and time options.
- For example, the attached screenshot will backup all containers on Sundays at 8:36 AM. and will send an email with the result of the backup.
- Select if you want to receive an email with the output of the work, the header will show what you write in the Comment field.
Edit
Opens the edit dialog for the selected task.
Delete
Deletes the selected task.
Run
Now executes the selected task. You will not receive an email if you run the scheduled job in this way.
Dashboard
There are three widgets on the dashboard that provide docker container information:
- Services Grid
- Shows if docker is enabled and running by a green button.
- Services Table
- Shows in a list if docker is enabled and running.
- Container Table
- Shows a list with the name of each container that is running, the image used by that container, and the time it has been running. Stopped containers do not appear in this table.
Usual procedures
How to implement a container using a yaml file
- If you have not already done so, define the folder where to store the configuration files. Go to Services > Compose > Settings In the dropdown choose a shared folder and click Save.
- Go to Services > Compose > Files Click on Create.
- Copy and paste your configuration yaml file into the File window.
- Fill in the Name field with a name for the file.
- Optionally type a description of the file in the Description field.
- Optionally copy and paste your environment parameter file into the Environment window.
- Press Save.
- Press the Up button. The image(s) of the container(s) defined in the yaml file will be downloaded and those containers will be put into operation.
How to update a single docker-compose container
- Go to Services > Compose > Containers and select the container you want to update.
- Press the Pull button. This will download the latest available image from that container.
- Now go to Services > Compose > Files and select the file where that container is defined.
- Click Up. The containers defined in the yaml file will start with the latest available image downloaded. Your container is already updated.
- Press Prune and then press Image. Old images will be deleted.
How to update multiple containers defined in a single docker-compose yaml file
- Go to Services > Compose > Files and select the yaml file that defines the containers you want to update.
- Press the Pull button. This will download the latest images available from all containers defined in the yaml file.
- Click Up. The containers defined in the yaml file will be started with the latest available image downloaded from each container. Your containers are already up to date.
- Press Prune and then press Image. Old images will be deleted.
How to delete containers from a yaml file
- Go to Services > Compose > Files and select the yaml file that defines the containers you want to remove.
- Click Down to stop the containers defined in that yaml file.
- Press Prune and then press System. All data generated by those containers will be removed from the system.
- If you want to delete the yaml file, click Delete. This will remove the yaml file.
How to deploy a container using a dockerfile
- If you have not already done so, define the folder where to store the configuration files. Go to Services > Compose > Settings In the dropdown choose a shared folder and click Save.
- Create the dockerfile composition file: Go to Services > Compose > Dockerfiles Click on Create.
- Copy and paste your configuration dockerfile into the dockerfile window.
- Fill in the Name field with a name for the dockerfile.
- Optionally type a description of the dockerfile in the Description field.
- Optionally copy and paste your script file into the Script window so that the dockerfile can execute it. Write the name of this file in the Script filename field.
- Optionally copy and paste your environment parameter file into the Conf file window so that it is included in the generated image. Write the name of this file in the Conf filename field.
- Press Save.
- Create the container and run it:
- Select the dockerfile and press the Up button. The container will be created with the dockerfile commands and that container will be put into operation.
How to generate a composition yaml file with Autocompose
- Go to Services > Compose > Files and press the + and then the Autocompose button
- Expand the Container field. A list of all running containers will appear, select the container you want to generate a yaml file for.
- In the Name field, type the name you want to use for the generated file.
- In the Description field you can write a reminder summary of the file content.
- In the Version field, select the version of docker-compose that will be used to generate the yaml file.
- Press the Create button. The generated file will appear on a line in the Files tab list.
- Select this file and press the Edit button to view the content of the generated file.
- There will probably be more information than necessary to define the container, it would be advisable to clean up all the unnecessary lines.
- If you remember roughly what the original yaml file looked like, you can clean up the extra information.
- You can search the internet for existing information about this container. If there is an example yaml file you can try to adapt yours to be as similar as possible.
- Press the Save button.
- Select the file again and press the check button.
- The output can show you possible errors. If you detect any, go back to the previous step.
- Select the file and press the Up button.
- If the container is deployed without any problems the generated yaml file works. Otherwise you should keep checking for errors until it works.
How to recover Portainer and other containers from versions prior to omv-extras 6.3 / openmediavault-compose 6.7
Openmediavault-omvextras version 6.3 and openmediavault-compose version 6.7 have introduced an operation change. Now Portainer is no longer available in omv-extras, if you want to use Portainer you must install it from the compose plugin itself.
If you upgraded the plugin version to openmediavalt-compose 6.7 and had Portainer installed from omv-extras prior to this update, at this point all your containers continue to work as usual and are reachable on their usual IP address and port, but you cannot access to their functionality from the OMV GUI. This procedure will guide you on how to proceed next.
Portainer is just one more container, like the rest, therefore, the situation is the same.
To continue using Portainer, the procedure is to reinstall this container from the openmediavault-compose plugin, for this, you must first stop the Portainer container and remove it (This will not delete the existing configurations in the Portainer, only the container which can then be recreated keeping its current configuration). The way to do this requires running two simple commands on the CLI. Once this is done, the plugin allows you to retrieve the container to the existing path and working exactly as it did before.
If you did not have the plugin installed before the update, you must first install it and configure the Shared folder to store the yaml files.
The procedure to recover Portainer is as follows:
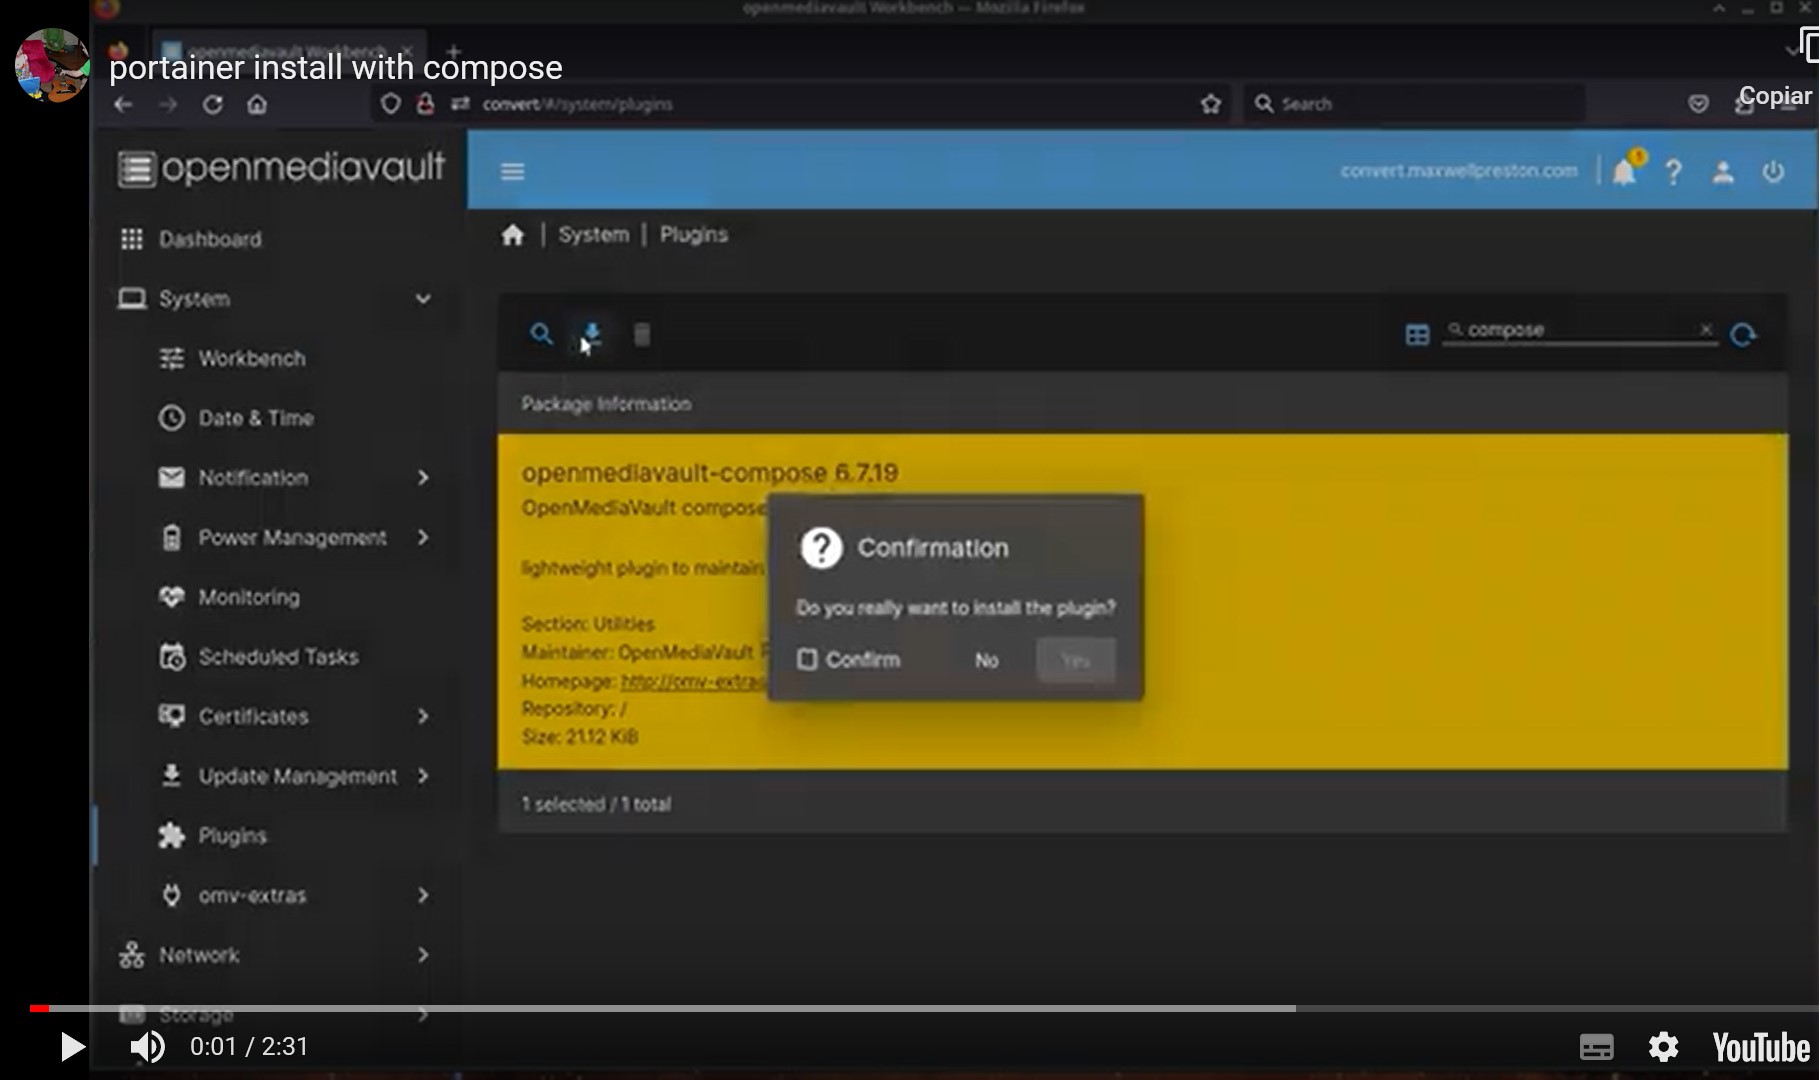
- From the CLI run the following commands, you can access the CLI via the openmediavault-wetty plugin if you have it available or via SSH via putty or similar means:
sudo docker stop portainersudo docker rm portainer
- In the OMV GUI go to Services > Compose > Files > Add from example
- In the field example search and select portainer-omvextras
- …
Note There are two example Portainer yaml files:
- The first one is called portainer, it is a standard file to do a fresh installation of Portainer at any time. You should not select this file in this case.
- The second one is called portainer-omvextras, this yaml file has been included expressly for this plugin update, so it is already pre-configured so that Portainer continues to work in the same state before the update. This is the file you should select.- …
Note This file extracts the Portainer Community Edition image, which is used by most people.
If you upgraded to Business Edition replace the line image: portainer/portainer-ce:latest to image: portainer/portainer-ee:latest- …
- In the Name field write portainer
- In the Description field you can write portainer (optional field)
- Press the Save button
- Select the row of the portainer file (yellow color)
- Press the Up button
- If it gives an error, you may have to reinstall docker. In Services > Compose > Settings Click on the Reinstall Docker button and click Up button again.
- Now your Portainer container is working exactly the same as you had it and you can manage your containers from Portainer just like before.
To recover any previously installed containers from the Portainer GUI and redeploy it to the plugin GUI the procedure is the same as for retrieving the Portainer container described above. With the exception that it will be necessary to have the configuration yaml file (stack).
- If Portainer is running and accessible.
- Copies the container stack (yaml file) to a text file. You will find it by clicking on the Stacks button in the Portainer GUI, then select the file and click on the Edit button.
- Remove the stack. This will stop and remove the container.
- In the OMV GUI go to Services > Compose > Files and click on Create
- Copy the content of the yaml file in the File field and type the file name in the Name field
- Press Save
- Select the file line and press the Up button
- Now the containers included in that file are working the same as before.
- If Portainer is not accessible:
- If you have a backup of the container configuration yaml file:
- Follow the procedure described to recover the Portainer container, but instead of looking for a sample yaml file, create a new file with the backup copy of your yaml file.
- If you do not have a backup of the container configuration yaml file:
- In this case you can generate a yaml configuration file from a working container using Autocompose. You can do it from the GUI in Services > Compose > Files by pressing the Autocompose button
- …
Note This is not an ideal situation, the generated file contains information that is not necessary and can prevent the container from running in some cases. You must locate the errors and correct them. - …
- Once this file is generated, follow the procedure described to recover the Portainer container, but instead of looking for a sample yaml file, use the generated yaml file.
To remove Portainer
- If you have already redeployed all your containers in the plugin GUI you can remove Portainer, you no longer need it.
- In Services > Compose > Files select the portainer file (yellow color).
- Click on the Delete button.
- CONGRATULATIONS, YOU'VE GOTTEN RID OF A HEAVY LOAD !! ;)
| Notes | |
|
- Portainer is just a tool to manage other containers, it's just another container. The operation of Portainer is independent of the operation of other containers. - The openmediavault-compose plugin provides the necessary functionality to deploy and manage any container, including Portainer. - Containers deployed from the Portainer GUI using docker-compose will not be able to be managed from the openmediavault-compose GUI. - Containers deployed from the openmediavault-compose GUI will not be able to be managed from the Portainer GUI. - Given the functionality provided by the openmediavault-compose plugin, it is recommended to get rid of Portainer and manage all containers from the openmediavault-compose GUI. Managing from the plugin makes things much simpler and has added benefits. | |
How to Create a vlan with IP on the same LAN as the host
This is useful if you need a container to have an IP within your LAN that is different from your server's.
The most common use case for this procedure is installing pi-hole in docker on an OMV server. The reason in this case is that both pi-hole and OMV need the same port to function correctly, port 53. Therefore we need pi-hole to use a different IP on our network to be able to use that port without affecting OMV. There may be other use cases besides pi-hole, depending on the needs of the container you're setting up.
Note that containers using this network will expose all their ports on the LAN, just like any other IP, eg OMV. Docker provides an additional layer of security through port mapping (similar to a firewall). Through this procedure we lose that additional security layer. This does not have to be a problem, it is normal operation in any network, but it is convenient to be aware of this circumstance. Logically it will be useless to map ports in those containers, so you can save that part.
Creation and use of the vlan network interface with IP in our LAN
We must create the network previously to be able to define the parameters we need and use it later in the containers. We will call it mynet and we will create it as follows:
- In the OMV GUI go to Services > Compose > Networks Press the Add button.
- Choose the name for your network and write it in the Name field. For example mynet.
- In the Driver field, drop down the menu and choose macvlan.
- In the Parent Network field, drop down the menu and choose your OMV network interface. You can check it in the GUI under Network > Interfaces.
- In the Subnet field write the IP range of your local network. Usually it can be
192.168.1.0/24Adapt it to your network. - In the Gateway field write the gateway of your network, normally your router, something like this
192.168.1.1Adapt it to your network. - In the IP range field write
192.168.1.240/29Adapt it to your network.- This network range is equivalent to the IP addresses between
192.168.1.241to192.168.1.246This will allow us to assign IP addresses up to 6 containers, you can expand it if you need more. Any such website can help with this: IP calculator - So that this is not a problem with the IP assignment of your DHCP server (your router in general) you can reduce the assignment range, instead of letting it assign from 1 to 254, we can reduce it from 1 to 235 for example. This is how we make sure we have those free IPs for docker.
- In the Aux address field you can optionally define an IP address to reserve for the host. In this case it would be
host=192.168.1.247- This will be useful only if you need the host and the container to communicate with each other.
- Press the Save button. At this moment the network is already created and you can use it in the configuration of any container.
- You can inspect the network by selecting it and clicking the Inspect button to view its current values. When some container is using it, it should appear in this configuration.
Assigning this network interface in a container
In order for a container to use the created network interface you need to add the following lines to the end of your compose file, assuming docker-compose is version 3 or higher. See the documentation for older versions of docker-compose.
services:
  pi-hole:
    container_name: "pi-hole"
    .
    .
    networks:
      mynet:
        ipv4_address: 192.168.1.241
networks:
  mynet:
    external: true
This sets up the mynet interface for that container and assigns it the IP value 192.168.1.241 within our network, which was the first available. We will still be able to use up to 246 in other containers.
When we start the container we will be able to access its interface from the assigned IP and the usual port.
Reduce the IP range of the DHCP server (usually the router)
Once the above is done, in order to avoid overlapping assignable IP ranges, it would be advisable to reduce the IP range of the network's DHCP server. In the case of the previous configuration it could be set to:
- From 192.168.1.2
- Up to 192.168.1.239
This way addresses from 192.168.1.240 onwards will always be available, since the router will not assign any of these IPs if a device requests an IP assignment.
If you use the container itself as a DHCP server, for example with pi-hole, you must disable the DHCP server on your router and adapt the DHCP range in pi-hole accordingly.
If we need communication between the containers and the host
What has been applied so far is enough to use pihole, but in the case of other different containers it may be necessary for the container and the host to communicate with each other. Vlans have a limitation, by design they cannot communicate with the host. To overcome this setback and allow communication between the containers and the host, if necessary, we can create a network interface that will act as a bridge between the two.
| Warning | |
|
This procedure creates a binding interface for communication with the host via /etc/network/interfaces when OMV is using netplan. This can generate some conflict in certain circumstances. Do it at your own risk. If you have a suggestion to do this in a safe way you can post it in the forum. | |
Running the following commands would create this interface, but this configuration would not be persistent in OMV. On the first server restart it would disappear:
ip link add mynet-host link eno1 type macvlan mode bridge
ip addr add 192.168.1.239/32 dev mynet-host
ip link set mynet-host up
ip route add 192.168.1.224/28 dev mynet-host
This would create a macvlan network interface called mynet-host in bridge mode that would use the IP 192.168.1.239. The host would use this network interface thanks to the static route set in the 192.168.1.224/28 network range to communicate with the containers.
To make this configuration persistent in OMV we must do it as follows:
- Create a network interface configuration file:
nano /etc/network/interfaces.d/99-mynet-host- Copy into that file the following content:
auto mynet-host
iface mynet-host inet static
    pre-up ip link add mynet-host link eno1 type macvlan mode bridge
    address 192.168.1.239/32
    up ip link set mynet-host up
up ip route add 192.168.1.224/28 dev mynet-host- Replace
eno1with your network interface. You can see it in the GUI under Network > Interfaces. - Save changes and exit the editor.
Ctrl+XandYes - Restart the service or the server.
From now on those settings will be set every time the server is started.
| Note | |
| If for some reason you need to create many different IPs keep in mind that macvlan uses different MAC addresses for each IP. This can be a problem if your hardware has a limit on the maximum number of MACs for the same physical interface. In that case you can change the configuration to ipvlan. Consult the official docker documentation in this regard to solve other possible configuration problems with ipvlan. | |
Source Code
A Closing Note
We, who support the openmediavault project, hope you’ve found this guide to be useful and that you’ll find your openmediavault server to be efficient, easy to use, and enjoyable.
If you found this plugin guide to be helpful, please consider a modest donation to support the hosting costs of this server.
OMV-Extras.org
Venmo: ryecoaaron

