Table of Contents

NAS Permissions In OMV7
General
The purpose of this document is to provide an overview explanation of access control settings, using Samba network shares, in a peer-to-peer network. It's a brief explanation of permissions, as implemented within Openmediavault's GUI, with some usable examples. It does not apply, directly, to LDAP or Domains environments.
In Openmediavault's New Users Guide, in the sections Setting up a Shared Folder and Creating a SMB/CIF “Samba” Network Share, permission selections where made that will allow ALL local LAN users to connect to OMV server shares with write access. For home LAN admin's, with one or two users, this may be adequate.
On the other hand, some home users may want to prevent children from deleting files and provision to allow guest login's with Read only access. Further, small businesses may want to grant or restrict employee access to specific shares. These scenarios will require that permissions are implemented for NAS share access control.
An Immutable Law for Good Server Security
The password for the root account (the server's super user) should be strong and it should NOT be shared. While this may not be practical when operating a SOHO or business NAS server, the number of users who know the password for the root account should be held to a minimum. (In the business use case, there should be at least two administrators with root access.)
Openmediavault has another super user account “admin” that is used to log into the Web Admin GUI. Given that this user has “root user like” capabilities, admin's password should not be shared either.
The reason why it is important to control who has access to the root and admin accounts and their passwords is, this level of access can be used to override or bypass all permissions discussed in this document.
A Workstation Logon
In most workgroup LAN environments, users log into their PC's using a unique username and password. These “credentials” are stored locally and have permissions associated with them that allow access to the local PC, it's folders and files, and other workstation resources. A username lookup is performed, the password is verified and if all match, access to the workstation is granted. A “local” server logon is very similar, allowing for local server administration.

NAS Share Access
The same is true, indirectly, of network share access. When access to a network share is requested by a LAN client, there's a background authentication process taking place that is not visible to the user. When a user is logged onto a workstation, the workstation acts as an authentication “proxy”, offering the logged on user's credentials (username + password) to the server.


This is the basis for setting up transparent access for users, who are logged on at workstations, when they attempt to access NAS network shares.
In a workgroup environment, it's relatively easy to grant access to shares by username and password, but it requires some setup. As indicated in the above example, the Openmediavault server (hereafter referred to as OMV) needs to be aware of usernames and passwords for users who may attempt to access shares with permissions enabled.
Adding LAN Users to OMV
To enable transparent access, the first step is to add workstation usernames and their passwords to OMV.
Under, Users, Users, click on the +Add button. In the popdown menu, click +Create.

Name: Add the user name exactly as it is entered in the workstation logon, with capitalized letters if used.
Password: Add the username's password exactly as it is entered at the workstation.
(In this example, the eye icon was used to show the password unmasked.)

Repeat the process, adding all LAN users that will need access to the server's shares where permissions are applied.

All users have been entered in OMV, by the exact username and password they use to log into their workstations, laptops, etc. Notice that all usernames are in the Group users by default.
Shared Folder Permissions
By default, the majority of files and folders on the OMV file server are owned and accessed by the root user account. Since that is not useful in a networked environment, user access to a NAS server storage location is changed by the creation of a “Shared Folder”. Creating a shared folder is covered in the New User's Guide under Setting up a Shared Folder. This process physically creates the folder and assigns usable permissions to the folder, that allow regular user access.
The default permissions assigned to a new Shared Folder, in OMV's GUI, are (in this case Test is the Shared Folder):
Administrator: read/write/execute,
Users: read/write/execute,
Others: read/execute
These permissions directly correlate to the following:
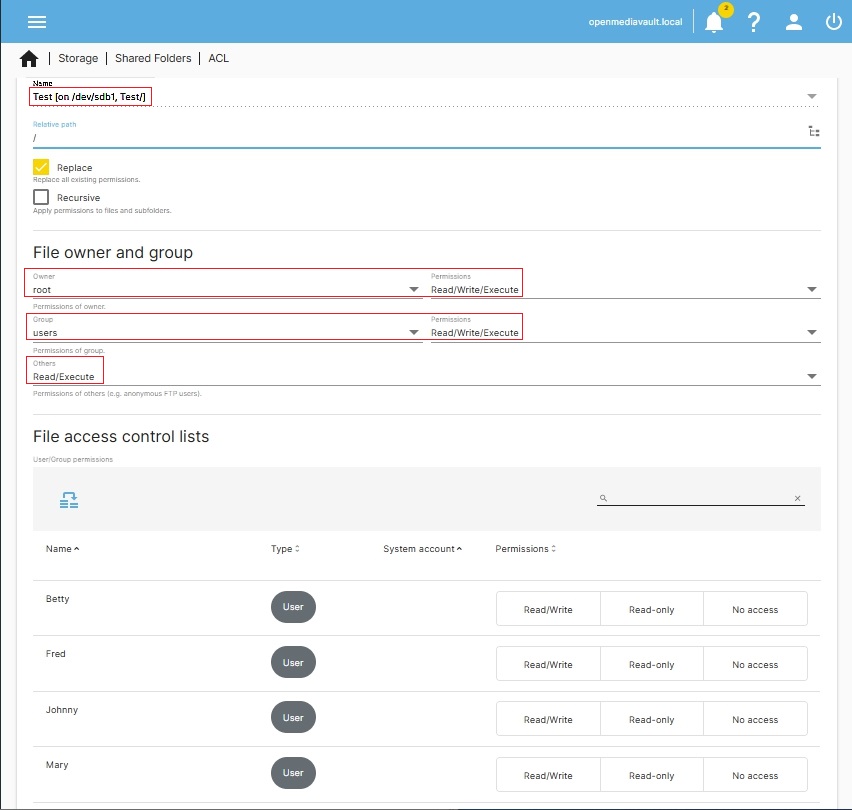
As previously noted and illustrated, all users are added to the Group users by default. In the example provided above, Fred, Mary, Johnny and Betty will be able to “Read, Write and Execute” in the Shared Folder “Test”.
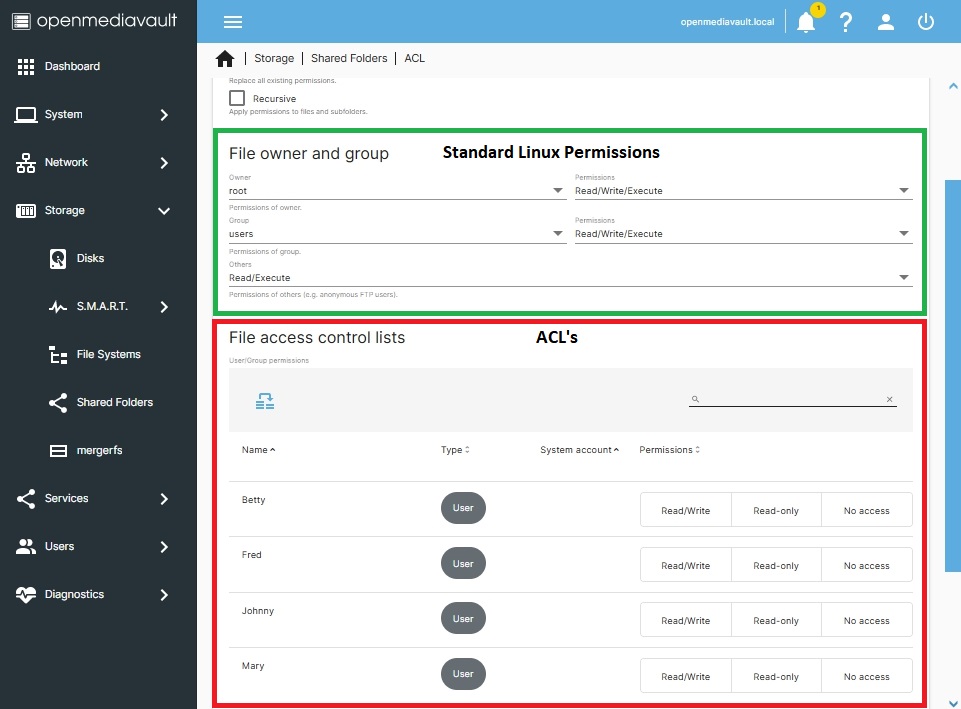
In the interests of clarity:
- The field that is labeled File, owner and group (above) assigns Standard Linux permissions.
- For home server use and to keep server permissions simple, use only Standard Linux Permissions.
- Under Standard Linux Permissions, “Others” means any user that is not root or any user that is NOT in the Group users. This includes members of other Groups and anonymous login's. Others, in the above example, have Read/Execute.
- The field that is labeled File access control lists (above) are ACL's - (Access Control List).
- DO NOT not mix ACL's with Standard Linux Permissions, without understanding the exact effects. When using Standard Linux Permissions, the boxes under File access control lists should NOT be checked.
Samba (SMB) Network Shares
While a Shared Folder is a “base” for sharing folders and files, it is only one part of sharing data on a network. A Shared Folder allows for local access, at the server, but it doesn't allow for network sharing. Network sharing requires a Samba share known as “SMB/CIF” in OMV's GUI.
(There are other network sharing techniques, such as NFS shares, that are not covered in this document.)

As noted in the illustration, a SMB share is layered onto a Shared folder to allow network access to LAN clients.
In the following; Samba, under Services, SMB/CIF, in the Settings tab is assumed that the Enabled box is checked.
Under Services, SMB/CIF, click the Shares button. Then click on the +Create button.
- Shared Folder:
In this case, we're layering a Samba network share on top of the “Test” Shared Folder, previously created.
- Public:
In this case, the entry selected is No.
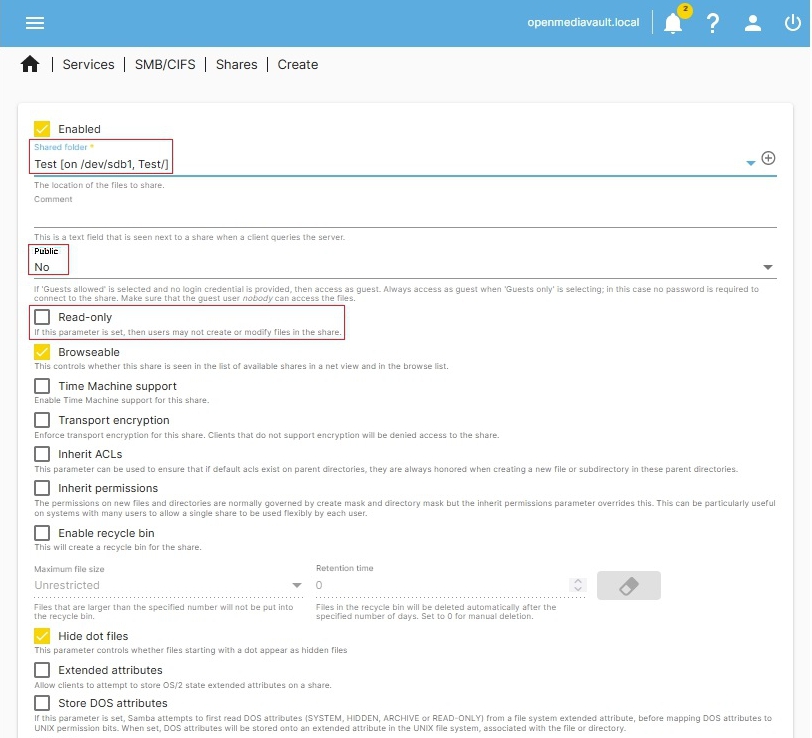
- In the Test Shared Folder, we allowed Others “Read” access. The SMB (Samba) network share is layered on top of the “Test” Shared Folder. Others with Read access, in the Shared folder, equates to “Guests Allowed” in Samba. However, the SMB setting “Public - No” will stop anonymous or unknown users at the network share. This is what was meant by, “Samba can be more restrictive” than base level Shared Folder permissions.
- If the SMB Public field is set to “Guests Allowed”, that would combine with the “Test” Shared Folder permission Others – Read, to allow network guests Read access. (These permissions; Others – Read in the Shared Folder and Guests Allowed in Samba are appropriate for media shares. Network guests would have read access to media, music, movies, etc.)
- Beyond Public access choices, Samba assumes that appropriate user permissions have been assigned to the bottom layer, at the Shared Folder level.
- If Read only is ON (the box is checked), users with write access to the Shared Folder, would not be able to add (write), modify or delete files in the SMB network share. (Exceptions to “Read only” can be made. More on that later.)
Scroll to the bottom of the Add share dialog box, using the slider bar, on the right, or the down cursor key.
The Hosts allow'ed and Hosts deny'ed fields are workstation level access control options. While these options may fit some use cases, they can make permissions excessively “complicated” for some of the reasons following.
Understanding permissions effects, specifically the combination of various settings, is important. Again, Samba can further restrict but it can't override and “increase” access. Some examples are:
- If a “host is allowed” but the username doesn't have access, the result is denied.
- If a host is denied but the username has access, the result is still denied.
- Consumer router behavior is not always consistent. If a host is specified by IP address, but the client uses DHCP, the IP address may change.
- Many consumer routers do not consistently map host names to IP address which may make “allow” or “deny” by host name inconsistent.
For these reasons and more, host entries should NOT be used without closely considering their effects.
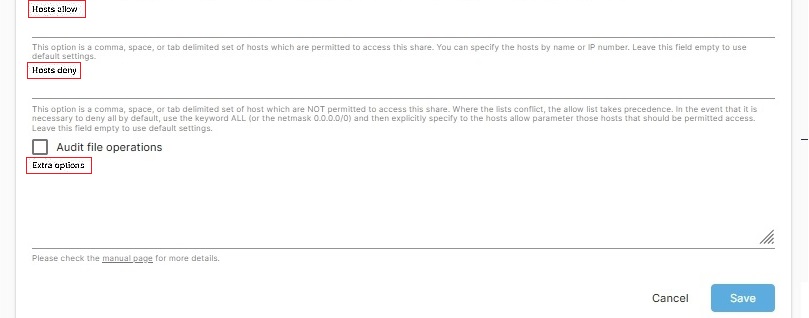
Extra options: This field presents home and small business administrators with some interesting options for share administration. For example, in the upper half of this Samba dialog box, there is the option for Read only. In a Samba share, the Read only switch will further restrict the group users to read only access, even if the Shared Folder below allows write access.
However a “write list” will allow an administrator to selectively bypass the Samba Read only switch. In this case if the statement write list=Fred is added to the Extra Options field, the user Fred will have write access while the rest of the Group users will still be restricted to Read only, enforced by Samba's Read only switch.
The same could be done for the Group users with write list=@users
Adding this statement would allow the entire Group users, write access while restricting Others with the Read only switch.
ACL's - Extended Permissions
General
ACL's, also known as Extended Permissions, are not native to Linux. (“Extended permissions” or “ACL's” (Access Control List), are interchangeable terms.) ACL's are “add-on's” that are stored with a file or folder in their extended attributes. ACL's grant or deny file/folder access based on user or group “names”.
Again, note the following:
Where possible, use Standard Linux Permissions (labeled as File owner and group).
| Warning | |
|
In the ACL field, below the list of administrator created user accounts, are System Accounts. System Accounts are defaults that are created for server operations. Admin's should NOT change permissions or ACL settings for System accounts. Doing so may render the server installation inoperable. | |
In the context of a Linux NAS, used as a home server, ACL's should be avoided. Mixing Standard Linux Permissions and ACL's can cause inexplicable effects, if not done carefully. However, ACL's can be used, if necessary, to explicitly “deny” access to one or more users in the Group users.
For instance, in the example Group users we have two adults Fred and Mary, and their two children Johnny and Betty. It's easy to envision a scenario where adults may need a network share that their children couldn't access, containing medical information, letters to school officials, etc.
The following is a potential use of ACL's that would allow parents access to the Shared Folder Test while denying their children access to the same share:
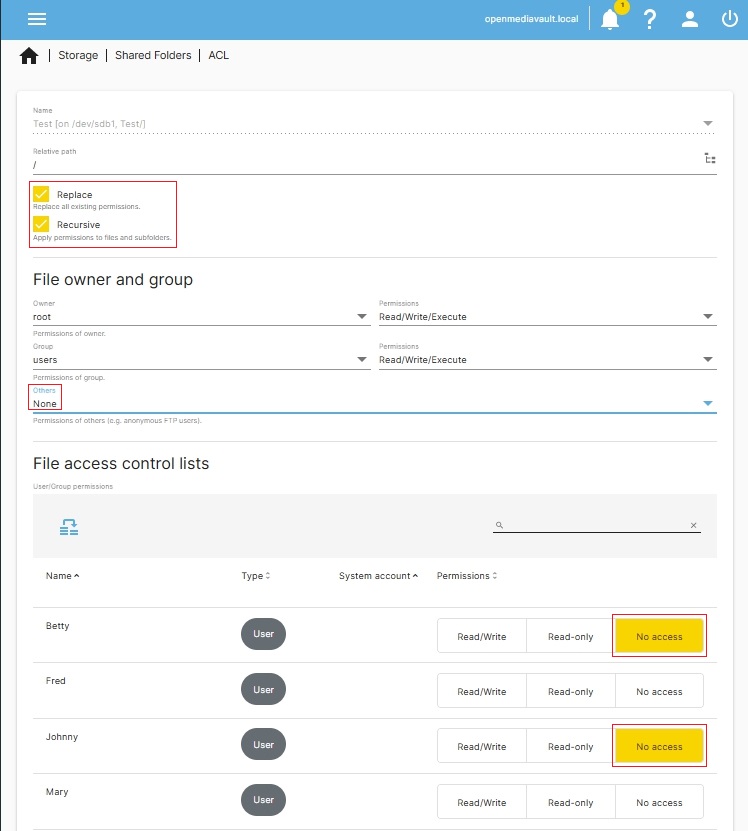
Note the red boxes around No access for Johnny and Betty. (To activate, click on the box. Highlighted is ON, clear is OFF.)
Also of note, in a private share, “Others” set to “None” makes sense as well.
To be sure that all files and folders in the share are reset with the appropriate permissions, the Replace and Recursive boxes, at the top, should be checked before clicking on Save and Apply.
After saving, Johnny and Betty will have no access to the Test share, while the remaining users in the Group users will have Write access based on Standard Linux Permissions. Using ACL's in this way allows a home administrator to selectively set individual users, in the Group users, to Read-only or No access. However, note that ACL's can not grant increased access that does not exist in Standard Linux permissions.
Permissions Overview
The following, moving left to right shows the hierarchy of Standard Linux permissions and the network permissions that are layered onto it, with Samba. Once Standard permissions are set in the Shared Folder, follow on permission layers can only reduce access. They cannot, for example, grant a user or a group Write access to a Shared Folder, if Read only is specified at the Shared Folder level.

Practical Permissions Examples
(In the following examples root, as the owner, is assumed.)
In the examples, the list of users and their passwords are as follows:
Fred – IworkOT
Mary – 2kids2feed
Johnny – Ihatechores
Betty – Iwashdishes
All users are in the default Group users. Fred is the server admin.
A Media Share

- In the Shared Folder, the group users have write. This is necessary so that Fred, who is the family server administrator, can write to the share from his client.
- Samba Public access is set to Guests allowed which works with the Shared Folder permission Others: Read These permissions and Samba settings will allow visitors read access to media shares such as music or movies.
- Read Only is ON. This will further restrict the Group users down from Write to Read only access. With young children accessing a share, Read only is a good idea to prevent the possibility of the accidental deletion of files.
- The Samba
write listbypasses the Samba Read Only setting for one user, allowing Fred to write to the share for admin purposes.
A Group Share
(A location for sharing files among all family members or members of a group.)

- The Group users have write.
- While Others have read, at the Shared Folder, the SMB Public setting is set to “NO” which stops all users who are not in the Group users. SMB Guests are not allowed. (The same effect, no Guest users, could be achieved at the Shared Folder level with Others – None.)
- Read only is OFF so Shared Folder permissions allow all members of the Group users to write to the share.
A Restricted Share
This share is for private information, for select members of the Group users. ACL's can be used to remove access for users that should not see the contents of the applicable share. In this example, Parents (Fred and Mary) have access while household children are set to No Access.
A significant point to be made about this example is that one or more users can be set to Read only or No Access without disturbing the access of the remaining members of the Group users. This might be convenient and expedient for employers who might want to restrict a specific employee to No access or Read-only access, quickly, when “notice” has been given or received.

Shared Folder settings are as shown below:
After selecting specific group usernames for No access (or Read-only) it's important to check the Replace and Recursive boxes, before clicking the Save button. This insures that new permissions are written to all files and folders within the share.
Note:
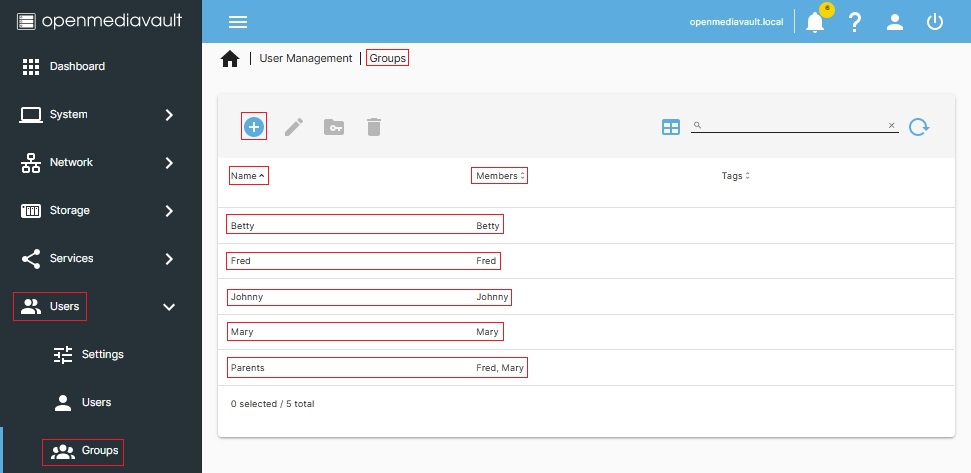
The above could also be achieved by creating a new group created under; Access Rights Management, Group and clicking on the +Add button. A group named Parents could contain the users Fred and Mary. If the Group Parents is used above, in the Group field and with Others set to None, Standard Linux Permissions would grant the appropriate access to Fred and Mary only. ACL entries to deny access to children would not be required.
Personal / Private Shares
A private share for an individual user could be created using ACL's and setting all users, but one, to No access. However, creating a new group with one user in the group is a better approach.
Note the names of the newly created groups, below, and the username in each group. The Group naming scheme keeps it simple.
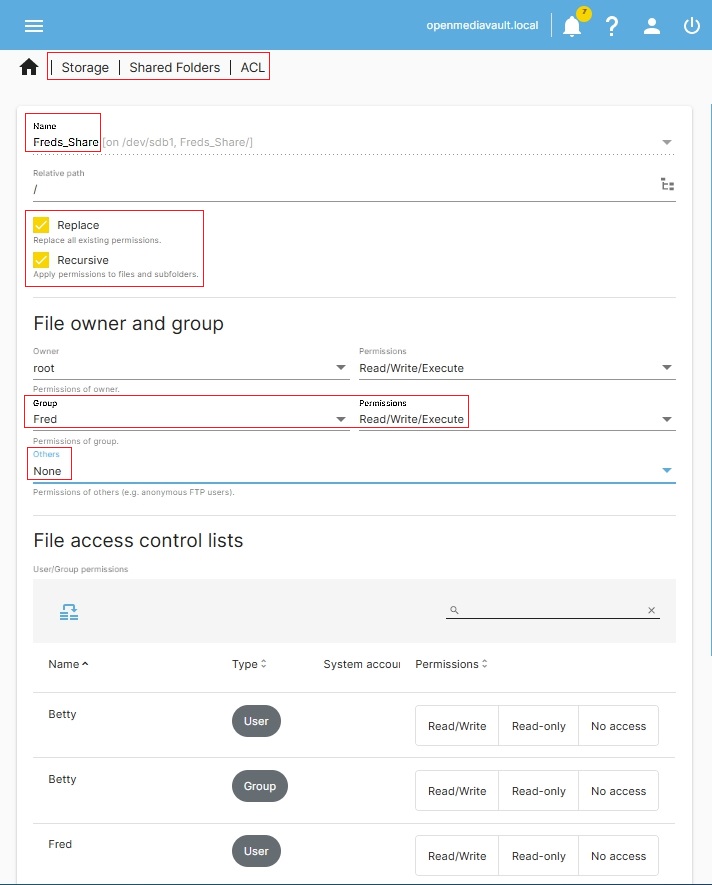
In the following case, a Shared Folder was created with the name Freds_Share:
To set permissions for a private share, the shared folder default permissions will have to be changed.
Under Storage, Shared Folders, ACL, highlight Freds_Share and click the Access Control List button.
In this example, the Group Fred (with a single user Fred) is given Read/Write/Execute access. The Replace and Recursive boxes are checked. Others is set to None. Then these settings are saved. At this point, Fred is the sole user that can access Freds_Share.
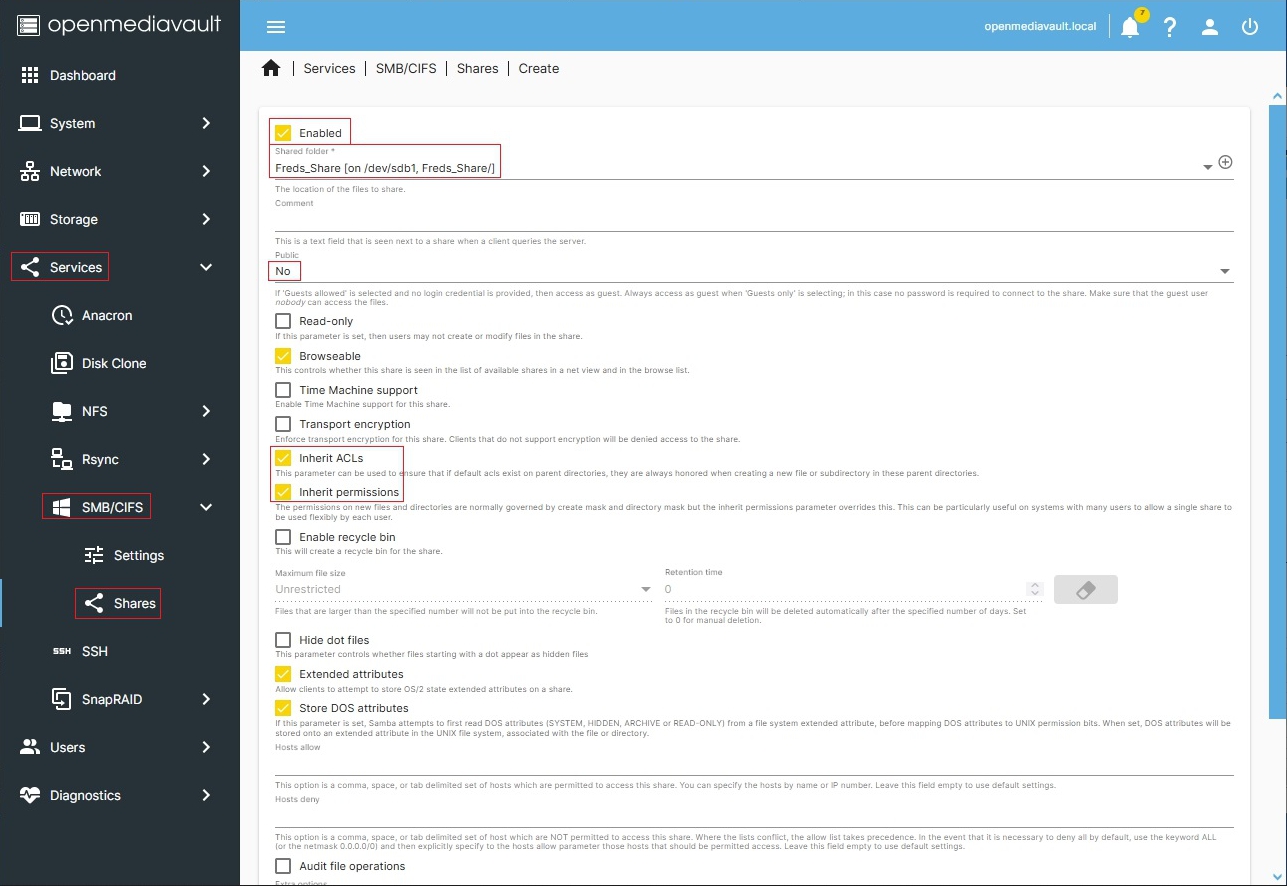
While the Shared Folder settings for Freds_Share prevent anyone other than Fred from accessing the share, the SMB settings noted below are in agreement with the base Shared Folder. Fred will be the sole user with Read/Write/Execute access to his personal SMB network share.
As a review of Freds_Share, the following permissions profile applies.

The Bottom Line
If all data is stored in a single share, assigning the appropriate permissions might range from difficult to impossible. On the other hand, if careful thought is given to segregating data into logical sets (Shared Folders) with user access and permissions in mind, assigning the appropriate permissions becomes a much easier task.
Permissions Notes:
- Additions of new users or changes to existing user accounts, such as password changes, would need to be replicated at the server.
- Some use cases may benefit from using the Credential Manager built into Win10 and 11.