Table of Contents

Installing OMV7 on Armbian Bookworm
Revisions:
June, 10th, 2025 - “Do not deviated” FOREWORD added.
Introduction
Due to the lack of the numerous Single Board Computers (SBC's) required for testing and integration, providing images for all Armbian supported SBC's, with Openmediavault (OMV) pre-installed, will not be possible. However, installing OMV7 on Armbian supported SBC's is a relatively easy task. This document is a guide for that purpose.
About this Guide
The purpose and intent of this guide is to provide a walk-through to get SBC users up and running as quickly and as easily as possible. This guide assumes that users have a working Windows Client for installing and executing the needed utilities. It is also assumed that Mac and Linux desktop users will be able to find, install, and use utilities equivalent to those called out in Prerequisites.
- This guide contains links to external sources of information and software. It's best used on an Internet connected PC.
- This is a community document and a work in progress. Input and feedback are welcome and can be sent to: omvguide@gmail.com
| FOREWORD | |
| This guide was written to avoid as many installation pitfalls as is possible to anticipate or predict. With that in mind, please adhere to this guide without deviating in any significant way. Specifically, that means DO NOT preconfigure wireless networking (that will be covered later - after OMV is installed), or use armbian-config prior to the installation of OMV. Once the OMV installation is complete, and after backing the OS' SD-card → Cloning Flash Media, additional configuration or experimentation will be possible without losing the install, if something goes awry. | |
Supported Devices
Given the wide variety of Armbian supported devices, and the images available for these devices, it's important to understand what will and will not work with an Openmediavault 7 installation.
OMV7 will install on most SBC devices with Armbian support AND a Debian 12 Bookworm image.
Further, before selecting a Bookworm image, note that Armbian supports devices with differing levels of support. See → this page for an explanation of the different support levels. Devices with “Standard support” or “Community support” images are acceptable. While Staging - Work in progress images may work, they are not supported and are used at the users risk.
A list of images, for your particular SBC can be found on the → Armbian Download Page. Find your SBC on the download page, click it, and scroll down to the “Branded” images as shown below. Select Bookworm CLI or Minimal images only.
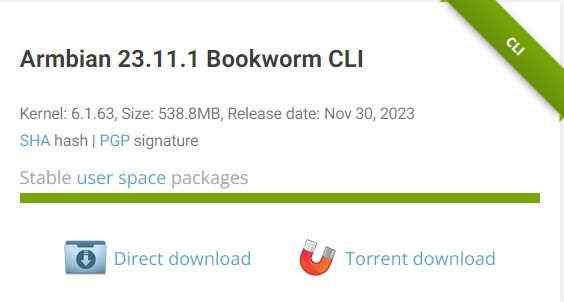
Images under a Stable Release heading, that are Bookworm CLI or Bookworm Minimal, are acceptable.
Not Supported
- Bookworm images with desktops are not supported.
- Jammy, Trixie and other non-Bookworm variants are not supported.
- Images at the bottom of some device pages under the heading of “Rolling releases from CI pipeline” are not supported.
- Bookworm images at the very bottom of some device pages, with the warning “Made with official Armbian build framework but untested by the Armbian team”, are not supported. While these images usually work, they're auto generated for test purposes, for software developers.
(These images are built nightly. Usually their date will be the current day or a few days before. Typically, Auto generated images have login warnings as noted below. Read and heed the warning. If user's install one of these development images, → Cloning the OS SD-card, before OS updates, is highly recommended.)
Prerequisites
This installation process requires a wired Ethernet connection and Internet access.
Typically, all that is needed to begin the installation is an Ethernet cable, an Armbian supported SBC, a power supply sufficient for the SBC model being used, and one SD-card (two are preferred for backup).
| Note | |
|
For best results, please DO NOT vary from the process outlined. Examples of variation would be "preconfiguring wireless networking" or the installation of extra packages before running the installation script. | |
To get started, a few utilities are needed to expand, check, and work with an Armbian image.
- To check the decompressed image, an MD5 – SHA Checksum utility is needed. This utility is portable, meaning it's not necessary to install it, but it may require support files. Simply run the executable.
- SDformatter is a utility for formatting SD-cards, that does a trim operation on flash media to clear remnants of old files. SDformatter is installable on a Windows client.
- h2testw_1.4 is a flash media test program. With a freshly formatted SD-card or USB thumbdrive, it writes files with known content and verifies the content in a read operation, detecting errors in the process. h2testw_1.4 downloads as a zip file. By right clicking on the zip file, and using “Extract All”, 7-Zip will expand the zip file to a folder named h2testw_1.4 The executable inside this folder is a portable application. Run the executable.
- To burn an Armbian Bullseye image to an SD-card, USBimager is recommended. (It burns the image and verifies it in one process.) USBimager for Windows is portable, with no required installation. Extract the archive with 7zip and use the executable file (usbimager.exe)
- PuTTY is an SSH client that will allow users to connect to their SBC, from a Windows client, and get on the command line. PuTTY is installable on a Windows client.
- While 8GB is the minimum, a 16GB card will provide longer life in the role of a boot drive. Users are encouraged to get two SD-cards. One is for the installation and the second is for backing up the OS installation, when configuration is complete.
For the best experience, use only high quality new SD-cards, such as Samsung or SanDisk, that are rated A1 Class 10 or better.


Working With the Image File
Verify the image
MD5 and SHA hashes check for image corruption that may have occurred during the download.
| Beginners Note - DO NOT SKIP THIS STEP | |
|
The chance of image corruption is highest when downloading and it's pointless to build a server with flawed software. Even the slightest corruption of the image may ruin your installation and the effects may not be noticed until well after your server is built and in use. Headaches can be avoided by checking the image. | |
Verify the image file, for your SBC, with the MD5 & SHA checksum utility.
(Note that it's possible to “drag and drop” the image file name into the utility, on the File line. Otherwise, use the Browse button and navigate to the image file.)

Click the SHA link that's associated with the image downloaded. A text file may download or a SHA256 hash may be displayed in the browser.
Notepad can be used to temporarily store the sha256 hash, copied from Armbian's web
site or paste the hash directly into the bottom “Hash” line (above) and click on verify.

Format and Test Flash Media
Using SDFormatter, do a clean format:
(Note that SDFormatter does a trim operation on the card which cleans up remnants of deleted or previously existing files.)
In most cases, SDFormatter will detect the SD-card or thumb-drive. A volume label is not necessary, at this point, and the default options are fine.


After H2testw verifies the SD-card; do one more clean format, using SDFormatter, before flashing the card. While optional, at this point, a volume label could be applied.
Flashing Armbian onto an SD-card


The First Boot
*At this point, a wired Ethernet connection is required to connect to the SBC with PuTTY and to install OMV in a later process.*
- Insure the SBC is connect to wired Ethernet.
- Insert the SD-card, into the SBC, and apply power.
- Wait 3 to 5 minutes.
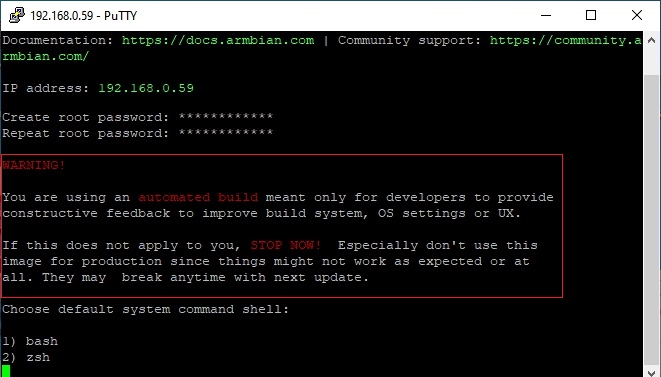
The IP address to use for logging into the console is available from your DHCP server. In most cases, your DHCP server will be running on your LAN's router.
(The following is an example.)

With the IP address noted, proceed to First Time Login.
- In the event that an IP address is not issued to your SBC, check the wired Ethernet connection and reboot the device. In some cases this will mean unplugging and plugging the power supply back in. Allow time for boot up (5 minutes or so) and check the DHCP server again.
- If an address is not issued, or if the user doesn't know how to find the ARM device's IP address on their DHCP server, connect a monitor and keyboard to watch the boot process until it completes. If the IP address is not displayed at the end of the boot cycle, login with the user root and password 1234
Unfortunately, this first time logon will start a mandatory root user password change and the addition of a non-root user. Once these processes are complete, type ip add on the command line. Note the IP address of the Ethernet interface, in the output, and proceed to First Time Login.
- In rare instances, it may be necessary to reboot the LAN's router, followed by rebooting the SBC.
Armbian - First Time Logon


- Create default system command shell: Beginners should use bash.
- Create a new user account: If completed, this dialog creates a non-root user, with “sudo” admin abilities.
Ctrl+Cexits user creation.

Finishing the Armbian Install
On the command line, copy and paste the following commands, one at a time, into the SSH window:
apt-get update
apt-get upgrade -y
(The above command may take a few to several minutes to complete.)
wget -O - https://github.com/OpenMediaVault-Plugin-Developers/installScript/raw/master/preinstall | sudo bash
Finally, reboot the SBC with the following command:
reboot
Note:
Some devices may require a hard power off and on, to reboot. In such cases, physically remove and reconnect power.
In a few minutes, open a new PuTTY/SSH window for the installation of OMV.
*In the event that the SSH client does not respond to the IP address used for the Armbian installation, look at your DHCP server again to see if a “new” IP address has been assigned.*
Install OMV
Installing OMV on Armbian is very easy, thanks to Arron Murray (ryecoaaron on the OMV Forum) for providing a comprehensive installation script that's executed from a single line.
Highlight and copy the following line complete (Ctrl+C) and paste it into PuTTY's SSH window, with a right mouse click. Then hit Enter.
wget -O - https://github.com/OpenMediaVault-Plugin-Developers/installScript/raw/master/install | sudo bash
Once the script is running, click out of the SSH window so the script will not be interrupted. Note: Do Not Close PuTTY – that will terminate the root session. Minimizing PuTTY is OK, but it must be running.
Depending on several factors, running this script may take up to 30 minutes.
When the script is complete, the SBC will automatically reboot.
First Time GUI Logon
After 3 to 5 minutes, OMV can be logged in using the same IP address that was used for the SSH client, entered in a web browser address bar. The web GUI user is admin and the default password is openmediavault
Note - after the completion of the script:
In the rare event that the OMV console or SSH client does not respond to the IP address used during the installation, recheck your DHCP server to see if a “new” IP address has been assigned.
(Typically, consumer router DHCP leases last at least 24 hours. In cases where DHCP leases are very short - as it is with some versions of DD-WRT router firmware [10 minutes] - the lease issued to the SBC may time out at the end of the installation. A different address may be issued on reboot.)
Finishing Up
- To add an existing or add-on Wireless Interface to openmediavault, see Final Notes below.
- New users can continue with the setup of OMV using the Getting Started with Openmediavault 7 guide, starting in the section titled → Initial Configuration.
- All users are encouraged to review this resource → Utilities, Maintenance & Backup for an easy process to clone your SBC's SD-Card and for additional information that will help in managing and maintaining an openmediavault server.
Final Notes:
Wireless Networking
First it should be noted that using a wireless interface, with a server, is not the best idea. To prevent a number of issues such as interference, bandwidth contention issues with clients, etc., a server should be connected to the wired LAN ports of a router or a network switch. However it is understood that, in some cases, wired connections may not be an option.
If your SBC is equipped with a wireless interface, by default, OMV will not show it in the GUI but it can be added.
- An existing interface can be added as noted in the following.
- After plugging it in, a compatible add-on USB wireless interface can be added in the same manner.


At this point, the wireless interface will appear under Network, in the Interfaces window. Further configuration can be done, as needed, by clicking on the interface line and the edit button (pencil).
To further configure the SBC; refer to the Getting Started with Openmediavault 7, starting in the section titled Initial Configuration.
A Closing Note
We, who support the openmediavault project, hope that you’ll find your openmediavault server to be
enjoyable, efficient, and easy to use.
If you found this guide to be helpful, please consider a modest donation to support the
hosting costs of this server.
OMV-Extras.org
Venmo: ryecoaaron