Table of Contents
![]()
KVM Plugin For OMV6
Summary
Kernel-based Virtual Machine (KVM) is an open source virtualization technology built into Linux. Specifically, KVM lets users turn Linux into a hypervisor that allows a host machine to run multiple, isolated virtual environments called “Guests” or “Virtual Machines” (VMs).
KVM converts Linux into a bare-metal “hypervisor”. All hypervisors need some operating system level processes such as a memory manager, a process scheduler, an input/output (I/O) stack, device drivers, a security manager, a network stack, etc., to run VMs. KVM has all these components because they're integrated into the Linux kernel. Every VM is implemented as a regular Linux process, scheduled by the standard Linux scheduler, with dedicated virtual hardware like a network card, graphics adapter, CPU(s), memory, and disks.
When used with the appropriate hardware (X86 and AMD64 with virtualization enabled in BIOS or UEFI), the OMV KVM plugin brings control of the necessary resources for virtualization into OMV's GUI. While so OS's can be a bit more involved, OMV's KVM plugin makes “spinning up” a guest OS a simple process when compared to the command line.
The plugin uses LIBVIRT internally, so virsh commands will work if needed. It is possible to connect to KVM from another machine on the network running virt-manager, providing yet another means of making modifications to a VM.
The plugin provides several methods of viewing a working VM. A Spice or VNC-like viewer can be installed on any machine on the network and access a VM. In addition, the plugin allows, from the GUI, to create integrated consoles accessible from any web browser using NOVNC or Spice-html5.
The ability to clone VMs, create snapshots, backups, restore, scheduled tasks, LXC configuration, etc. is provided.
Parts of the document:
Third Party Software Note
This OMV plugin uses KVM, which was created by a third party. See the project web page → KVM project web page  for more detailed information and support.
This OMV plugin uses Qemu, which was created by a third party. See the project web page → Qemu project web page  for more detailed information and support.
This OMV plugin uses libvirt, which was created by a third party. See the project web page → libvirt project web page  for more detailed information and support.
Prerequisites
- OMV-Extras must be pre-installed.
- The server processor must have virtualization capability → Check the characteristics on the website of your CPU manufacturer.
- The virtualization feature must be enabled in the server BIOS → Consult your server's motherboard manual.
- Consider the RAM needs for the guest VMs on your system.
- A couple of cool beers on hand will be welcome.
Installation
In OMV6's GUI:
Under System > Plugins, find and highlight openmediavault-kvm 6.X, and click the install button.
| Note | |
|
Depending on the development state of Debian at any given time, you may need to activate backports for the installation of this plugin. To do this go to the omv-extras tab in the OMV GUI and click the Activate Backports button. Once the installation is done you can disable backports again if you want. | |
Overview of the plugin's operation
The plugin is divided into several tabs, which, for a better understanding, could be grouped as follows:
Creation and management of VMs
- VMs

VMs is the main tab of the plugin, the main dashboard of the plugin when we need to perform any action on a VM.
This tab will allow us to generate the VMs and manage them later. From here we can configure a VM from scratch or delete it, start or stop it, create a snapshot or a clone, add or remove virtual hardware from an already configured VM, etc. In short, any management related to the configuration and operation of a VM.
Creation and management of storage and networks
- Pools
- Volumes
- ISOs
- Networks

This group of tabs are what manage and define storage and networking in the plugin. From the VMs tab we will decide which storage or which network interface to assign to each VM, but in order to do so, we must previously configure it from this group of tabs.
The procedure followed by the plugin is to generate one or more pools where we can store the virtual disk drives, and one or more pools where we can store the ISO images to be able to assign them to a VM in the form of a virtual DVD drive.
From the Pools tab we can generate and activate or delete the different pools.
From the Volumes tab we can manage, create and delete virtual drives that will be stored in one of the pools created in the previous tab.
The ISOS tab does the same as the Pools tab but with DVD ISO images.
As for the networks, they are generated and activated or deleted from the Networks tab.
Once we have created and activated at least one pool for storage volumes, at least another pool for DVDs, and at least one network interface, we will be able to go to the VMs tab to create a vm.
Various utilities for vms
- Backup
- Restore
- Schedule
- Settings

The rest of the tabs simply group various added vms management utilities, such as making and/or restoring backups, scheduling tasks, and configuring LXC containers.
The Backup tab shows the actual backups performed and logged in /etc/omv-backup-vm.list. You can delete backups if needed here as well. The fact that the buttons are there gives you a quick way to run an identical backup to the one selected. Much faster than setting up a scheduled backup, especially if you just want a one off backup.
The Restore tab lists the same backups from the Backups tab and allows you to restore that backup to the same or different VM name.
The Schedule tab allows you to schedule backups and run ad hoc backups from that scheduled item.
So while you can create backups from two tabs, they accomplish the goal in different ways.
The Settings tab allows you to configure LXC containers.
Preconfiguring the plugin → Storage and Network interface
Storage
Prior to configuring any virtual machine, it is necessary to enable in the add-on the storage where to locate the virtual drives for the VMs and the storage where to locate the DVD ISO images.
For this the plugin provides a tool to define the necessary pools and use each one for different purposes.
Therefore it will be necessary to define two pools, one for virtual drives and another for ISO images. When they are created it will be necessary to activate them so that KVM recognizes them. The necessary steps for this are first Create the folders and second Configure and activate the pools that the plugin will use in the previously created folders.
- Create the folders.
- We create two folders that we will call volumes and isos.
- In Storage > Shared Folders create a folder called volumes.
- Click on Create in the top menu.
- In the Name field write volumes
- In the File system field choose the appropriate one. It is suggested to use a separate disk of the operating system formatted in EXT4 to avoid problems.
- In the Relative path field type
volumes/ - Press Save
- Follow the same to create the isos folder.
- …
Warning These folders are now owned by the root user and the users group and have 2775 permissions, that's enough for it to work.
The libvirt-qemu user (id=64055) must have path access to these folders, make sure of this if you choose another way to create those folders.- …
- Configure and activate the pools that the plugin will use in the previously created folders.
- To create the virtual drive storage pool in the OMV GUI go to the Services > KVM > Pools and click Add new pool.
- In the Name field assign the same name as the created folder, in this case volumes.
- In the Type field choose Directory.
- …
Note The Directory option will determine a folder on your server. If you want to define another type of storage, you can display the Type field and choose the required option for each case. You can check the different configurations at https://libvirt.org/storage.html - …
- In the Path field, search for the folder in the tree (button on the right) and select it. Disk mount folders are usually in the /srv folder.
- Press Add
- Now the pool is created, it only remains to activate it so that KVM can use it. To do it:
- Press the line corresponding to the pool.
- Press State in the top bar.
- Click Start on the dropdown menu options.
- Now the pool is active, the State column shows the value Running, otherwise there is something wrong.
- Now it is necessary to create and activate the other pool for DVD ISO images. To do so, repeat the steps you followed to create and activate the pool volumes, simply choose the isos folder created previously and name it isos.
You should now have two active pools, volumes and isos. You lack the network.
| Note | |
|
If we want to create a Windows virtual machine, in the Pools tab we can download the ISO image with the Virtio drivers for Windows. To do this, select the isos pool and then press the top button Download virtio iso. It will be downloaded and available in our isos pool. | |
Network interface
To configure a VM it is necessary to have a network interface on the system that can be assigned to that VM. For this we have different options, depending on what we need the VM to do once it is up and running. Basically, the differences between the different methods are whether or not we want the guest virtual machine to be able to access the host's shares and whether we want it to be on the same network. The following table illustrates these differences.
| Access to host resources | IP on the same LAN as the server | ||
|---|---|---|---|
| Virtual interface | Default Network | Yes | No |
| Macvtap Bridge | No | Yes | |
| br0 Bridge interface on OMV | Yes | Yes | |
| Physical interface | Separate physical interface on the system | Yes | Yes |
Configuring a Default Network
- This is the network interface that is already configured by default in the plugin. The only thing we need to do to be able to use it in any VM is to activate it.
- It gives the guest VM access to the host's resources but the IP will be in a subnet.
- To activate the Default Network:
- In the OMV GUI go to Services > KVM > Networks and select the network, click on the corresponding line.
- Click on the State button in the top menu.
- Press the Start button on the dropdown menu.
- Right now that network interface is up. The Network State column should read Active and KVM will be able to assign it to any VM.
Configuring a Macvtap Bridge

- This type of network interface is easily configurable in the openmediavault-KVM GUi.
- With this network interface, the guest virtual machine's IP will be on the same network as the host and will be able to access shared resources on the network, but will not be able to access shared resources by the host.
- To configure this type of network interface:
- In Services > KVM > Networks click on the Add button on the top menu bar.
- Click on Add macvtap network in the dropdown menu
- In the Name field define a name for the interface, for example, bridge.
- In the Network Adapter field, choose the network adapter that we want to use. We can check which one is used by OMV in the GUI in Network > Interfaces The name will appear under the Device column.
- Press Add.
- Now the network interface is created but not active, we can check it by reading the value shown in the Network State column. To be able to assign this interface in a VM we must activate it. To do it:
- Select the network interface (yellow) by clicking on the corresponding line.
- Click on the State button in the top bar menu.
- Press the Start button on the drop down menu.
- Now the network interface is already active, the Network State column shows the value Active
Configuring a br0 bridge interface on OMV

- This interface is the one that offers more connectivity to the guest machine on the host. It allows access to shared resources and also the IP will be in the same network range as the host.
- The procedure can be summarized by saying that we are going to create a virtual network switch in OMV. To do this, we are going to replace the network interface that the OMV server is currently using with another Bridge type interface. OMV will use the new Bridge interface from then on and will continue to receive the same IP it had, but now through the new network interface.
- Once the change is made, that Bridge interface can be assigned to any VM that we configure in the KVM plugin, so that the Bridge will request another IP from the DHCP server of our network (usually the router), within the same network range, for the VM.
- Since we have to remove the existing network interface and to replace it with a new one, in order not to lose the connection during the process we take advantage of the feature offered by OMV to perform several configurations before accepting the changes in the upper yellow bar. That is, we remove the current interface, without applying changes we configure the bridge, and once configured we apply changes. As soon as we accept the changes, the existing network interface will be deleted and the new one will be configured simultaneously, so that everything will continue to work normally.
- To configure the bridge in OMV:
- In the OMV GUI go to Network > Interfaces. Make a mental note of the name of the current interface that appears in the Device column. Click on the line to select it and click on Edit button in the top bar menu. Write down your network interface values or take a screenshot, you will need them later. Hit the Cancel button and exit edit mode.
- Select the interface by clicking on the line and click on the Delete button in the top bar menu and click on Yes, but DO NOT ACCEPT THE CHANGES IN THE YELLOW BAR YET, if you do, the interface will be deleted and you will lose the connection.
- With the yellow bar pending to accept changes, we are going to configure the new bridge-type network interface.
- Click on the Create button in the top bar menu.
- In the dropdown menu press the Bridge button. A dialog will open to enter the configuration of the bridge type interface.
- In the Interfaces field, drop down the menu and choose your old network interface, the one you mentally noted. All that remains is to enter the configuration values of the interface as if it were the one you had previously. Fill in the previously noted values.
- In the IPv4 field select Static.
- In the Address field, enter the current OMV IP.
- In the Netmask field, enter the value you had, 255.255.255.0
- In the Gateway field you had the IP of your DHCP server (probably your router), enter it.
- Do not forget to fill in the DNS servers field or you will be left without internet access. Enter the value you had. If you don't remember it, for example
1.1.1.1will serve you.
- Press the Save button.
- Now the new bridge network interface is configured, when you click on Accept the changes in the upper yellow bar, the previous interface will be deleted and the bridge will be created simultaneously. Accept the changes in the top yellow bar.
- Now the original interface is removed and the new bridge type interface is created and working. The name of the original interface no longer appears in the Device field, now the name of the interface is br0.
- At this point netplan must make several changes to the network configuration. In some cases this procedure may require a server reboot for the configuration to stabilize.
- This is the network interface that we will select in the plugin if we want a VM to use the br0 bridge. We don't need to configure anything in the Network section of the plugin.
- To select this network in a new vm, in the vm creation interface go to the Network Section and change the value of the Model field to Bridge, then change the value of the Bridge field to br0.
| Note | |
|
The br0 bridge will affect the entire server, once configured all services will need to use this network interface. This implies that if you already have a service running, it will be affected and you may have to reconfigure it. An example of this is openmediavault-wireguard plugin, if it is already configured and working you will have to modify the network adapter so that Wireguard also uses it. | |
Configuring a Separate physical interface on the system
- If you have two physical network interfaces on your server you can reserve one of them for KVM. Just don't set it to OMV.
- Depending on the type of connection (USB, pcie,…) you must choose the appropriate method to attach this hardware to the VM. Once a VM is configured you can attach the hardware in the VMs tab, choosing the appropriate button in each case on the top bar.
Configuring a Virtual Machine
- The first requirement is to have storage and a network interface. If you have not configured them yet, do so by following the steps in the previous point.
- Download the ISO of the guest operating system you want to configure and store it in the isos folder.

- To configure a VM we must go in the GUI to Services > KVM > VMs and click on the Add new vm button from the menu on the top bar. A dialog box for entering the virtual machine configuration parameters will open with the following sections:
- Settings:
- VM name: This will be the name that will appear after in the plugin GUI, type something that identifies the VM.
- Do not use spaces.
- Do not repeat a name that is already in use in the plugin.
- OS: Choose the preconfiguration that best suits the virtual machine you want to configure.
- UEFI: If you check this box, the VM will boot through UEFI, otherwise it will be legacy boot.
- Avoid UEFI if you don't need it for some reason.
- CPUs: Select the number of CPUs you want to assign to your VM.
- Do not exceed the number of CPUs in your system.
- Memory: Assign to the VM the amount of RAM you need.
- Do not exceed the amount of RAM available on your system.
- TPM: Will create and attach a virtual TPM version 2.0 device to the VM configuration.
- Needed to set up a Windows 11 VM for example.
- If you check the Show advanced options button at the top, new fields will appear in this section:
- Architecture: Allows you to emulate an architecture from the existing ones in the drop-down menu.
- CPU: Allows emulating a CPU from the existing ones in the drop-down menu.
- Audio: If you check this box an audio device will be configured in the VM.
- VNC: Checked by default. Allows you to view the VM through a VNC-type viewer. If you uncheck it it will not be configured in the VM.
- Spice: Checked by default. Allows you to view the VM through a Spice type viewer. If you uncheck it it will not be configured in the VM.
- Storage Volume:
- Volume: If we have units created in the volumes folder, they will appear in the drop-down menu and we can select them. The Create new disk option by default will cause KVM to create a virtual drive defined by the following parameters:
- Pool: Defines which pool we have configured in the plugin that will store the generated virtual unit. Usually it will be volumes.
- Name: You can name the virtual unit created. This is the name that will later appear in the plugin to identify that drive. It is usually left blank and will have the same name as the virtual machine.
- Format: You can choose qcow2 or raw.
- qcow2: Default option. This format will generate a virtual drive that will only occupy the disk space corresponding to the actual disk space occupied within the VM. It will grow as we use the disk in the VM.
- raw: It will provide a little more performance to the disk but the real size in our storage will be the same as the capacity that we give to the virtual unit. Select it if you need it for any reason.
- Size: Select the size of the virtual drive.
- Choose the size that is required by the operating system of the VM you are configuring.
- Unit: Select the units in which the size of the virtual unit is measured.
- If you check the Show advanced options button at the top, new fields will appear in this section:
- Bus: Allows you to select the type of Bus that will be used for the virtual storage unit.
- Optical Drive:
- Optical disk: The drop-down menu will show the ISO images available in our isos pool and we can select one of them. The plugin will create a DVD device in the VM and attach the image simulating a DVD.
- Network:
- Model: The dropdown menu shows the different network configuration options.
- Virtio: Allows you to select the network interfaces defined in the plugin, it can be Default or Macvtap.
- Network: In the dropdown menu select one of the network interfaces defined in the plugin, Default or macvtap.
- …
- Bridge: Allows you to select the bridges available in the system, select this option if you configured a br0 Bridge in OMV.
- Bridge: In the drop-down menu, select the br0 bridge created in OMV.
- If you check the Show advanced options button at the top, new fields will appear in this section:
- MAC address: Allows you to define the MAC that will be used by the defined network interface.
- Notes: Allows you to make annotations regarding the VM that will later appear in the line corresponding to the VM in the plugin.
- Hit the bottom Save button.
- At this point the Virtual Machine is configured.
- The volume will be created and should appear under Services > KVM > Volumes.
- The virtual machine xml configuration file is generated and can be viewed or edited in Services > KVM > VMs before starting the VM.
- If you need to make any changes to the VM before starting it, this is the moment.
- For example, you might need to add a second DVD with the virtio drivers in case you are setting up a Windows VM. In this case, in Services > KVM > VMs, select the VM and press the top button Optical. Click on Add disc and select the ISO image you want to add.
- To start the VM select it and click the State button from the top menu bar, then click the Start button from the dropdown menu.
Access methods for viewing the VM

Once the VM is started, we have different alternatives to access the VM and visualize its operation:
- Access from a browser by creating noVNC and spice-html5 consoles.
- With the VM running and from Services > KVM > VMs select the VM and press the Console button on the top menu bar.
- Press the Start button on the dropdown menu.
- In this dialog you can change the access ports if you need to.
- Press the Start button to create the consoles (Note: If the Start button is not available modify any of the ports and it will be activated, you can leave the port again as it was before pressing Start).
- In the VM line, two links should have appeared in the Spice-html5 URL and noVNC URL columns. If you click any of the two links, a window will open in the browser with access to the VM.
- Spice visor.
- In the Spice Port column, the port that we must use to access the VM with Spice appears → 5901.
- We need a viewer such as virt-viewer.
- Tip: This viewer can be installed on Windows and works well, but it has a small drawback that has not been resolved for years and that makes it uncomfortable to use, it does not store the access addresses and it is necessary to write them each time. You can solve it in part as follows:
- Edit the shortcut with which the application starts (right click > properties)
- In the Destination field you will have something similar to this:
- "C:\Program Files\VirtViewer v11.0-256\bin\remote-viewer.exe"
- Add at the end a space and the path you want to connect to, for example:
- "C:\Program Files\VirtViewer v11.0-256\bin\remote-viewer.exe" spice://192.168.1.50:5901
- Accept changes.
- From now on, when you start virt-viewer, the connection window will not appear, but you will be automatically logged in at the address spice://192.168.1.50:5901
- If you need to connect to multiple IP addresses, you can create multiple shortcuts each with a different IP. You can leave a shortcut to bring up the login window, so you can always enter new addresses.
- VNC viewer.
- In the VNC Port column, the port that we must use to access the VM with VNC appears → 5900.
- We need a viewer such as VNC viewer.
| Note | |
|
Depending on the language of your keyboard and other variables, one method may work better than another. Try and decide the one that works best for you. | |
Configuring a Windows 11 VM
Preparation

- Download the Windows 11 ISO. At this moment it can be downloaded on the software download page
- Copy the ISO to the isos folder we have created for the plugin.

- Download virtio drivers ISO for windows. It can be downloaded on the proxmox download page or directly from the plugin:
- Go to Services > KVM > Pools and select the isos pool. The top buttons will be activated.
- Press the Download virtio iso button. At that time we already have it available in the isos folder and ready to use.
Configuring VM
- In the OMV GUI, go to Services> KVM> VMs Press Add new VM
- In the dialog box define the following:
- Settings:
- Show advanced options: Activate if we want sound.
- VM name: For example windows11
- OS: Find and select Microsoft Windows 11
- UEFI: Enable. When we activate it, another button called Secure boot will appear
- Secure boot: Enable (Windows 11 Requirement)
- CPUs: Allocate at least 2 CPUs (Windows 11 Requirement)
- Memory: We allocate 4 GB minimum (Windows 11 Requirement)
- Audio: Activate if we want sound.
- TPM: Activate (Windows 11 Requirement)
- Storage Volume:
- Volume: Choose Create new disk.
- Pool: Select volumes, here the virtual disk for the VM will be created.
- Name: Choose a name or leave it blank to use the same as the VM.
- Size: 64GB minimum (Windows 11 requirement)
- Format: qcow2 (raw if you need it)
- Bus: virtio
- Optical Drive:
- Optical disk: Select the Windows 11 ISO previously stored in the isos folder.
- Network:
- Model: Switch to Bridge to access the br0 bridge (If that's what we want)
- Bridge: Select br0 (or the one we have created in OMV)
- Press Save button
- Before starting the VM we must add the virtio drivers for windows:
- In Services > KVM > VMs select the VM that we have created (yellow) and press the Optical button, then the Add disc button
- In the dialog box, open the Optical disc field and select the ISO with the virtio drivers previously downloaded.
- Press the Add button.
- Now the vm has two drives, one with the Windows installation ISO and the other with the virtio drivers ISO.
Windows Installation
- Start the vm.
- In Services > KVM > VMs Select the VM and press the State button and then the Start button.
- Choose one of the virtual machine visualization systems described and access the VM.
- Start Windows Setup normally. Choose the language, keyboard… until you get to…
- Choose the installation type as custom.
- When you get to the window to choose a hard drive to install on it will be blank.
- Click on Load Driver.
- Find the virtio driver for windows that we have attached to the VM and install the drivers for your version of Windows. Accept and now the virtual disk should appear. Select it and continue the installation normally.
- When you have finished the installation you must install the complete virtio driver package to have access to all virtio devices.
- Open the File Explorer and look for the CD with the drivers. Run the file virtio-win-gt-x64 or virtio-wingt-x86 depending on your system and the drivers will be installed.
- Now you should have everything in Device Manager working normally.
Graphic Card
- Right now we are using the virtio QXL drivers. For most users it should be enough, but if you need more graphics power you can attach a dedicated card to the vm.
- The plugin does not provide this feature so you would have to do it manually. If you have the right hardware and enough patience you will be able to do it, it is a long and hard road, but it has an end.
- A good starting point is here, in this forum post Ryecoaaron published several interesting links to achieve this. This other forum post shows links to port an integrated intel GPU to the VM.
Remote connection with virt-manager to KVM
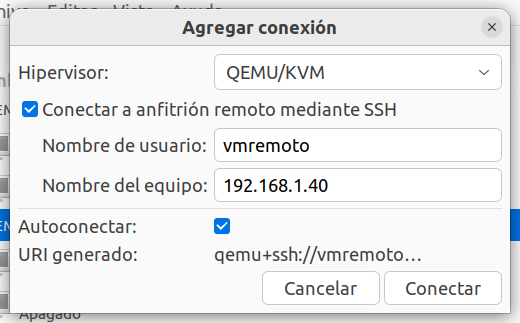
- You can connect to KVM from your PC with virt-manager through the local network. It can be useful if you need to make any changes to an already configured VM. It is not advisable to fully configure a VM from virt-manager.
- To achieve this connection follow these steps:
- Install virt-manager on your PC (If your PC has Windows you will need the Windows Subsystem for Linux).
- In the OMV GUI create a user, for example vmremote.
- Add the vmremote user to the libvirt libvirt-qemu and ssh groups.
- Create ssh access for this user with Public Key Authentication. You can follow this forum post.
- Start virt-manager on your pc
- Click on File > Add connection and fill it as in the image (with the IP of your server/domain)
- Click on Connect.
- Your VMs should now appear on the dashboard.
- You can also use virt-manager through a docker container. In the openmediavault-compose plugin there is an example for using virt-manager via a docker container.
| Warning | |
| Use this only to make minor modifications, creating a VM from virt-manager or making certain modifications may have unexpected effects on performance. | |
Increase the number of monitors in the VM with QXL
- If you need two monitors or more in your vm with the QXL driver, you can do it by modifying the xml file of the vm as follows, depending on whether the VM is Linux or Windows (remember to shutdown the VM before the modification and restart the service after of the modification):
If it's a Linux VM
- If it's a linux vm, the controller supports up to 4 monitors.
- It will be necessary to edit the xml configuration file of the VM and make some modifications:
- In the OMV GUI go to Services > KVM > VMs Select the VM line and press the Advanced button, then press Edit xml button.
- Look for these lines:
<video>
<model type='qxl' ram='65536' vram='65536' vgamem='16384' heads='1' primary='yes'/>
<address type='pci' domain='0x0000' bus='0x00' slot='0x01' function='0x0'/>
</video>
- Change the heads value to a value of 2, 3, or 4, to have up to 2, 3, or 4 monitors. For two monitors it would look like this.
<video>
<model type='qxl' ram='65536' vram='65536' vgamem='16384' heads='2' primary='yes'/>
<address type='pci' domain='0x0000' bus='0x00' slot='0x01' function='0x0'/>
</video>
If it's a Windows VM
- If the VM is Windows the QXL driver only supports one monitor. Therefore you must add a controller for each monitor up to a maximum of 4. You can try to edit the xml configuration file of the VM and look for these lines:
<video>
<model type='qxl' ram='65536' vram='65536' vgamem='16384' heads='1' primary='yes'/>
<address type='pci' domain='0x0000' bus='0x00' slot='0x01' function='0x0'/>
</video>
- You can add another controller for each monitor you need by copying the same text below, but deleting primary='yes' For two monitors it would look like this:
<video>
<model type='qxl' ram='65536' vram='65536' vgamem='16384' heads='1' primary='yes'/>
<address type='pci' domain='0x0000' bus='0x00' slot='0x01' function='0x0'/>
</video>
<video>
<model type='qxl' ram='65536' vram='65536' vgamem='16384' heads='1'/>
<address type='pci' domain='0x0000' bus='0x00' slot='0x08' function='0x0'/>
</video>
- But be careful, you must assign slot that is available and not already occupied
slot=
Support
If you need support on this plugin you can post your problem in this dedicated forum thread.
Source Code
A Closing Note
We, who support the openmediavault project, hope that you’ll find your openmediavault server to be
enjoyable, efficient, and easy to use.
If you found this guide to be helpful, please consider a modest donation to support the
hosting costs of this server (OMV-Extras) and the project (Openmediavault).
OMV-Extras.org
www.openmediavault.org